-
Section 1: Introduction
- 1. Welcome to course
- 2. Materials: Delete/destroy all the AWS resources every time you do not use them
- 3. How to start kubernetes cluster on AWS
- 4. How to create Hosted Zone on AWS
- 5. How to setup communication kops to AWS via aws
- 6. Materials: How to install KOPS binary
- 7. How to install kops
- 8. How to create S3 bucket in AWS
- 9. Materials: How to install TERRAFORM binary
- 10. How to install Terraform binary
- 11. Materials: How to install KUBECTL binary
- 12. How to install Kubectl binary
- 13. Materials: How to start Kubernetes cluster
- 14. How to lunch kubernetes cluster on AWS by using kops and terraform
-
Section 2: How to deal with Kubernetes deployments
- 15. Materials: How to run Jupyter Notebooks locally as Docker image
- 16. How to Jupyter Notebook in Docker on local
- 17. Materials: How to deploy Juypyter Notebooks to Kubernetes via YAML file
- 18. How to deploy Jupyter Notebooks to Kubernetes AWS
- 19. Explore POD DEPLOYMENT and SERVICE for Jupyter Notebooks
-
Section 3: Introduction to Helm Charts
- 20. Install helm v3 and helmfile binaries
- 21. Introduction to Helm charts
- 22. Explore example helm chart
- 23. Deploy Gogs helm chart to a Kubernetes cluster running in AWS
- 24. Create your own git repository at self-hosted Gogs in your Kubernetes cluster
- 25. Clone your git repository devopsinuse from self-hosted Gogs in your Kubernetes cluster
- 26. Add some content to devopsinuse-repo and git push to your self-hosted Gogs running in Kubernetes
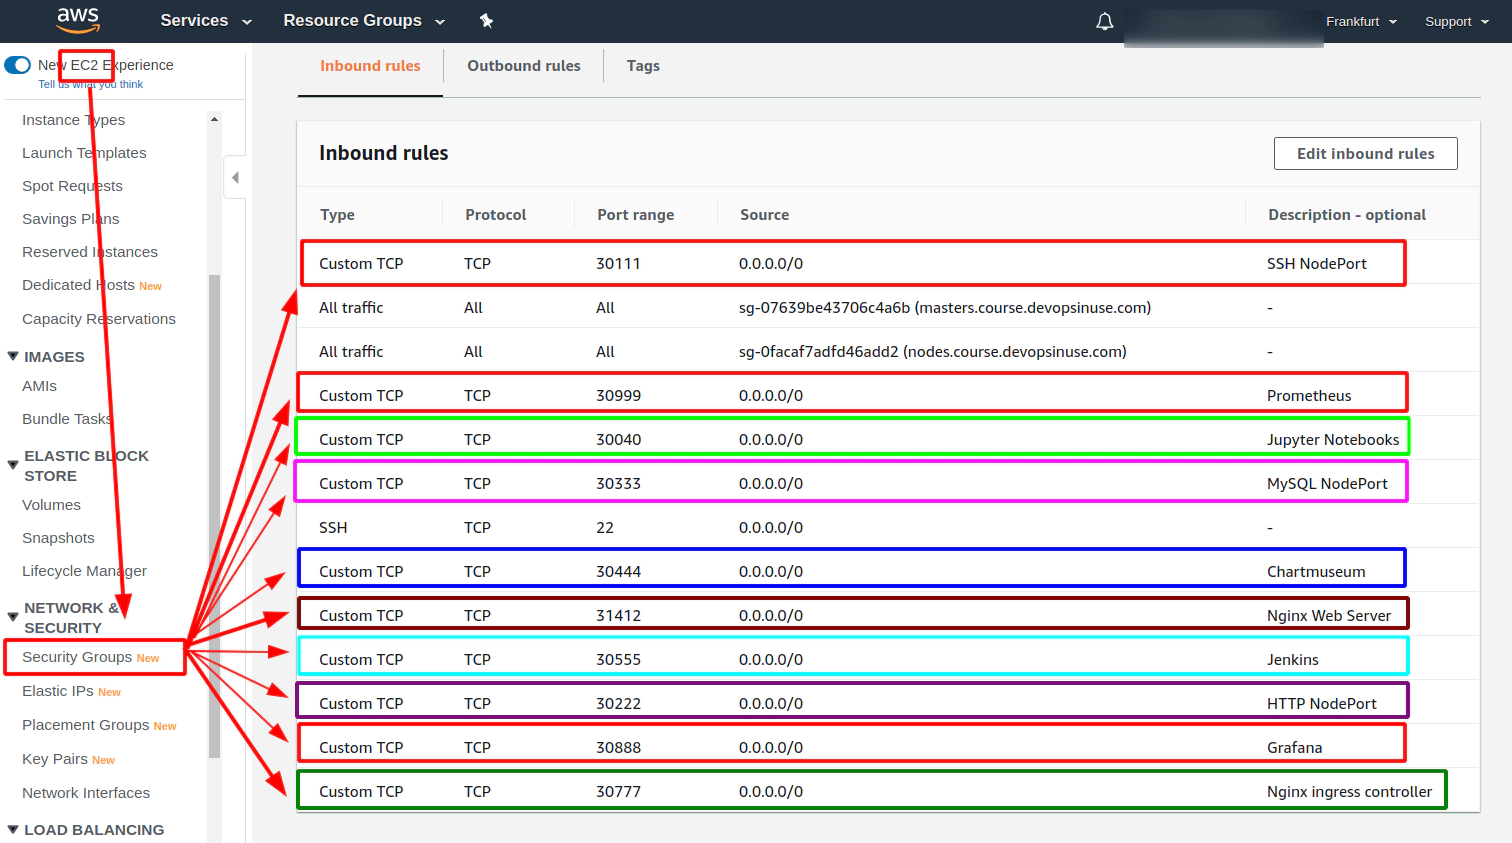
- 27. Allow NodePort in AWS Security Group section manually in case you like it more
- 28. MySQL helm chart deployment with Persistent Volume
- 29. Connect to your MySQL deployment running in your Kubernetes cluster in AWS via an extra ubuntu pod
- 30. Connect to your MySQL deployment running in your Kubernetes cluster in AWS via dbeaver or your favourite GUI program
-
Section 4: Helmfile
- 31. Understand helmfile specification for example and gogs helm charts via helmfile binary
- 32. Deploy example and gogs helm charts via helmfile to your Kubernetes cluster-
- 33. Explore helmfile specification for gogs and example helm charts via helmfile template
- 34. Deploy MySQL helm chart from stable helm chart repository to your Kubernetes cluster running in AWS
- 35. Create helm chart repository at your Github account
- 36. Deploy Jenkins via helmfile from your own Github helm chart repository
- 37. Deploy Chartmuseum as a helm chart repository running as another deployment within your Kubernetes cluster in AWS
- 38. Grafana and Prometheus helm charts from Chartmuseum helm chart repository
- 39. Deploy Grafana and Prometheus from Chartmuseum helm chart repository via helmfile to your Kubernetes cluster in AWS
- 40. Explore deployment of Nginx ingress controller with NodePort to your Kubernetes cluster in AWS
- 41. Deploy Nginx Ingress Controller and remove NodePorts for Grafana and Prometheus
- 42. Explore Nginx Ingress Controller as LoadBalancer
- 43. Deploy Nginx Ingress Controller as LoadBalancer type of service

1. Welcome to course
Learn DevOps Helm/Helmfile Kubernetes deployment in AWS
-
Section 1. How to bring up Kubernetes cluster in AWS
- create AWS resources like: S3 bucket, Hosted Zone
- install important binaries (kops, terraform, awscli, kubectl, …)
- start Kubernetes cluster in AWS
- Quiz at the end of section
-
Section 2. How to deal with Kubernetes deployments
- run docker container (Jupyter Notebooks) locally at your PC/MAC
- compose deployment and service specification for Jupyter Notebooks
- execute deployment YAML specification against Kubenretes cluster
- explore Jupyter Notebooks deployment in Kubernetes cluster
- Quiz at the end of section
-
Section 3. Introduction to Helm Charts
- install helm v3 and helmfile binaries
- create your own “example” helm chart
- deploy helm chart from local filesystem
- deploy MySQL helm chart from a stable helm chart reository
- how to create helm chart repository from your Github repo
- deploy Jenkins from Github helm chart repository
- Quiz at the end of section
-
Section 4. Helmfile
- write helmfile specification for “example” and “gogs” helm charts
- deploy “example” and “gogs” to your Kubernetes cluster in AWS
- MySQL helm chart
- Chartmuseum (helm chart repository) to your Kubernetes cluster
- Grafana and Prometheus from Chartmuseum helm chart repository
- Nginx Ingress Controller to your Kubenretes ecosystem
- use an extra values.yaml file together with
helmfilespecification - setup Nginx Ingress Controller as LoadBalancer type of K8s service
- Quiz at the end of section
Important notes:
-
please run
terraform destroywhenever you not using your resources in AWS -
all materials can be found at my Github project
https://github.com/xjantoth/helmfile-course
-
feel free to post any question into Q&A section
-
all videos are recorded in Full HD however Udemy’s player use HD
-
I’m greatful for your reviews :)
-
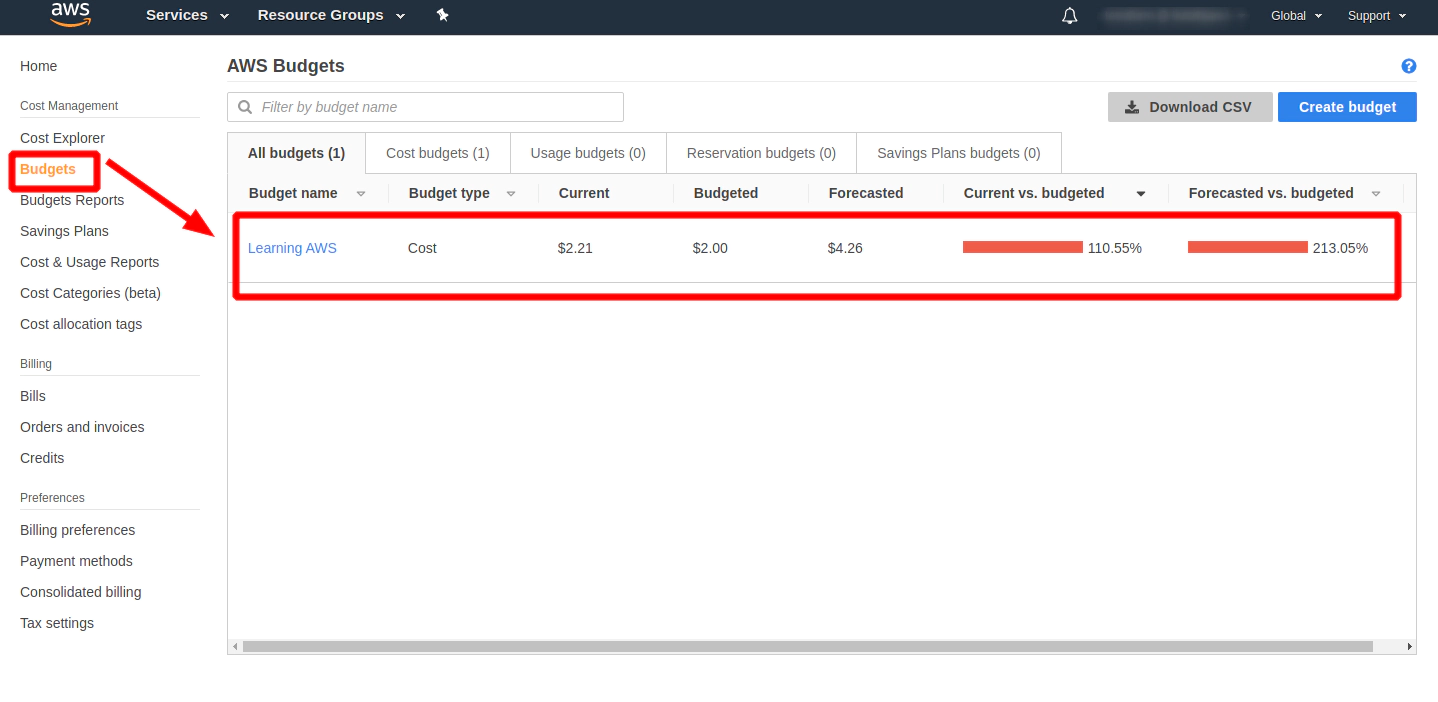
please setup budget within your Free AWS account to be notified if from some reason AWS is going to charge some fees.
How to setup Budget in AWS
- You can setup Budget in AWS console e.g.
if costs > $2AWS will send you an email
an image caption
Hit the button “Create budget”
This is an email I have received because I keep my Kubernetes cluster running for 2 days and I am not eligible for a free AWS account anymore.
2. Materials: Delete/destroy all the AWS resources every time you do not use them
Materials available:
https://github.com/xjantoth/helmfile-course/blob/master/Content.md
Note: I assume that if you are going through this course during several days - You always destroy all resources in AWS It means that you stop you Kubernetes cluster every time you are not working on it.
The easiest way is to do it via
terraform cd /.../.../.../terraform_code;
terraform destroy # hit yes
destroy/delete manually if terraform can’t do that:
- VOLUMES
- LoadBalancer/s (if exists)
- RecordSet/s (custom RecordSet/s)
- EC2 instances
- network resources
- …
except:
- S3 bucket (delete once you do not want to use this free 1 YEAR account anymore, or you are done with this course.)
- Hosted Zone (delete once you do not want to use this free 1 YEAR account anymore, or you are done with this course.)
Please do not forget redeploy tiller pod by using of this commands every time you are starting your Kubernetes cluster.
Start your Kubernetes cluster
cd /.../.../.../terraform_code
terraform apply
Crete service account && initiate tiller pod in your Kubernetes cluster
kubectl create serviceaccount --namespace kube-system tiller
kubectl create clusterrolebinding tiller-cluster-rule --clusterrole=cluster-admin --serviceaccount=kube-system:tiller
# kubectl patch deploy --namespace kube-system tiller-deploy -p '{"spec":{"template":{"spec":{"serviceAccount":"tiller"}}}}'
helm init --service-account tiller --upgrade
3. How to start kubernetes cluster on AWS
- install binaries:
- kops
- terraform v12
- awscli
- create S3 bucket (unique across entire AWS)
- generate SSH key pair
- make sure you got your own domain name
- create hosted zone in AWS (costs $0.50/month)
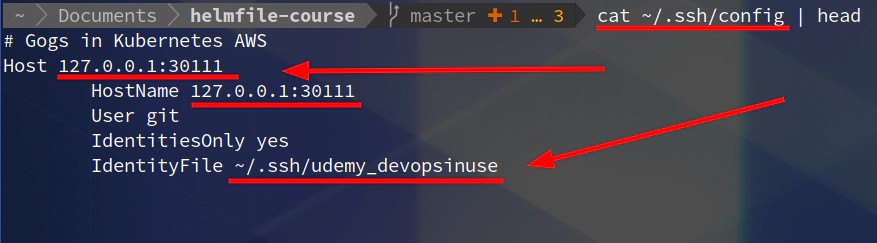
SSH_KEYS=~/.ssh/udemy_devopsinuse

if [ ! -f "$SSH_KEYS" ]
then
   echo -e "\nCreating SSH keys ..."
   ssh-keygen -t rsa -C "udemy.course" -N '' -f $SSH_KEYS
else
   echo -e "\nSSH keys are already in place!"
fi

export AWS_ACCESS_KEY_ID=""
export AWS_SECRET_ACCESS_KEY="..."
export AWS_DEFAULT_REGION="eu-central-1"

echo -e "\nCreating kubernetes cluster ...\n"

kops create cluster \
--cloud=aws \
--name=course.devopsinuse.com \
--state=s3://course.devopsinuse.com \
--authorization RBAC \
--zones=eu-central-1a \
--node-count=2 \
--node-size=t2.micro \
--master-size=t2.micro \
--master-count=1 \
--dns-zone=course.devopsinuse.com \
--out=terraform_code \
--target=terraform \
--ssh-public-key=~/.ssh/udemy_devopsinuse.pub

cd terraform_code
terraform init
terraform validate                  # -> thrown me some errors
terraform 0.12upgrade         # <- this command fix some of the errors
terraform validate
sed -i 's/0-0-0-0--0/kops/g' kubernetes.tf

terraform validate       # -> this time it passed with no errors
terraform plan
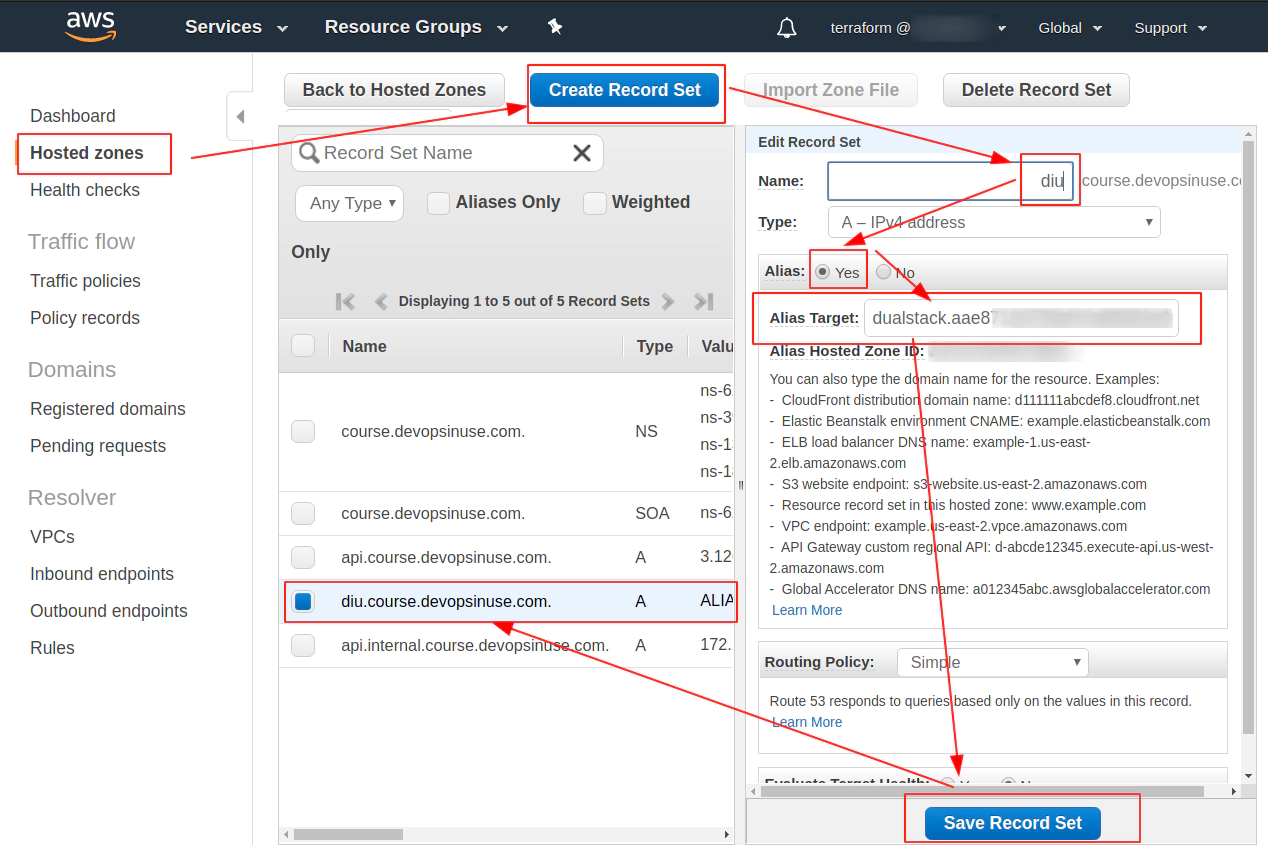
4. How to create Hosted Zone on AWS
-
Navigate to your AWS console and search for Route 53 - then click at Hosted Zones
-
My “Hosted zone” has already been created course.devopsinuse.com
-
Create your own Hosted zone with the domain name you own
-
Check on your 4 Name Servers
Save all your nameservers at the providers web page you either purchased the domain or you got the free domain from
Use dig binary to determine that your domain and hosted zone is setup correctly
dig NS course.devopsinuse.com

; <<>> DiG 9.16.1 <<>> NS course.devopsinuse.com
;; global options: +cmd
;; Got answer:
;; ->>HEADER<<- opcode: QUERY, status: NOERROR, id: 31746
;; flags: qr rd ra; QUERY: 1, ANSWER: 4, AUTHORITY: 0, ADDITIONAL: 0

;; QUESTION SECTION:
;course.devopsinuse.com.		IN	NS

;; ANSWER SECTION:
course.devopsinuse.com.	172800	IN	NS	ns-1380.awsdns-44.org.
course.devopsinuse.com.	172800	IN	NS	ns-1853.awsdns-39.co.uk.
course.devopsinuse.com.	172800	IN	NS	ns-399.awsdns-49.com.
course.devopsinuse.com.	172800	IN	NS	ns-627.awsdns-14.net.

;; Query time: 203 msec
;; SERVER: 192.168.1.1#53(192.168.1.1)
...
;; MSG SIZE  rcvd: 177
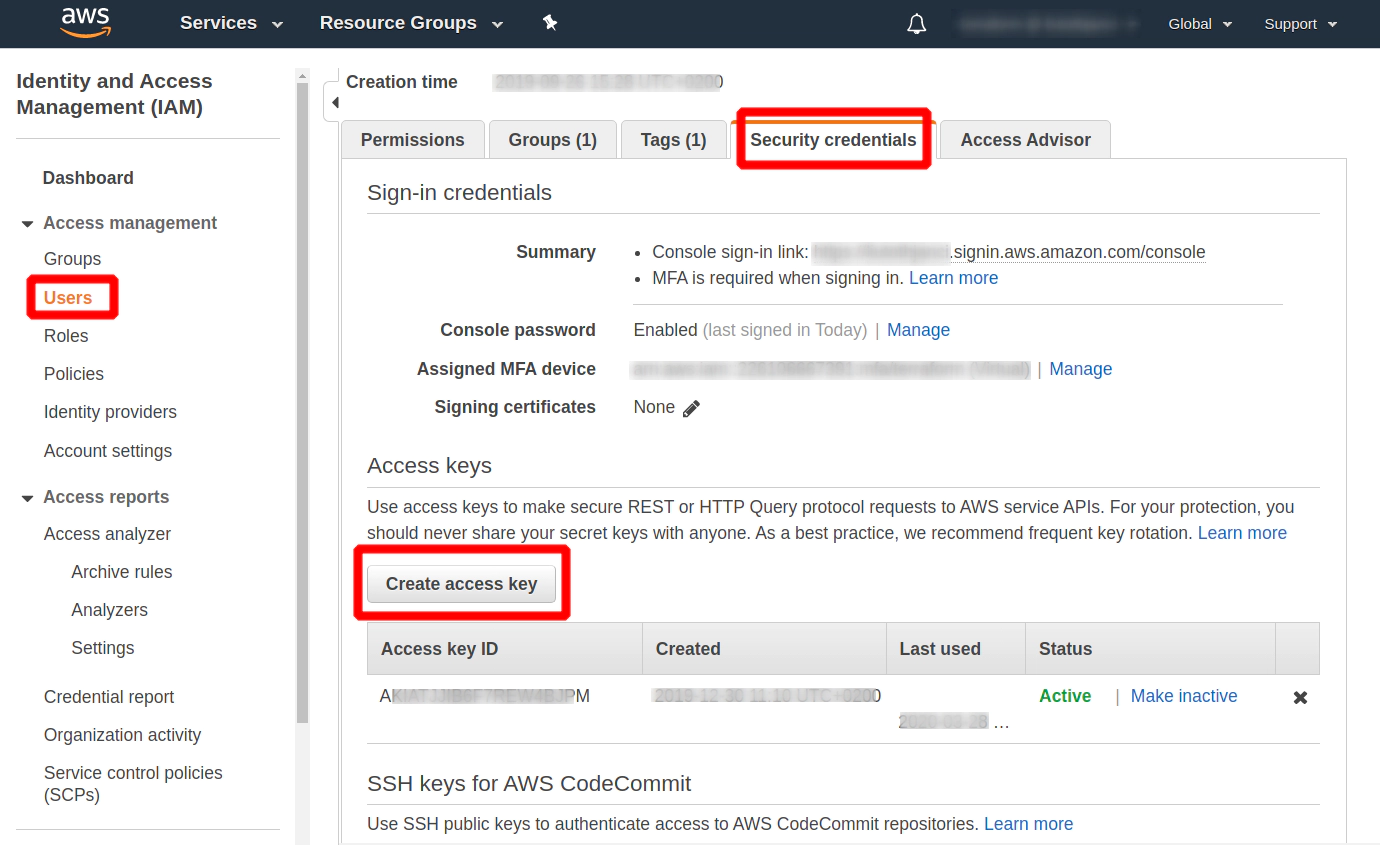
5. How to setup communication kops to AWS via aws
- Install
awsclibinary - Please configure these two files
- ~/.aws/credentials
- ~/.aws/config
Search for IAM expression in Free AWS account
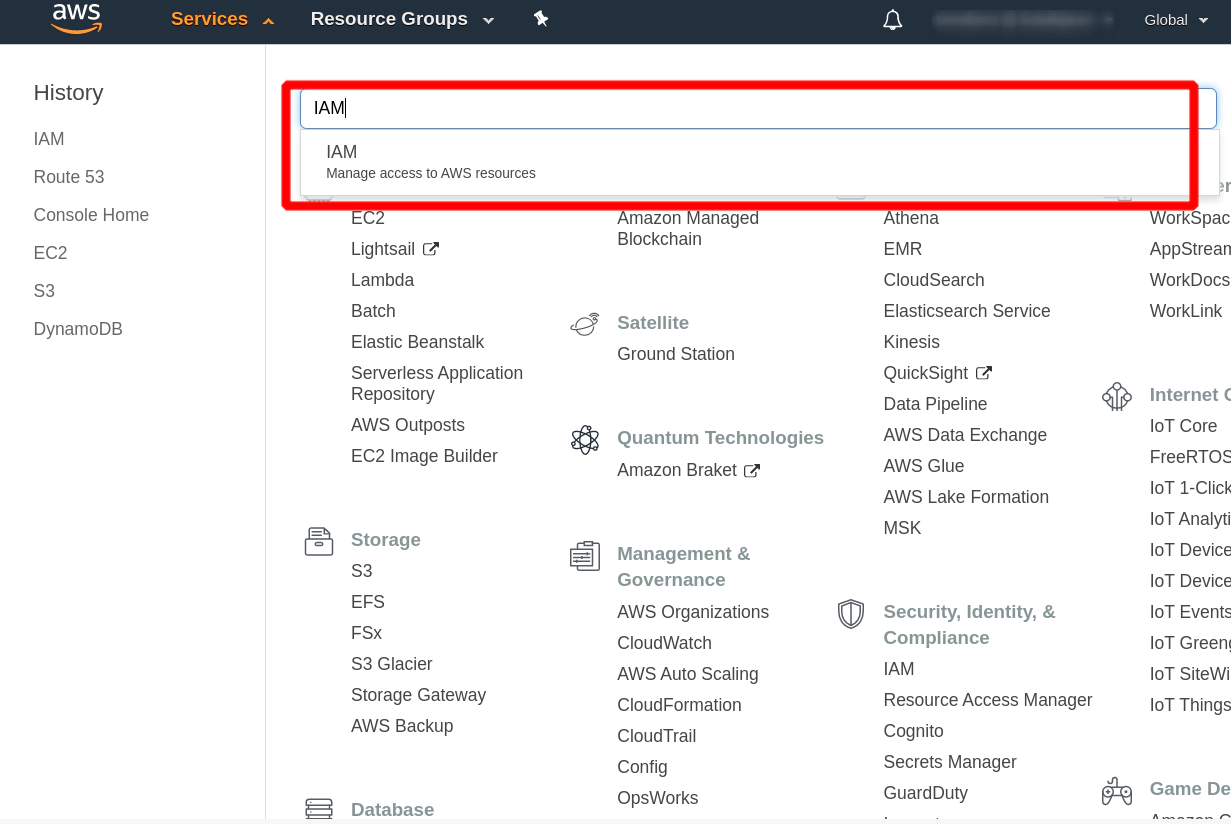
Add User if you do not have one
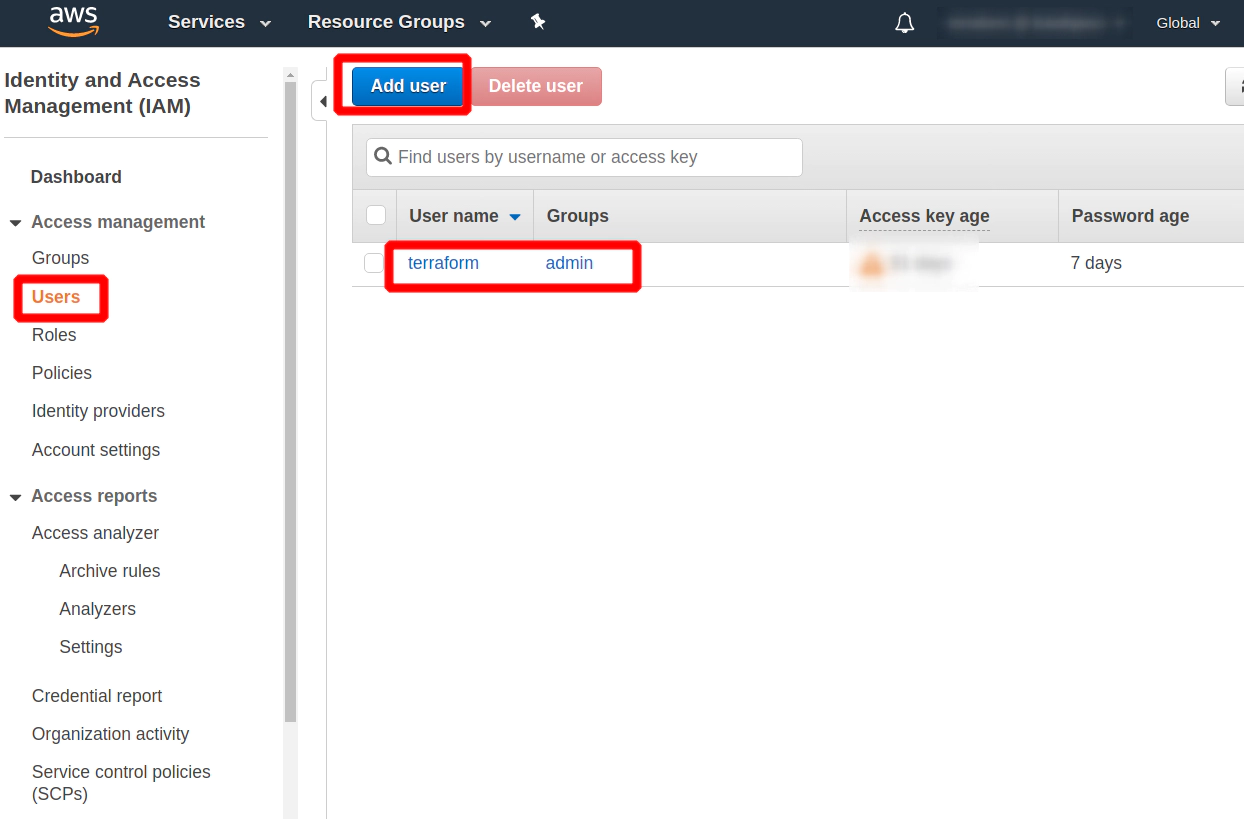
Click at a newly created User and search for Security credentials and Create access key section
vim  ~/.aws/credentials
[terraform]
aws_access_key_id = ...
aws_secret_access_key = ...
vim ~/.aws/config
[profile terraform]
region=eu-central-1
6. Materials: How to install KOPS binary
Navigate to: https://github.com/kubernetes/kops/releases/tag/v1.16.0
sudo curl \
-L --output /usr/bin/kops  \
https://github.com/kubernetes/kops/releases/download/v1.16.0/kops-linux-amd64 && sudo chmod +x /usr/bin/kops
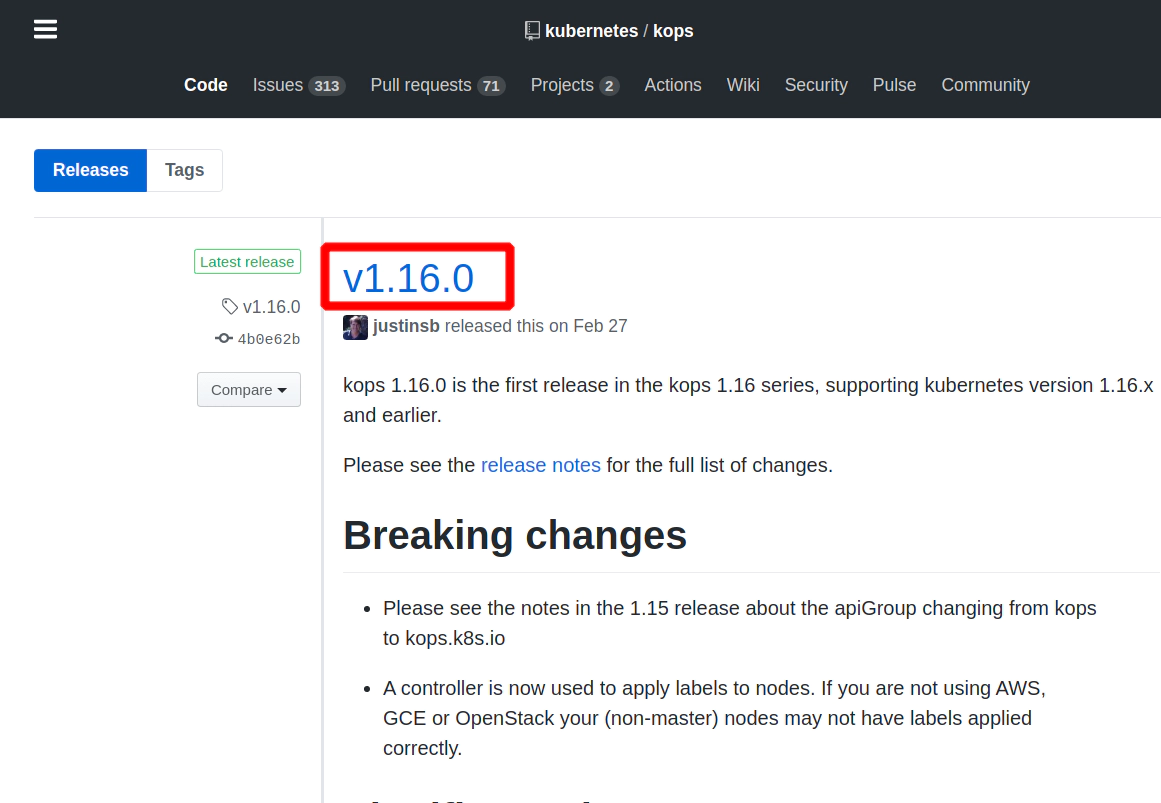
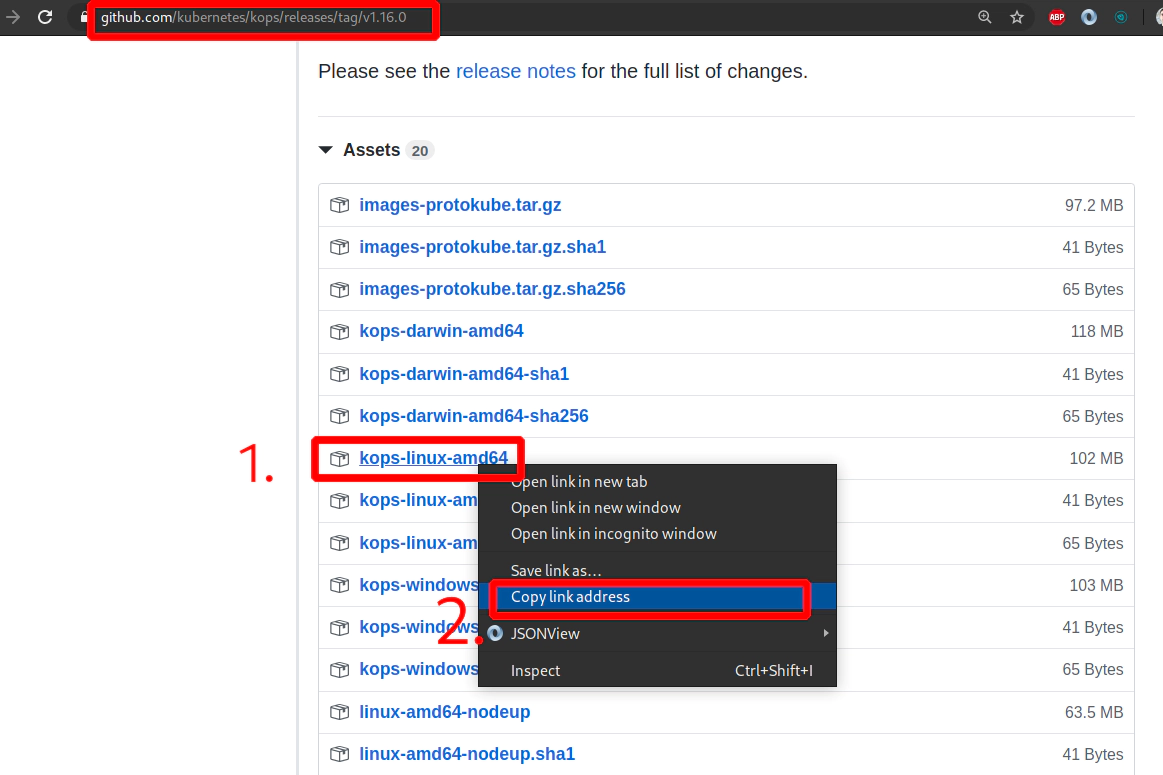
7. How to install kops
All kops releases: https://github.com/kubernetes/kops/releases/
Navigate to: https://github.com/kubernetes/kops/releases/tag/v1.16.0
which kops

sudo curl \
-L --output /usr/bin/kops  \
https://github.com/kubernetes/kops/releases/download/v1.16.0/kops-linux-amd64 && sudo chmod +x /usr/bin/kops
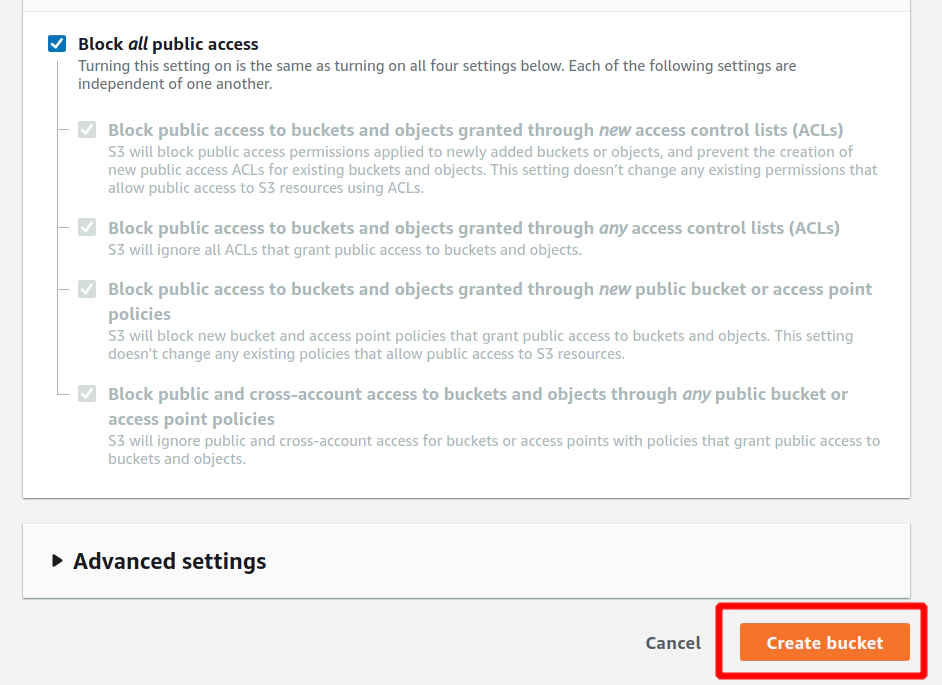
8. How to create S3 bucket in AWS
# create a new bucket
aws s3 mb s3://example.devopsinuse.com --profile terraform
make_bucket: example.devopsinuse.com

# list all buckets
aws s3 ls --profile terraform
2018-07-06 12:26:00 course.devopsinuse.com
2020-03-31 15:23:14 example.devopsinuse.com

# remove bucket
aws s3 rb s3://example.devopsinuse.com --profile terraform
remove_bucket: example.devopsinuse.com
Search for the expression “S3” in AWS console

Create a new S3 bucket if you do not have one
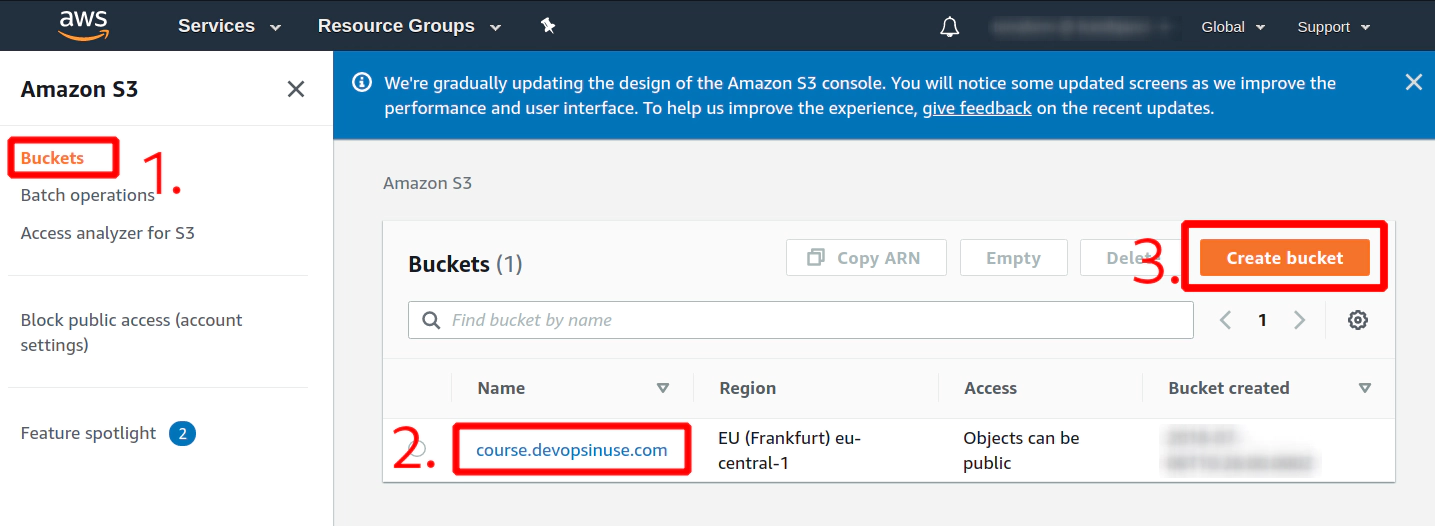
Fill up neceassary details
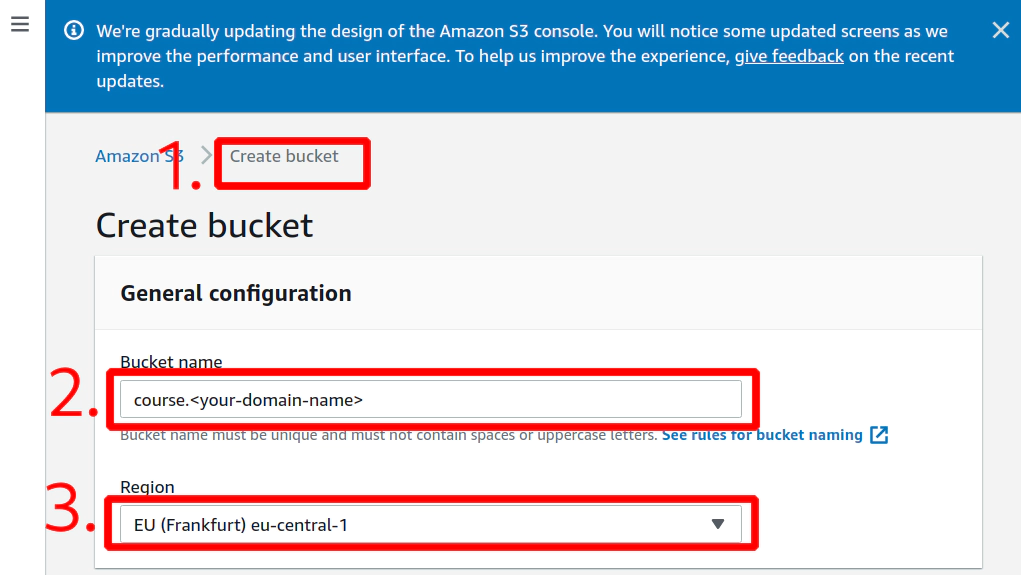
Hit button Create bucket
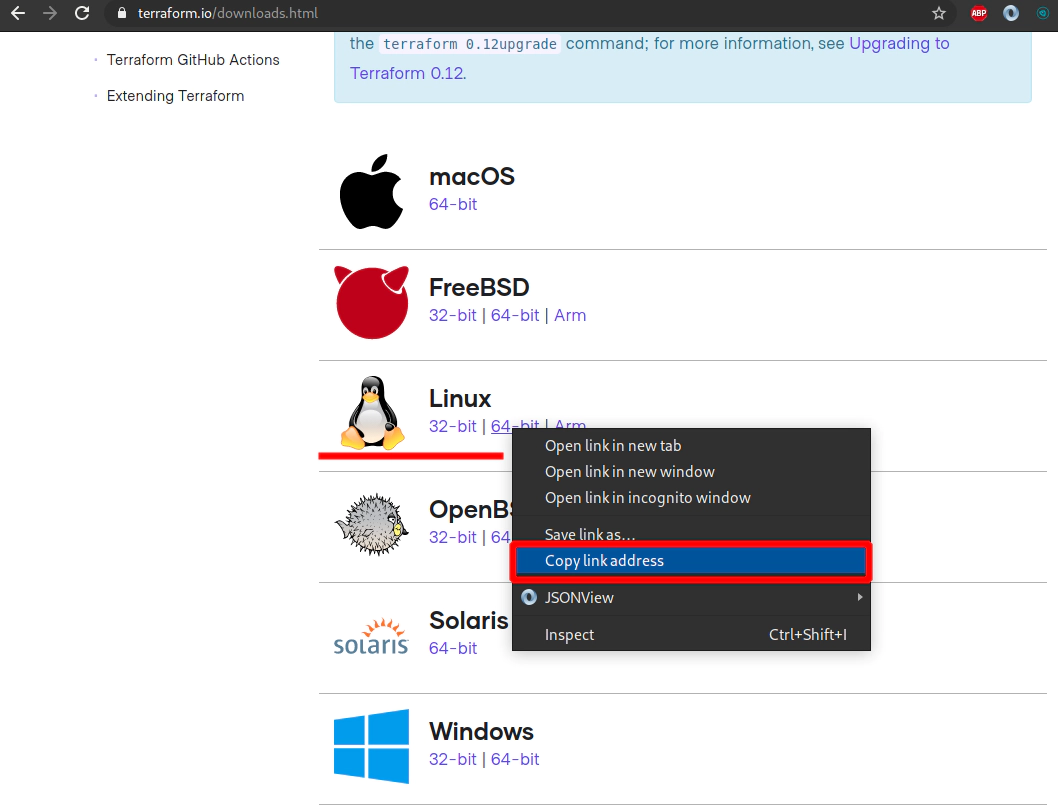
9. Materials: How to install TERRAFORM binary
https://www.terraform.io/downloads.html
curl -L --output /tmp/terraform.zip  \
https://releases.hashicorp.com/terraform/0.12.24/terraform_0.12.24_linux_amd64.zip

sudo unzip -d /usr/bin/ /tmp/terraform.zip

terraform -version
Terraform v0.12.24
10. How to install Terraform binary
https://www.terraform.io/downloads.html
curl -L --output /tmp/terraform.zip  \
https://releases.hashicorp.com/terraform/0.12.24/terraform_0.12.24_linux_amd64.zip

sudo unzip -d /usr/bin/ /tmp/terraform.zip

terraform -version
Terraform v0.12.24
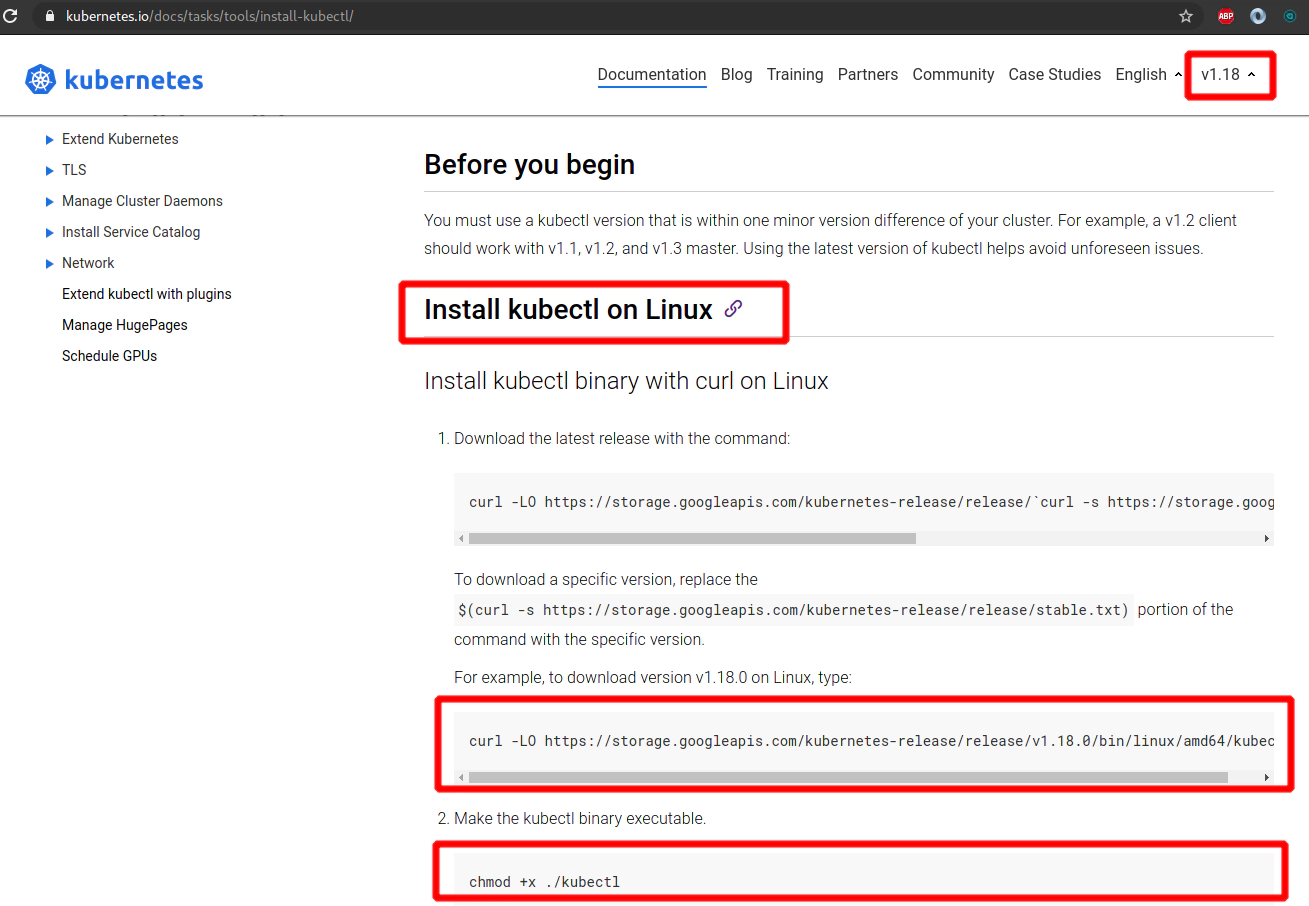
11. Materials: How to install KUBECTL binary
Link: https://kubernetes.io/docs/tasks/tools/install-kubectl/
curl -LO https://storage.googleapis.com/kubernetes-release/release/v1.18.0/bin/linux/amd64/kubectl
chmod +x ./kubectl
sudo mv ./kubectl /usr/local/bin/kubectl
kubectl version --client
12. How to install Kubectl binary
Link: https://kubernetes.io/docs/tasks/tools/install-kubectl/
curl -LO https://storage.googleapis.com/kubernetes-release/release/v1.18.0/bin/linux/amd64/kubectl
chmod +x ./kubectl
sudo mv ./kubectl /usr/local/bin/kubectl
kubectl version --client
13. Materials: How to start Kubernetes cluster
Generate SSH key pair:
SSH_KEYS=~/.ssh/udemy_devopsinuse

if [ ! -f "$SSH_KEYS" ]
then
   echo -e "\nCreating SSH keys ..."
   ssh-keygen -t rsa -C "udemy.course" -N '' -f $SSH_KEYS
else
   echo -e "\nSSH keys are already in place!"
fi
Export environmental variables for kops, awscli and terraform binaries:
- AWS_ACCESS_KEY_ID
- AWS_SECRET_ACCESS_KEY
- AWS_DEFAULT_REGION
export AWS_ACCESS_KEY_ID="..."
export AWS_SECRET_ACCESS_KEY="..."
export AWS_DEFAULT_REGION="eu-central-1"

env | grep AWS | sed -E  's/^(.*=)(.*)$/\1masked-output/'
Generate terraform code by executing following kops command to provision Kubernetes cluster in AWS:
kops create cluster \
--cloud=aws \
--name=course.devopsinuse.com \
--state=s3://course.devopsinuse.com \
--authorization RBAC \
--zones=eu-central-1a \
--node-count=2 \
--node-size=t2.micro \
--master-size=t2.micro \
--master-count=1 \
--dns-zone=course.devopsinuse.com \
--out=terraform_code \
--target=terraform \
--ssh-public-key=~/.ssh/udemy_devopsinuse.pub

cd terraform_code
terraform init
terraform validate            # -> thrown me some errors
terraform 0.12upgrade         # <- this command fix some of the errors
terraform validate
sed -i 's/0-0-0-0--0/kops/g' kubernetes.tf

terraform validate            # -> this time it passed with no errors
terraform plan
Pleas run terrafrom apply command to provision Kubernetes cluster in AWS:
terraform apply
Please wait like ~10 miutes not to get upset that DNS records are not being created very fast
!!! This section is only applicable if you want to use helm v2 Install helm v2
curl -L --output /tmp/helm-v2.16.5-linux-amd64.tar.gz  https://get.helm.sh/helm-v2.16.5-linux-amd64.tar.gz
sudo tar -xvf /tmp/helm-v2.16.5-linux-amd64.tar.gz --strip-components=1 -C /usr/bin/ linux-amd64/helm
sudo chmod +x /usr/bin/helm
!!! This section is only applicable if you want to use helm v2
helm version
kubectl create serviceaccount --namespace kube-system tiller
kubectl create clusterrolebinding tiller-cluster-rule --clusterrole=cluster-admin --serviceaccount=kube-system:tiller
helm init --service-account tiller --upgrade
helm ls
Destroy your Kubernetes cluster
cd terraform_code
terraform destroy
14. How to lunch kubernetes cluster on AWS by using kops and terraform
Generate SSH key pair:
SSH_KEYS=~/.ssh/udemy_devopsinuse

if [ ! -f "$SSH_KEYS" ]
then
   echo -e "\nCreating SSH keys ..."
   ssh-keygen -t rsa -C "udemy.course" -N '' -f $SSH_KEYS
else
   echo -e "\nSSH keys are already in place!"
fi
Export environmental variables for kops, awscli and terraform binaries:
- AWS_ACCESS_KEY_ID
- AWS_SECRET_ACCESS_KEY
- AWS_DEFAULT_REGION
export AWS_ACCESS_KEY_ID="..."
export AWS_SECRET_ACCESS_KEY="..."
export AWS_DEFAULT_REGION="eu-central-1"

# I do not want to make my credential public and be visible in video
env | grep AWS | sed -E  's/^(.*=)(.*)$/\1masked-output/'
Generate terraform code by executing following kops command to provision Kubernetes cluster in AWS:
kops create cluster \
--cloud=aws \
--name=course.devopsinuse.com \
--state=s3://course.devopsinuse.com \
--authorization RBAC \
--zones=eu-central-1a \
--node-count=2 \
--node-size=t2.micro \
--master-size=t2.micro \
--master-count=1 \
--dns-zone=course.devopsinuse.com \
--out=terraform_code \
--target=terraform \
--ssh-public-key=~/.ssh/udemy_devopsinuse.pub

cd terraform_code
terraform init
terraform validate            # -> thrown me some errors
terraform 0.12upgrade         # <- this command fix some of the errors
terraform validate
sed -i 's/0-0-0-0--0/kops/g' kubernetes.tf

terraform validate            # -> this time it passed with no errors
terraform plan
Pleas run terrafrom apply command to provision Kubernetes cluster in AWS:
terraform apply
Please wait like ~10 miutes not to get upset that DNS records are not being created very fast
!!! This section is only applicable if you want to use helm v2 Install helm v2
curl -L --output /tmp/helm-v2.16.5-linux-amd64.tar.gz  https://get.helm.sh/helm-v2.16.5-linux-amd64.tar.gz
sudo tar -xvf /tmp/helm-v2.16.5-linux-amd64.tar.gz --strip-components=1 -C /usr/bin/ linux-amd64/helm
sudo chmod +x /usr/bin/helm
!!! This section is only applicable if you want to use helm v2
helm version
kubectl create serviceaccount --namespace kube-system tiller
kubectl create clusterrolebinding tiller-cluster-rule --clusterrole=cluster-admin --serviceaccount=kube-system:tiller
helm init --service-account tiller --upgrade
helm ls
Destroy your Kubernetes cluster
cd terraform_code
terraform destroy
15. Materials: How to run Jupyter Notebooks locally as Docker image
docker ps
docker run \
--name djupyter  \
-p 8888:8888 \
-d jupyter/scipy-notebook:2c80cf3537ca

6f1d5c03efced84f7e9502649c1618e8304f304a69ce3f6100d2ef11111

docker logs 6f1d5c03efced84f7e9502649c1618e8304f304a69ce3f6100d2ef11111 -f
16. How to Jupyter Notebook in Docker on local
Start Jupyter Notebook locally as docker image:
docker ps

docker run \
--name djupyter  \
-p 8888:8888 \
-d jupyter/scipy-notebook:2c80cf3537ca

6f1d5c03efced84f7e9502649c1618e8304f304a69ce3f6100d2ef11111

docker logs 6f1d5c03efced84f7e9502649c1618e8304f304a69ce3f6100d2ef11111 -f
...
...
    Copy/paste this URL into your browser when you connect for the first time,
    to login with a token:
        http://localhost:8888/?token=<some_long_token>
...
...
docker stop djupyter
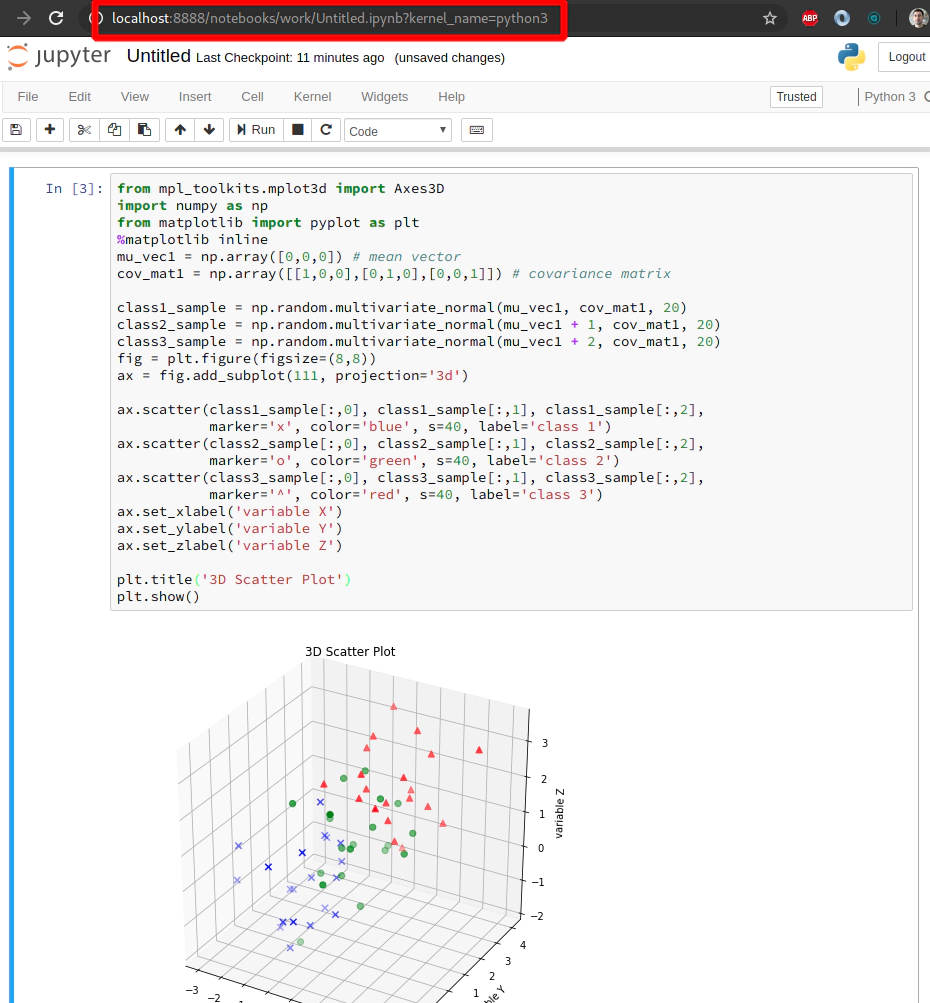
Copy and paste this code snippet to your Jupyter Notebook in the web browser:
from mpl_toolkits.mplot3d import Axes3D
import numpy as np
from matplotlib import pyplot as plt
%matplotlib inline
mu_vec1 = np.array([0,0,0]) # mean vector
cov_mat1 = np.array([[1,0,0],[0,1,0],[0,0,1]]) # covariance matrix

class1_sample = np.random.multivariate_normal(mu_vec1, cov_mat1, 20)
class2_sample = np.random.multivariate_normal(mu_vec1 + 1, cov_mat1, 20)
class3_sample = np.random.multivariate_normal(mu_vec1 + 2, cov_mat1, 20)
fig = plt.figure(figsize=(8,8))
ax = fig.add_subplot(111, projection='3d')

ax.scatter(class1_sample[:,0], class1_sample[:,1], class1_sample[:,2],
           marker='x', color='blue', s=40, label='class 1')
ax.scatter(class2_sample[:,0], class2_sample[:,1], class2_sample[:,2],
           marker='o', color='green', s=40, label='class 2')
ax.scatter(class3_sample[:,0], class3_sample[:,1], class3_sample[:,2],
           marker='^', color='red', s=40, label='class 3')
ax.set_xlabel('variable X')
ax.set_ylabel('variable Y')
ax.set_zlabel('variable Z')

plt.title('3D Scatter Plot')
plt.show()
17. Materials: How to deploy Juypyter Notebooks to Kubernetes via YAML file
Execute kubernetes deployment file:
kubectl create -f jupyter-notebook-deployment.yaml
File: https://github.com/xjantoth/helmfile-course/blob/master/jupyter-notebook-deployment.yaml
---
apiVersion: apps/v1
kind: Deployment
metadata:
  name: jupyter-k8s-udemy
  labels:
    app: jupyter-k8s-udemy
spec:
  replicas: 1
  selector:
    matchLabels:
      app: jupyter-k8s-udemy
  template:
    metadata:
      labels:
        app: jupyter-k8s-udemy
    spec:
      containers:
      - name: minimal-notebook
        image: jupyter/scipy-notebook:2c80cf3537ca
        ports:
        - containerPort: 8888
        command: ["start-notebook.sh"]
        args: ["--NotebookApp.token=''"]
Execute kubernetes service file:
kubectl create -f jupyter-notebook-service.yaml
File: https://github.com/xjantoth/helmfile-course/blob/master/jupyter-notebook-service.yaml
---
kind: Service
apiVersion: v1
metadata:
  name: jupyter-k8s-udemy
spec:
  type: NodePort
  selector:
    app: jupyter-k8s-udemy
  ports:
  - protocol: TCP
    nodePort: 30040
    port: 8888
    targetPort: 8888
kubectl get nodes -o wide | awk -F" " '{print $1"\t"$7}'

NAME	EXTERNAL-IP
ip-172-20-34-241.eu-central-1.compute.internal	18.184.212.193
ip-172-20-50-50.eu-central-1.compute.internal	3.120.179.150
ip-172-20-52-232.eu-central-1.compute.internal	18.196.157.47
SSH to your AWS EC2 instances if neceassary
ssh -i ~/.ssh/udemy_devopsinuse admin@18.184.212.193
ssh -i ~/.ssh/udemy_devopsinuse admin@3.120.179.150
ssh -i ~/.ssh/udemy_devopsinuse admin@18.196.157.47
Run command netstat -tunlp | grep 30040 at each of the EC2 instances
to see that NodePort type of kubernetes service results in exposing this port at each
physical EC2 within your Kubernetes cluster in AWS
ssh -i ~/.ssh/udemy_devopsinuse admin@18.184.212.193  netstat -tunlp | grep 30040
ssh -i ~/.ssh/udemy_devopsinuse admin@3.120.179.150   netstat -tunlp | grep 30040
ssh -i ~/.ssh/udemy_devopsinuse admin@18.196.157.47   netstat -tunlp | grep 30040
18. How to deploy Jupyter Notebooks to Kubernetes AWS
Execute kubernetes deployment file:
kubectl create -f jupyter-notebook-deployment.yaml
File: https://github.com/xjantoth/helmfile-course/blob/master/jupyter-notebook-deployment.yaml
---
apiVersion: apps/v1
kind: Deployment
metadata:
  name: jupyter-k8s-udemy
  labels:
    app: jupyter-k8s-udemy
spec:
  replicas: 1
  selector:
    matchLabels:
      app: jupyter-k8s-udemy
  template:
    metadata:
      labels:
        app: jupyter-k8s-udemy
    spec:
      containers:
      - name: minimal-notebook
        image: jupyter/scipy-notebook:2c80cf3537ca
        ports:
        - containerPort: 8888
        command: ["start-notebook.sh"]
        args: ["--NotebookApp.token=''"]
Execute kubernetes service file:
kubectl create -f jupyter-notebook-service.yaml
File: https://github.com/xjantoth/helmfile-course/blob/master/jupyter-notebook-service.yaml
---
kind: Service
apiVersion: v1
metadata:
  name: jupyter-k8s-udemy
spec:
  type: NodePort
  selector:
    app: jupyter-k8s-udemy
  ports:
  - protocol: TCP
    nodePort: 30040
    port: 8888
    targetPort: 8888
Reminder: how to run Jupyter Notebooks at your local laptop as a single dokcer container
docker run \
--name djupyter  \
-p 8888:8888 \
-d jupyter/scipy-notebook:2c80cf3537ca
Execute deployment for Jupyter Notebooks in your Kubernetes cluster in AWS
kubectl apply -f jupyter-notebook-deployment.yaml
kubectl apply -f jupyter-notebook-service.yaml
Check for the status of pods and services
kubectl get pods,svc
NAME                                     READY   STATUS    RESTARTS   AGE
pod/jupyter-k8s-udemy-5686d7b74f-qgj5x   1/1     Running   0          62s

NAME                        TYPE        CLUSTER-IP       EXTERNAL-IP   PORT(S)          AGE
service/jupyter-k8s-udemy   NodePort    100.67.171.238   <none>        8888:30040/TCP   57s
service/kubernetes          ClusterIP   100.64.0.1       <none>        443/TCP          8h
Make sure to allow Security group for Kubernetes Node
Retrive the IP addresses of your physical EC2 instances (servers) in AWS
kubectl get nodes -o wide | awk -F" " '{print $3"\t"$1"\t"$7}'
ROLES	NAME	EXTERNAL-IP
master	ip-172-20-34-241.eu-central-1.compute.internal	18.184.212.193
node	ip-172-20-50-50.eu-central-1.compute.internal	3.120.179.150
node	ip-172-20-52-232.eu-central-1.compute.internal	18.196.157.47
Navigate to you favourite web browser and hit either
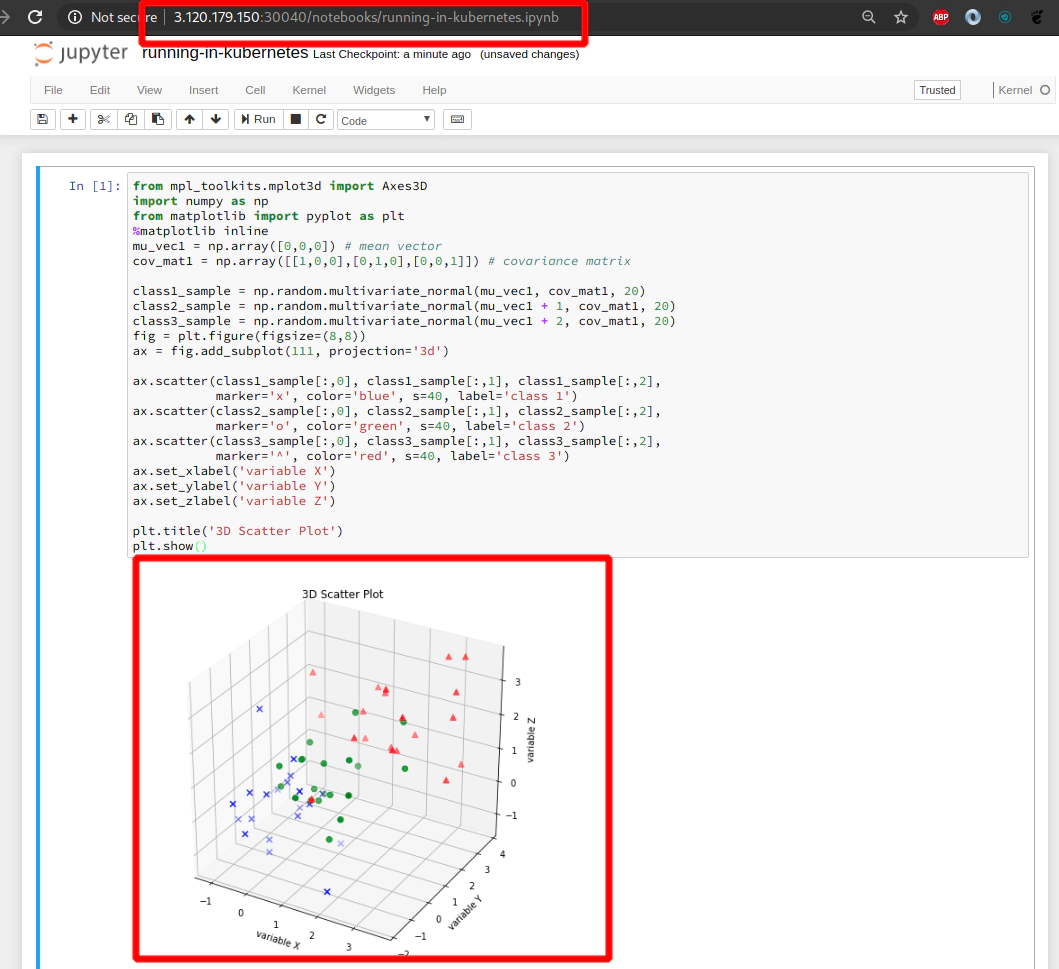
http://3.120.179.150:30040      # for node #1
http://18.196.157.47:30040      # for node #2
Copy and paste this code snippet to your Jupyter Notebook in the web browser:
from mpl_toolkits.mplot3d import Axes3D
import numpy as np
from matplotlib import pyplot as plt
%matplotlib inline
mu_vec1 = np.array([0,0,0]) # mean vector
cov_mat1 = np.array([[1,0,0],[0,1,0],[0,0,1]]) # covariance matrix

class1_sample = np.random.multivariate_normal(mu_vec1, cov_mat1, 20)
class2_sample = np.random.multivariate_normal(mu_vec1 + 1, cov_mat1, 20)
class3_sample = np.random.multivariate_normal(mu_vec1 + 2, cov_mat1, 20)
fig = plt.figure(figsize=(8,8))
ax = fig.add_subplot(111, projection='3d')

ax.scatter(class1_sample[:,0], class1_sample[:,1], class1_sample[:,2],
           marker='x', color='blue', s=40, label='class 1')
ax.scatter(class2_sample[:,0], class2_sample[:,1], class2_sample[:,2],
           marker='o', color='green', s=40, label='class 2')
ax.scatter(class3_sample[:,0], class3_sample[:,1], class3_sample[:,2],
           marker='^', color='red', s=40, label='class 3')
ax.set_xlabel('variable X')
ax.set_ylabel('variable Y')
ax.set_zlabel('variable Z')

plt.title('3D Scatter Plot')
plt.show()
Determine the IP addresses/names/roles of your physical EC2 instances (servers) in AWS
kubectl get nodes -o wide | awk -F" " '{print $3"\t"$1"\t"$7}'
ROLES	NAME	EXTERNAL-IP
master	ip-172-20-34-241.eu-central-1.compute.internal	18.184.212.193
node	ip-172-20-50-50.eu-central-1.compute.internal	3.120.179.150
node	ip-172-20-52-232.eu-central-1.compute.internal	18.196.157.47
SSH to your AWS EC2 instances if neceassary
ssh -i ~/.ssh/udemy_devopsinuse admin@18.184.212.193
ssh -i ~/.ssh/udemy_devopsinuse admin@3.120.179.150
ssh -i ~/.ssh/udemy_devopsinuse admin@18.196.157.47
Run command netstat -tunlp | grep 30040 at each of the EC2 instances
to see that NodePort type of kubernetes service results in exposing this port at each
physical EC2 within your Kubernetes cluster in AWS
ssh -i ~/.ssh/udemy_devopsinuse admin@18.184.212.193  netstat -tunlp | grep 30040
ssh -i ~/.ssh/udemy_devopsinuse admin@3.120.179.150   netstat -tunlp | grep 30040
ssh -i ~/.ssh/udemy_devopsinuse admin@18.196.157.47   netstat -tunlp | grep 30040
Destroy deployment, service for Jupyter Notebooks for your Kubernetes cluster in AWS
kubectl delete -f jupyter-notebook-deployment.yaml
kubectl delete -f jupyter-notebook-service.yaml
19. Explore POD DEPLOYMENT and SERVICE for Jupyter Notebooks
Deploy deployment, service for Jupyter Notebooks for your Kubernetes cluster in AWS
kubectl apply -f jupyter-notebook-deployment.yaml
kubectl apply -f jupyter-notebook-service.yaml
Useful commands for pods kubernetes object
---
# Describe pod
kubectl describe pod $(kubectl get pods | cut -d' ' -f1 | grep -v "NAME")

# Edit pod
kubectl edit pod $(kubectl get pods | cut -d' ' -f1 | grep -v "NAME")

# Check for pods logs
kubectl logs -f  $(kubectl get pods | cut -d' ' -f1 | grep -v "NAME")

Executing the command: jupyter notebook --NotebookApp.token=''
[I 19:40:56.558 NotebookApp] Writing notebook server cookie secret to /home/jovyan/.local/share/jupyter/runtime/notebook_cookie_secret
[W 19:40:56.966 Notebook
...
Useful commands for deployment kubernetes object
kubectl get deployment -A

kubectl describe deployment   $(kubectl get deployment | cut -d' ' -f1 | grep -v "NAME")
Name:                   jupyter-k8s-udemy
Namespace:              default
CreationTimestamp:      Wed, 01 Apr 2020 21:40:54 +0200
Labels:                 app=jupyter-k8s-udemy
Annotations:            deployment.kubernetes.io/revision: 1
Selector:               app=jupyter-k8s-udemy
Replicas:               1 desired | 1 updated | 1 total | 1 available | 0 unavailable
StrategyType:           RollingUpdate
MinReadySeconds:        0
RollingUpdateStrategy:  25% max unavailable, 25% max surge
Pod Template:
  Labels:  app=jupyter-k8s-udemy
  Containers:
   minimal-notebo...
File: https://github.com/xjantoth/helmfile-course/blob/master/jupyter-notebook-deployment.yaml
---
apiVersion: apps/v1
kind: Deployment
metadata:
  name: jupyter-k8s-udemy
  labels:
    app: jupyter-k8s-udemy
spec:
  replicas: 1
  selector:
    matchLabels:
      app: jupyter-k8s-udemy
  template:
    metadata:
      labels:
        app: jupyter-k8s-udemy
    spec:
      containers:
      - name: minimal-notebook
        image: jupyter/scipy-notebook:2c80cf3537ca
        ports:
        - containerPort: 8888
        command: ["start-notebook.sh"]
        args: ["--NotebookApp.token=''"]
Useful commands for service kubernetes object
kubectl get svc
kubectl get svc -A
kubectl edit svc <service-name>
EDITOR=vim kubectl edit svc <service-name>
Describe service kubernetes object
kubectl describe svc $(kubectl get svc | grep jupyt | cut -d' ' -f1 )
Name:                     jupyter-k8s-udemy
Namespace:                default
Labels:                   <none>
Annotations:              Selector:  app=jupyter-k8s-udemy
Type:                     NodePort
IP:                       100.65.51.245
Port:                     <unset>  8888/TCP
TargetPort:               8888/TCP
NodePort:                 <unset>  30040/TCP
Endpoints:                100.96.2.5:8888
Session Affinity:         None
External Traffic Policy:  Cluster
Events:                   <none>
File: https://github.com/xjantoth/helmfile-course/blob/master/jupyter-notebook-service.yaml
---
kind: Service
apiVersion: v1
metadata:
  name: jupyter-k8s-udemy
spec:
  type: NodePort
  selector:
    app: jupyter-k8s-udemy
  ports:
  - protocol: TCP
    nodePort: 30040
    port: 8888
    targetPort: 8888
20. Install helm v3 and helmfile binaries
Install helm v3
curl --output /tmp/helm-v3.1.1-linux-amd64.tar.gz -L https://get.helm.sh/helm-v3.1.1-linux-amd64.tar.gz
sudo tar -xvf /tmp/helm-v3.1.1-linux-amd64.tar.gz --strip-components=1 -C /usr/local/bin/ linux-amd64/helm
sudo mv /usr/local/bin/helm /usr/local/bin/helm3
sudo chmod +x /usr/local/bin/helm3

# In case you have no helm chart repository added
helm3 repo add stable https://kubernetes-charts.storage.googleapis.com/
Verify your helm chart repository repo helm v3
helm3 repo update
helm3 repo list
Install helmfile
sudo curl -L --output /usr/bin/helmfile https://github.com/roboll/helmfile/releases/download/v0.104.0/helmfile_linux_amd64
sudo chmod +x /usr/bin/helmfile

# Create symbolic link from helm3 to helm
ln -s /usr/local/bin/helm3 /usr/bin/helm
!!! This section is only applicable if you want to use helm v2 Install helm v2
curl -L --output /tmp/helm-v2.16.5-linux-amd64.tar.gz  https://get.helm.sh/helm-v2.16.5-linux-amd64.tar.gz
sudo tar -xvf /tmp/helm-v2.16.5-linux-amd64.tar.gz --strip-components=1 -C /usr/bin/ linux-amd64/helm
sudo chmod +x /usr/bin/helm
!!! This section is only applicable if you want to use helm v2
helm version
kubectl create serviceaccount --namespace kube-system tiller
kubectl create clusterrolebinding tiller-cluster-rule --clusterrole=cluster-admin --serviceaccount=kube-system:tiller
helm init --service-account tiller --upgrade
helm ls
21. Introduction to Helm charts
Create your first helm chart named example
Keep in mind that by default when running helm3 create <chart-name>
the helm chart will use Nginx docker container and I will use it in this example helm chart.
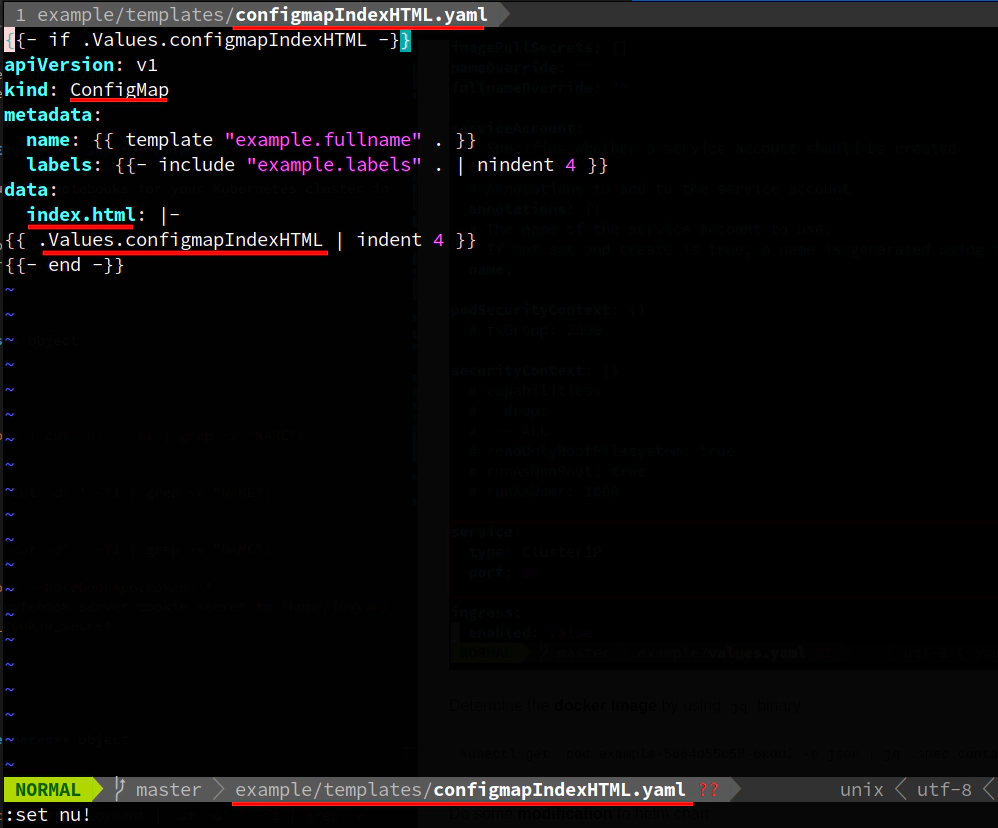
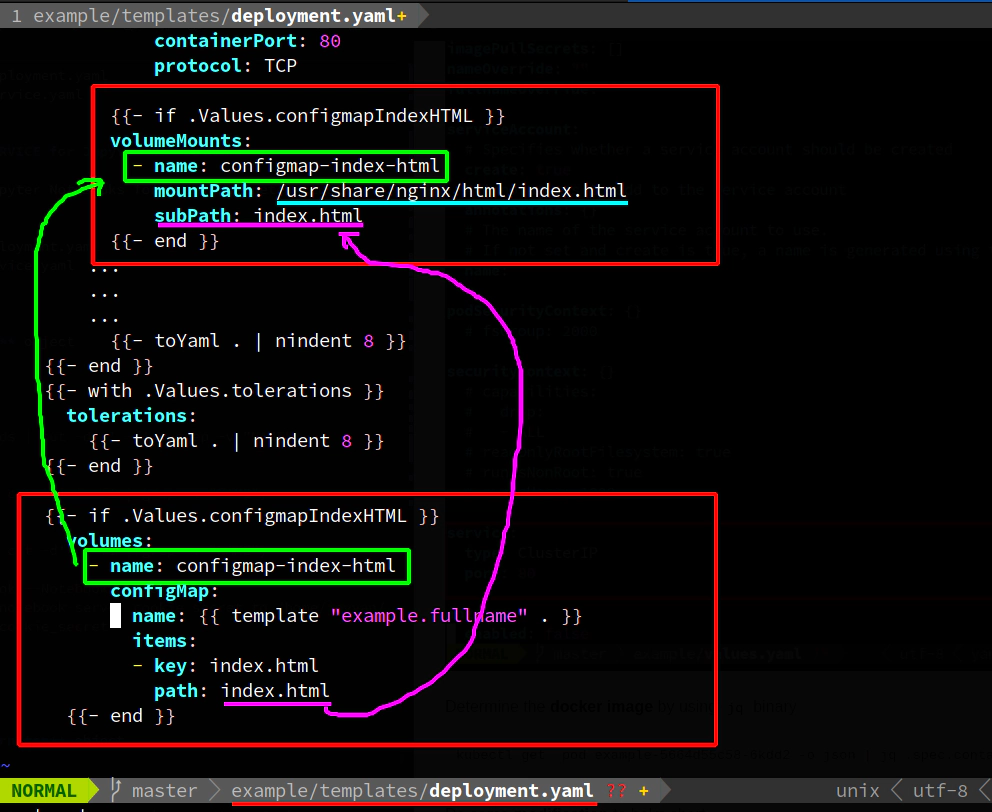
We will then add an extra template called:
example/templates/configmapIndexHTML.yaml
and replace the content of a default index.html file in web root for Nginx (/usr/share/nginx/html/index.html).
cd helm-charts
helm3 create <name-of-helmchart>
helm3 create example

Explore Chart.yaml file
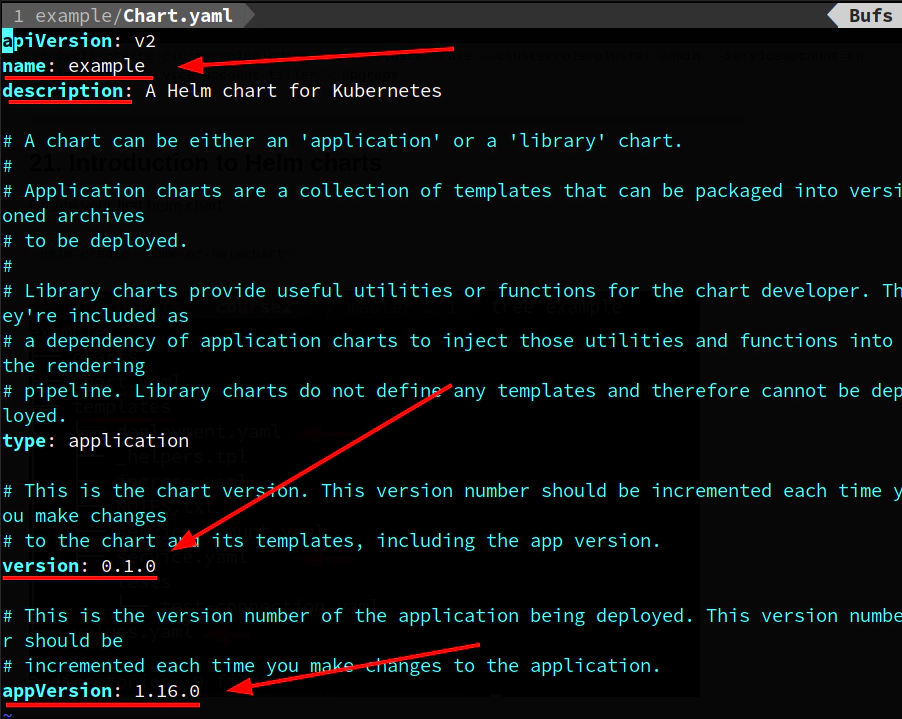
Determine the docker image by using jq binary
kubectl get pod example-5664d55c58-6kdd2 -o json | jq .spec.containers | jq '.[].image'
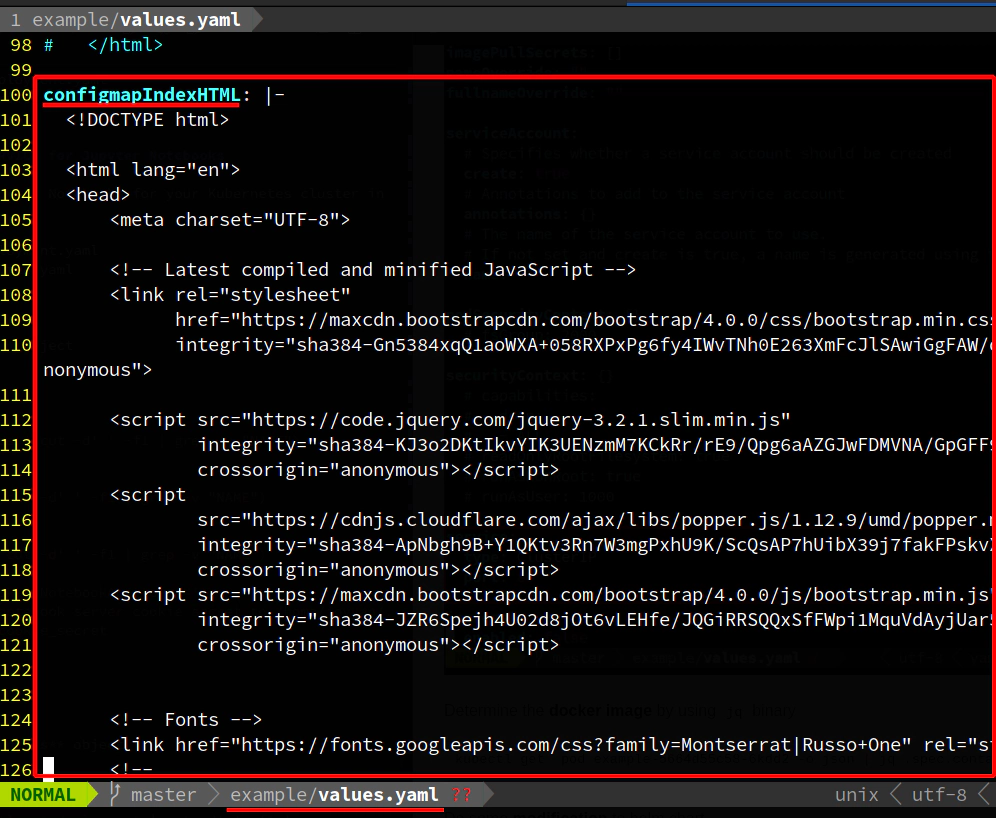

Do some modification to example helm chart
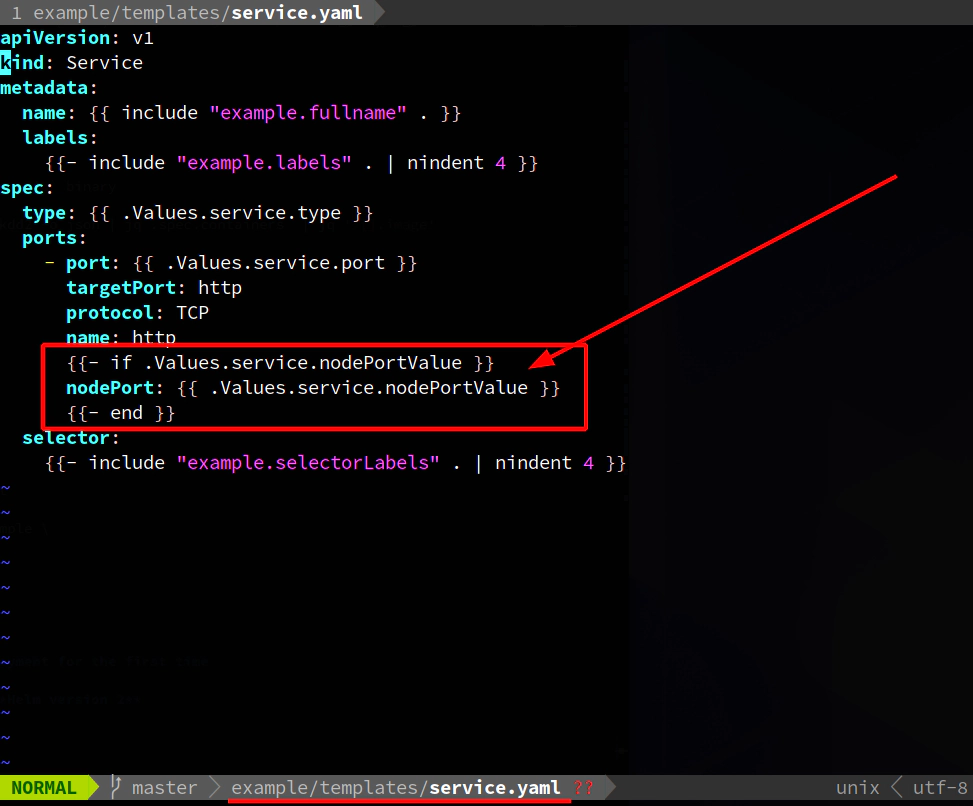
- example/values.yaml
- example/templates/service.yaml
- example/templates/deployment.yaml
Create this new file
- example/templates/configmapIndexHTML.yaml
Execute helm deployment
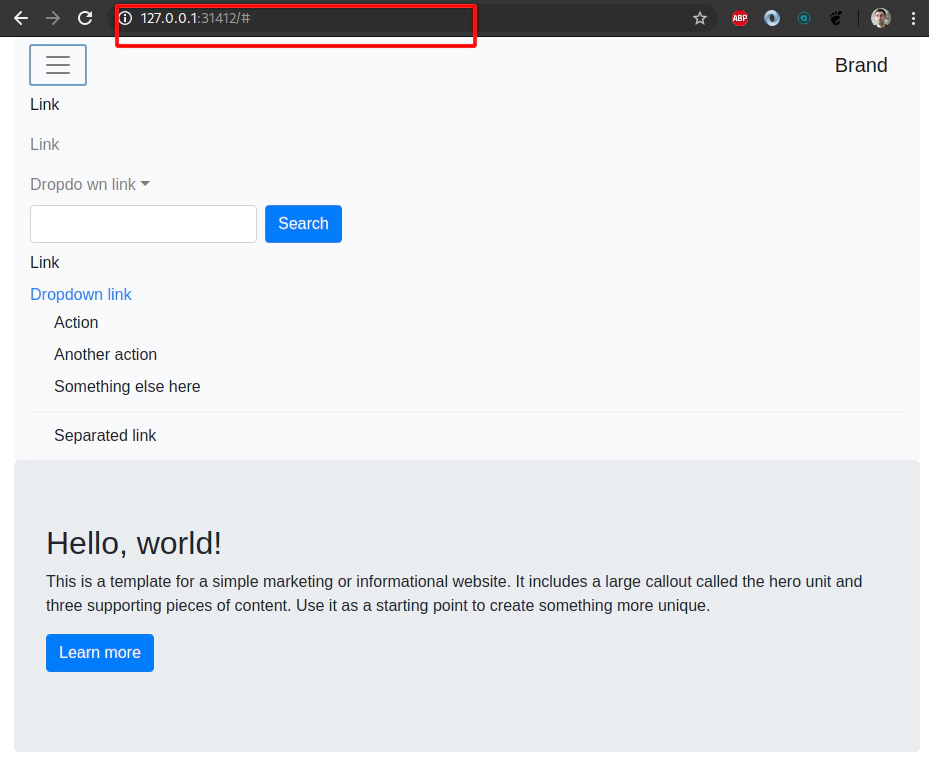
helm3 install example helm-charts/example \
--set service.type=NodePort \
--set service.nodePortValue=31412

# Create SSH tunnel to avoid opening
# of an extra nodePort: 31412
ssh -L31412:127.0.0.1:31412 \
-i ~/.ssh/udemy_devopsinuse \
admin@18.184.212.193
22. Explore example helm chart
Try to close SSH tunnel
ssh -L31412:127.0.0.1:31412 \
-i ~/.ssh/udemy_devopsinuse \
admin@18.184.212.193
Determine the IP addresses/names/roles of your physical EC2 instances (servers) in AWS
kubectl get nodes -o wide | awk -F" " '{print $3"\t"$1"\t"$7}'
ROLES	NAME	EXTERNAL-IP
master	ip-172-20-34-241.eu-central-1.compute.internal	18.184.212.193
node	ip-172-20-50-50.eu-central-1.compute.internal	3.120.179.150
node	ip-172-20-52-232.eu-central-1.compute.internal	18.196.157.47
List all deployments
helm3 ls -A
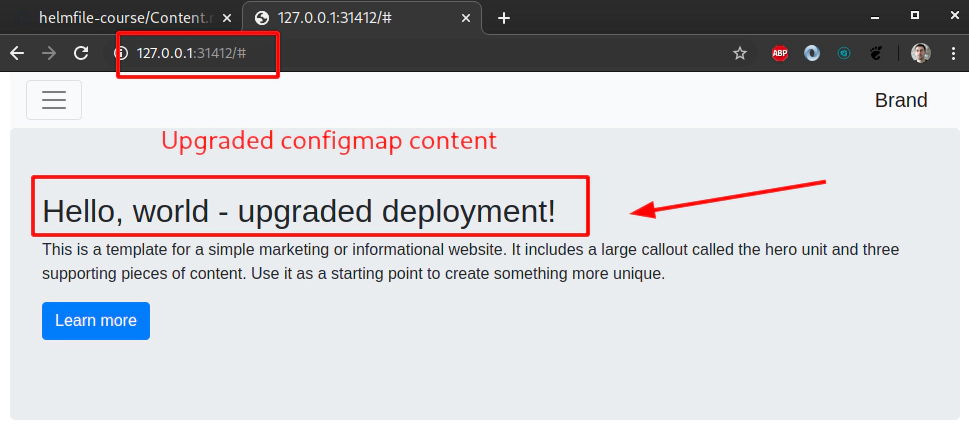
Before upgrade
Do some changes in example/values.yaml file in HTML section
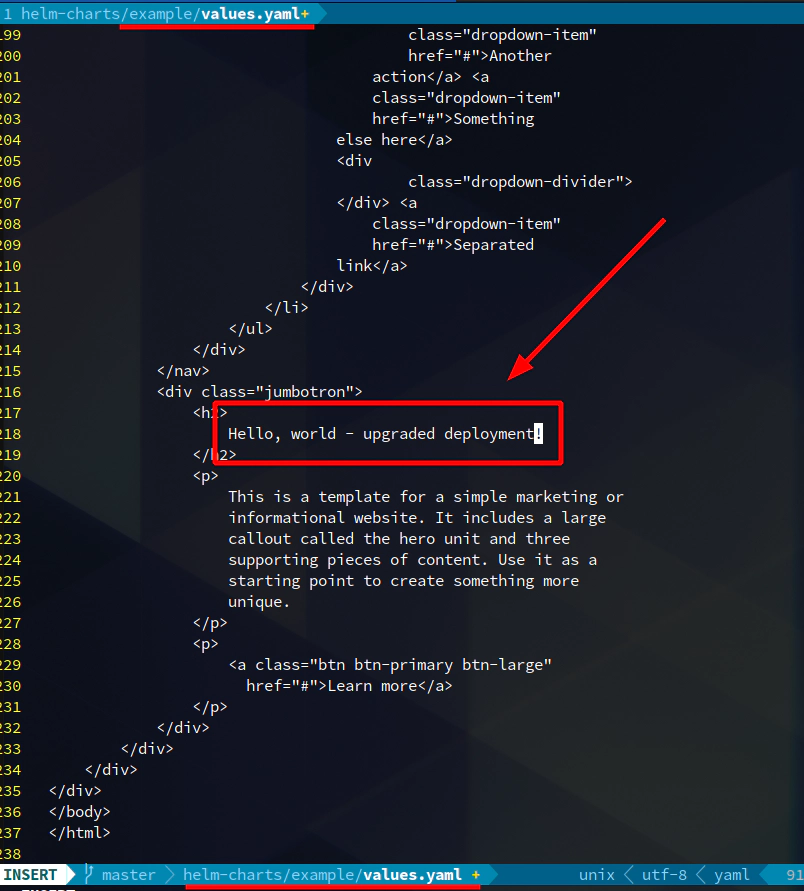
Upgrade deployment
helm3 upgrade example helm-charts/example \
--set service.type=NodePort \
--set service.nodePortValue=31412
Explore configmap for example helm chart
kubectl get cm example -o yaml
apiVersion: v1
data:
  index.html: "<!DOCTYPE html>\n\n<html lang=\"en\">\n<head>\n   ...             </p>\n            </div>\n        </div>\n    </div>\n</div>\n</body>\n</html>"
kind: ConfigMap
metadata:
  creationTimestamp: "2020-04-03T19:21:26Z"
  labels:
    app.kubernetes.io/instance: example
    app.kubernetes.io/managed-by: Helm
    app.kubernetes.io/name: example
    app.kubernetes.io/version: 1.16.0
    helm.sh/chart: example-0.1.0
  name: example
  namespace: default
  resourceVersion: "398879"
  selfLink: /api/v1/namespaces/default/configmaps/example
  uid: b2e95666-8e4b-4ca5-a8ea-60fe3cc3e6fb
Delete Nginx pod to load new content from updated configmap
kubectl delete pod example-7cb6767455-f84p6
Delete helm chart example deployment
helm3 delete example
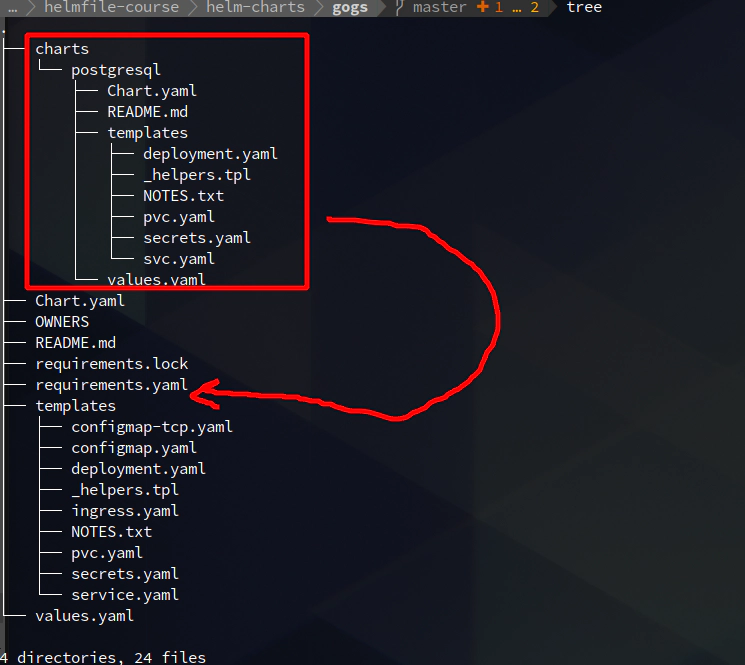
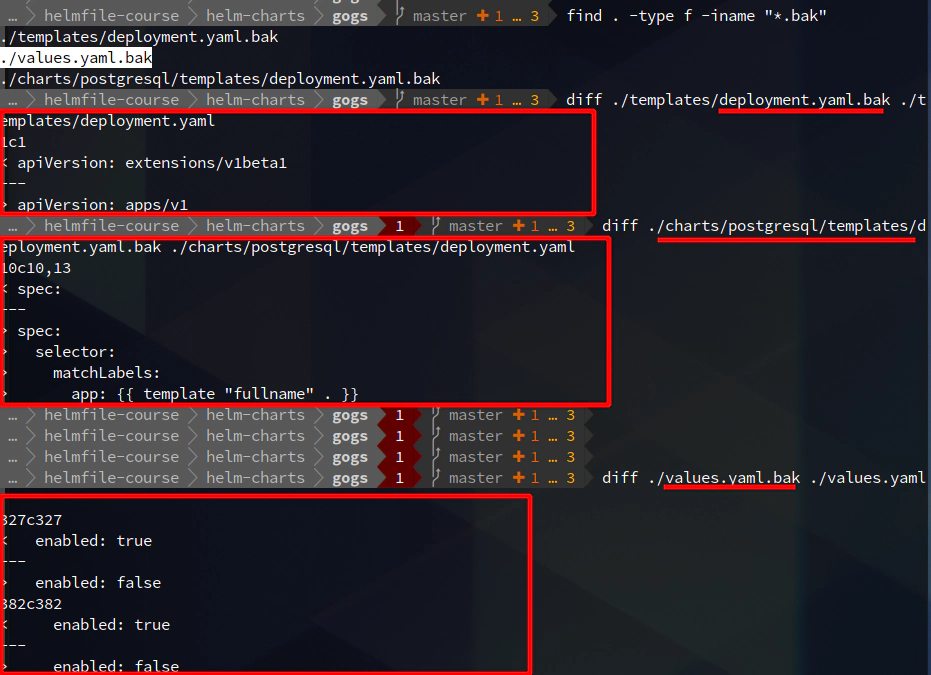
23. Deploy Gogs helm chart to a Kubernetes cluster running in AWS
It will work the same way even with Helm version 2
helm3 list -A

helm3 repo add incubator \
https://kubernetes-charts-incubator.storage.googleapis.com/

helm3 repo update
helm3 repo list
helm3 search repo incubator/gogs
helm3 fetch  incubator/gogs --untar
cd gogs/
# optional
helm3 dependency update

sed -i.bak 's@apiVersion: extensions/v1beta1@apiVersion: apps/v1@' templates/deployment.yaml charts/postgresql/templates/deployment.yaml
sed -i.bak '/^\s*kind:\s*Deployment/,/^\s*template/s/^\(\s*spec:\s*\)/\1 \n  selector:\n    matchLabels:\n      app: {{ template "fullname" . }}/' charts/postgresql/templates/deployment.yaml

# Optional - if you do not want to enable peristent volume
sed -i.bak 's/^\(\s*enabled:\s\)\(.*\)/\1false/' values.yaml

# you can see that three files have been updated
find . -type f -iname "*.bak"
./templates/deployment.yaml.bak
./values.yaml.bak
./charts/postgresql/templates/deployment.yaml.bak
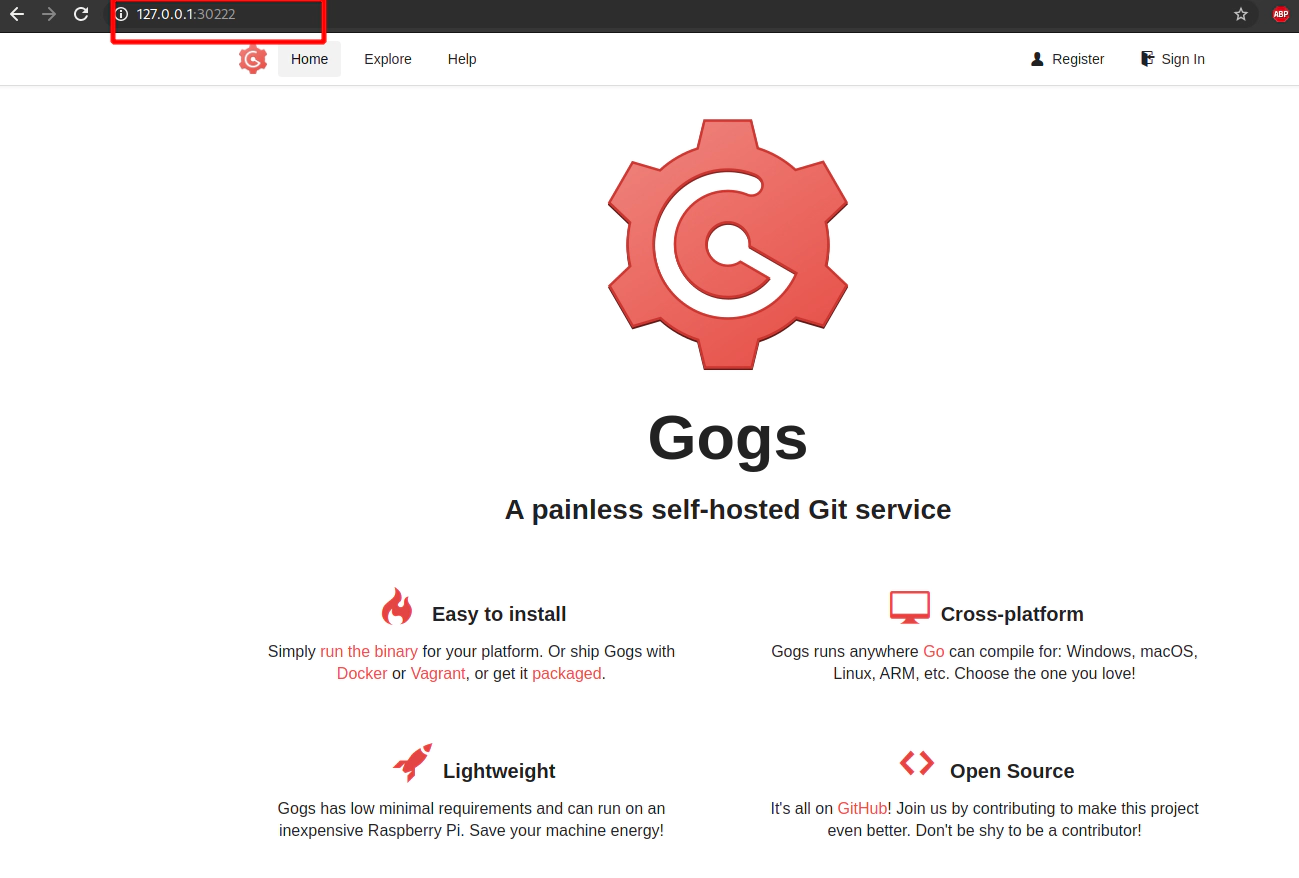
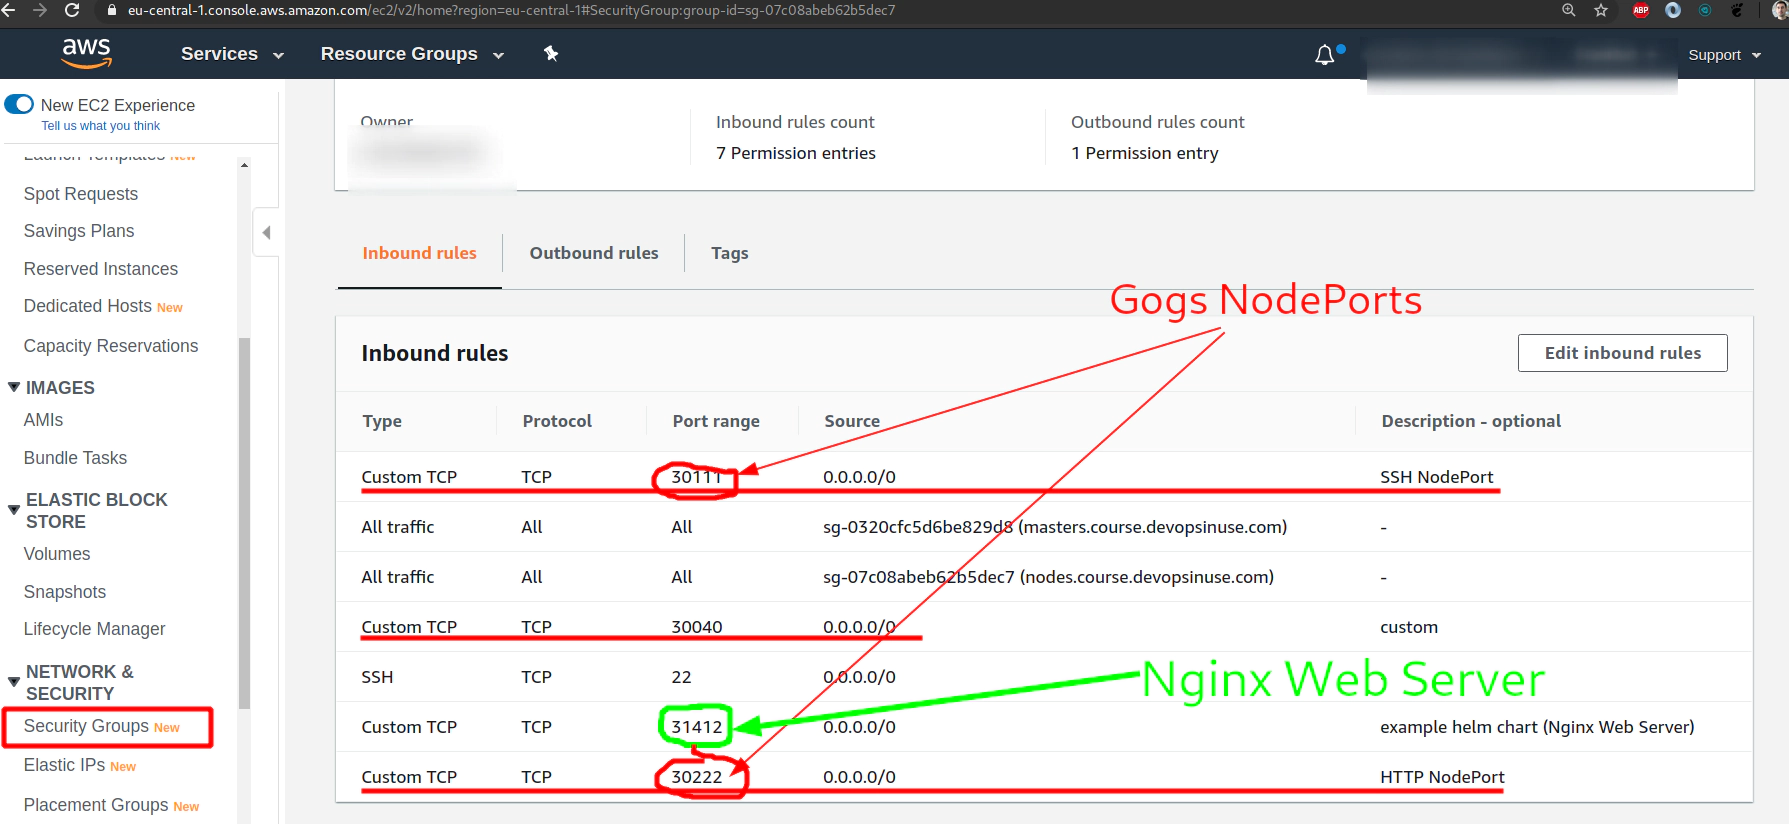
I have special requirement when it comes to NodePort values for:
- HTTP 30222
- SSH 30111
Reason is being that I do not want Kubernetes to generate them automatically - rather - I want to specify them Cause I can open firewall up front. That’s why I passed two extra flags as you can see down below.
helm3 install test \
--set service.httpNodePort=30222 \
--set service.sshNodePort=30111 .

ssh -L30222:127.0.0.1:30222 \
-i ~/.ssh/udemy_devopsinuse admin@18.184.212.193
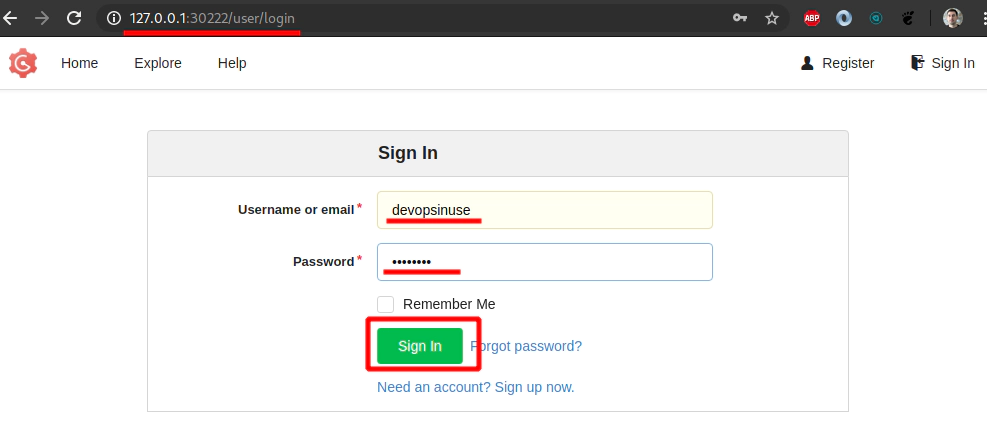
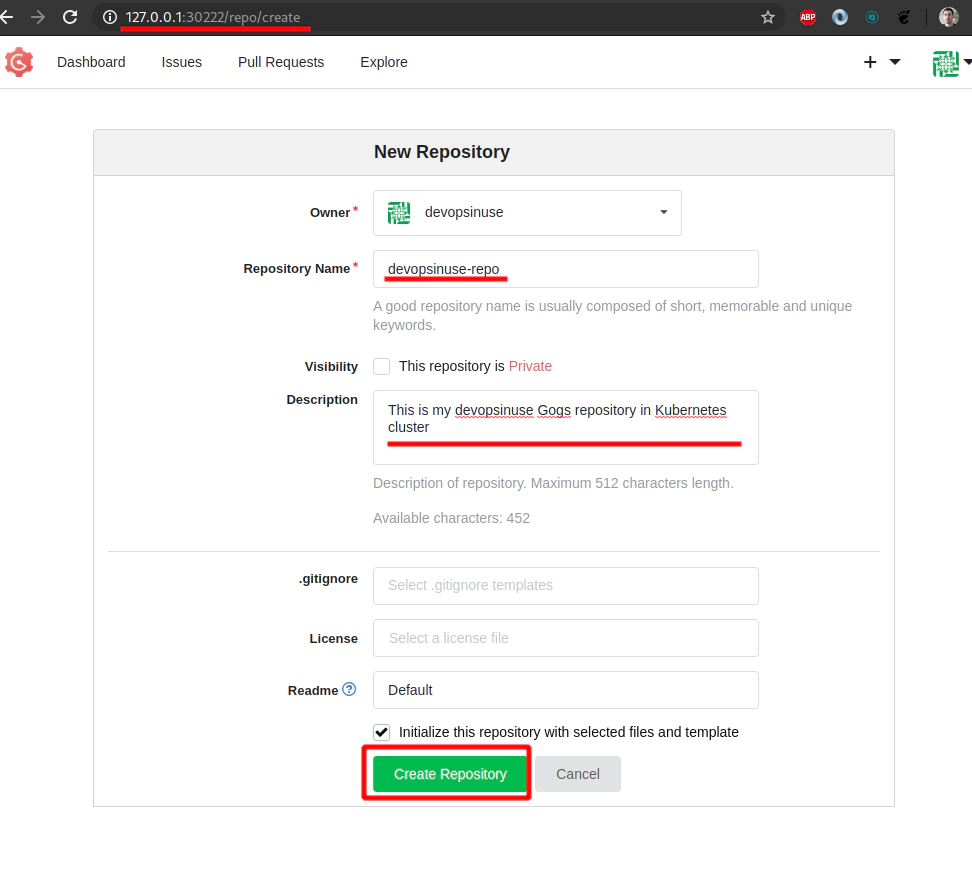
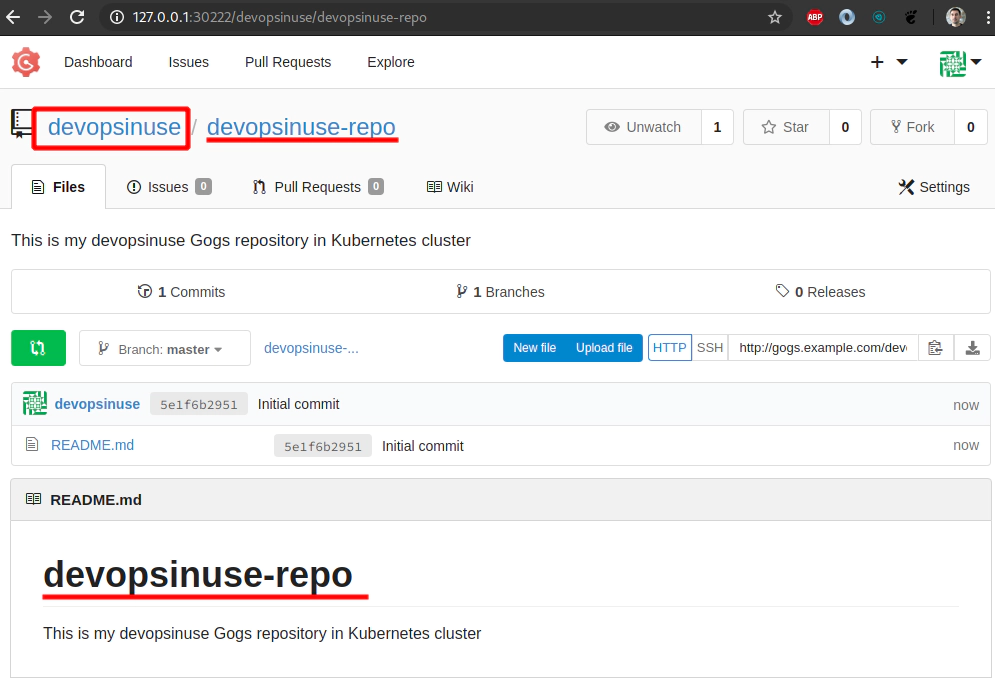
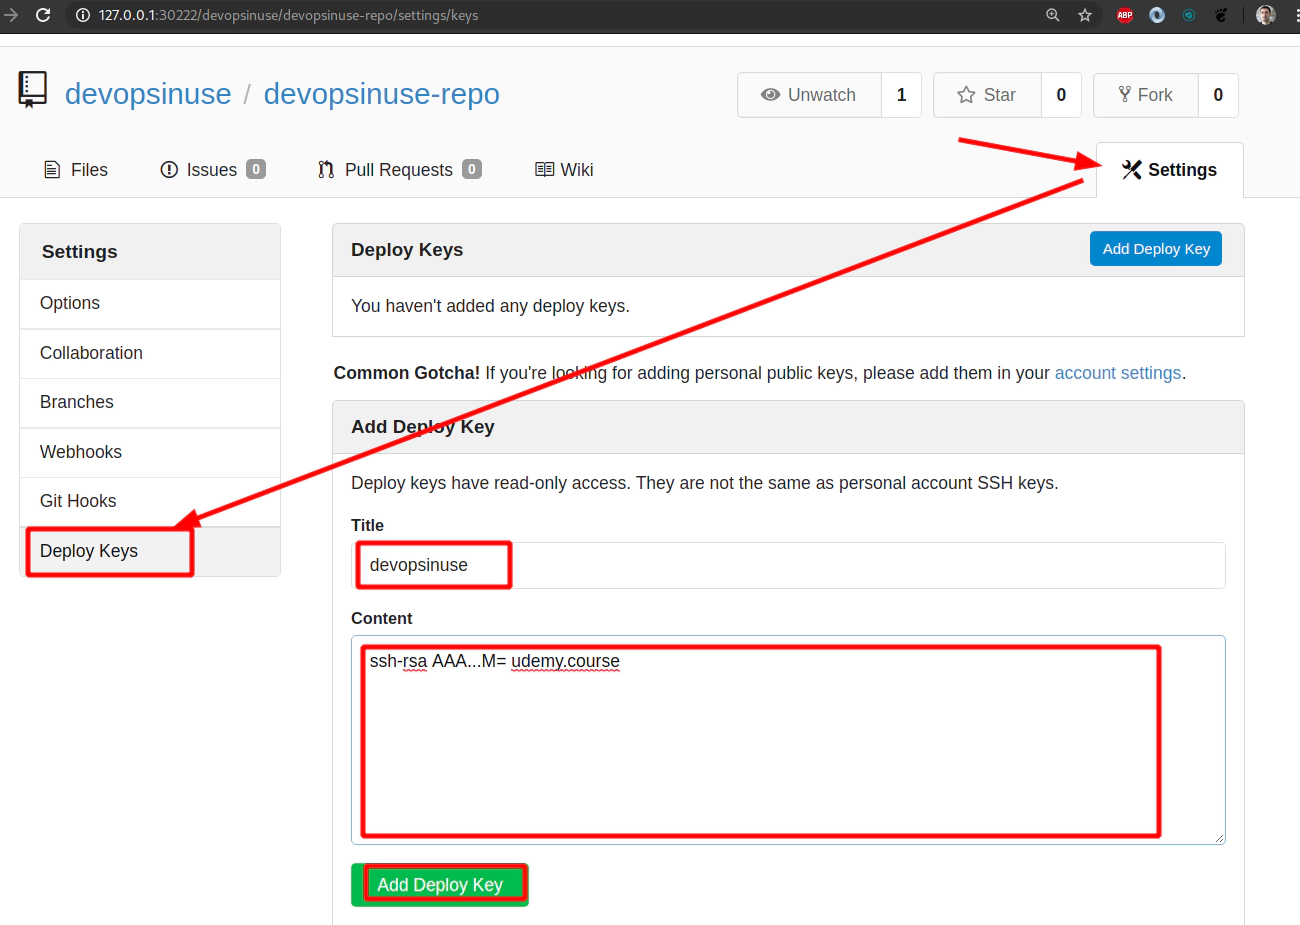
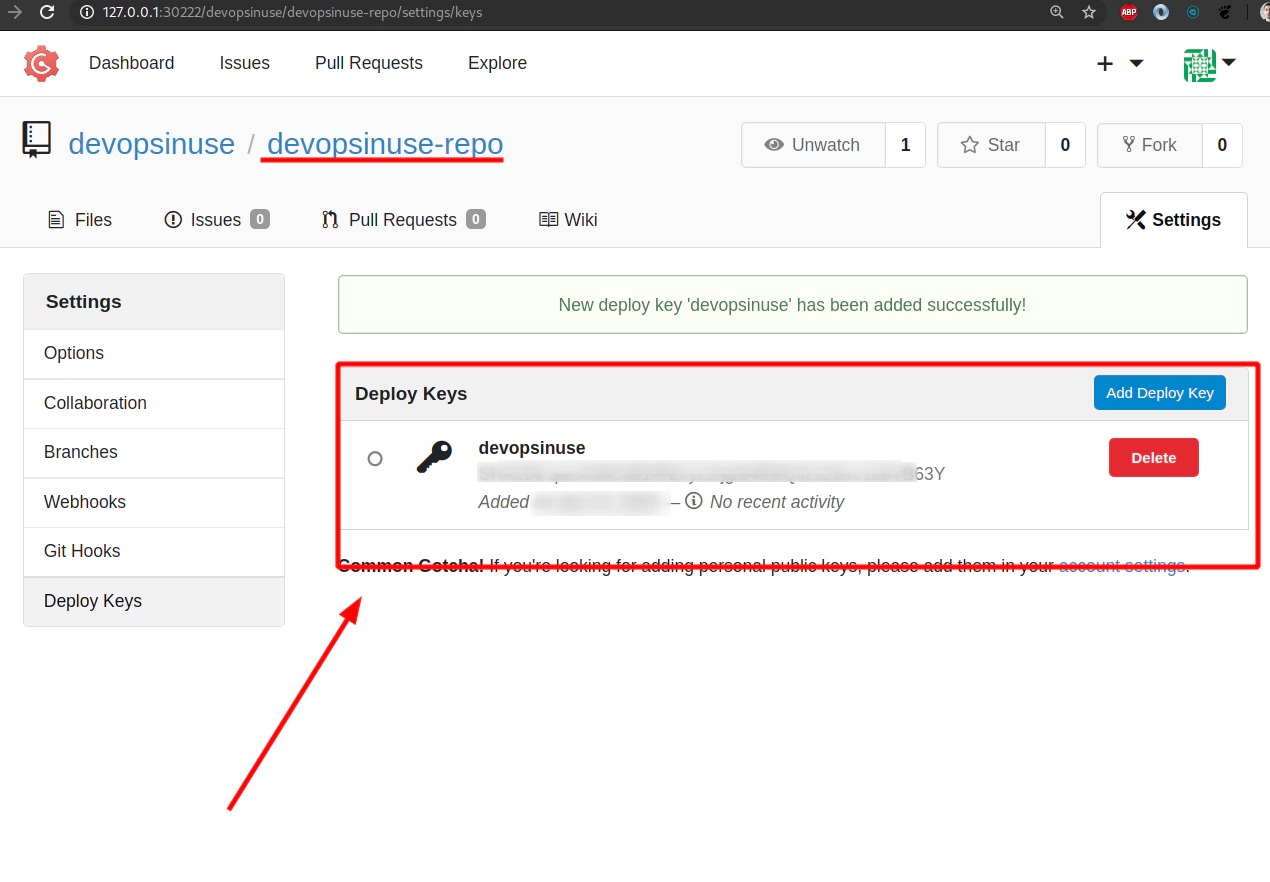
24. Create your own git repository at self-hosted Gogs in your Kubernetes cluster
At first you need to register yourself to Gogs running in Kubernetes in AWS
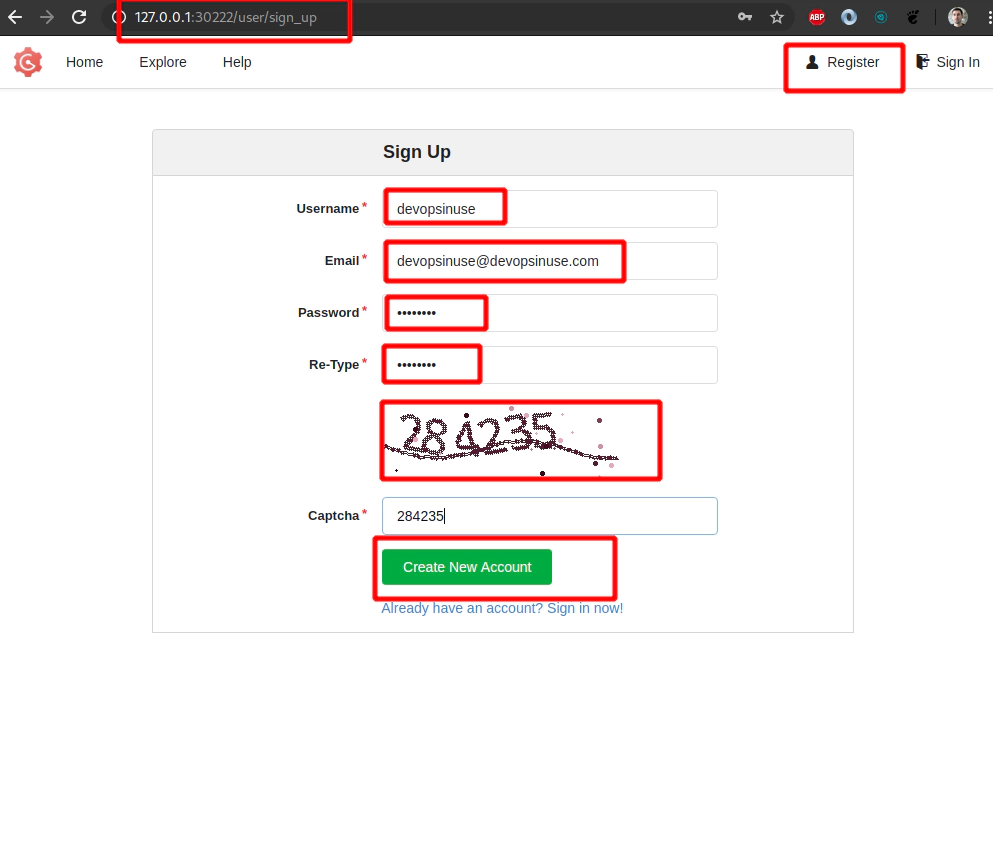
Login with a newly created username/password running in Kubernetes in AWS
Create a git repository withing your gogs account running in Kubernetes in AWS
Fill up some details about your git repository at self hosted gogs running in Kubernetes in AWS
25. Clone your git repository devopsinuse-repo from self-hosted Gogs in your Kubernetes cluster
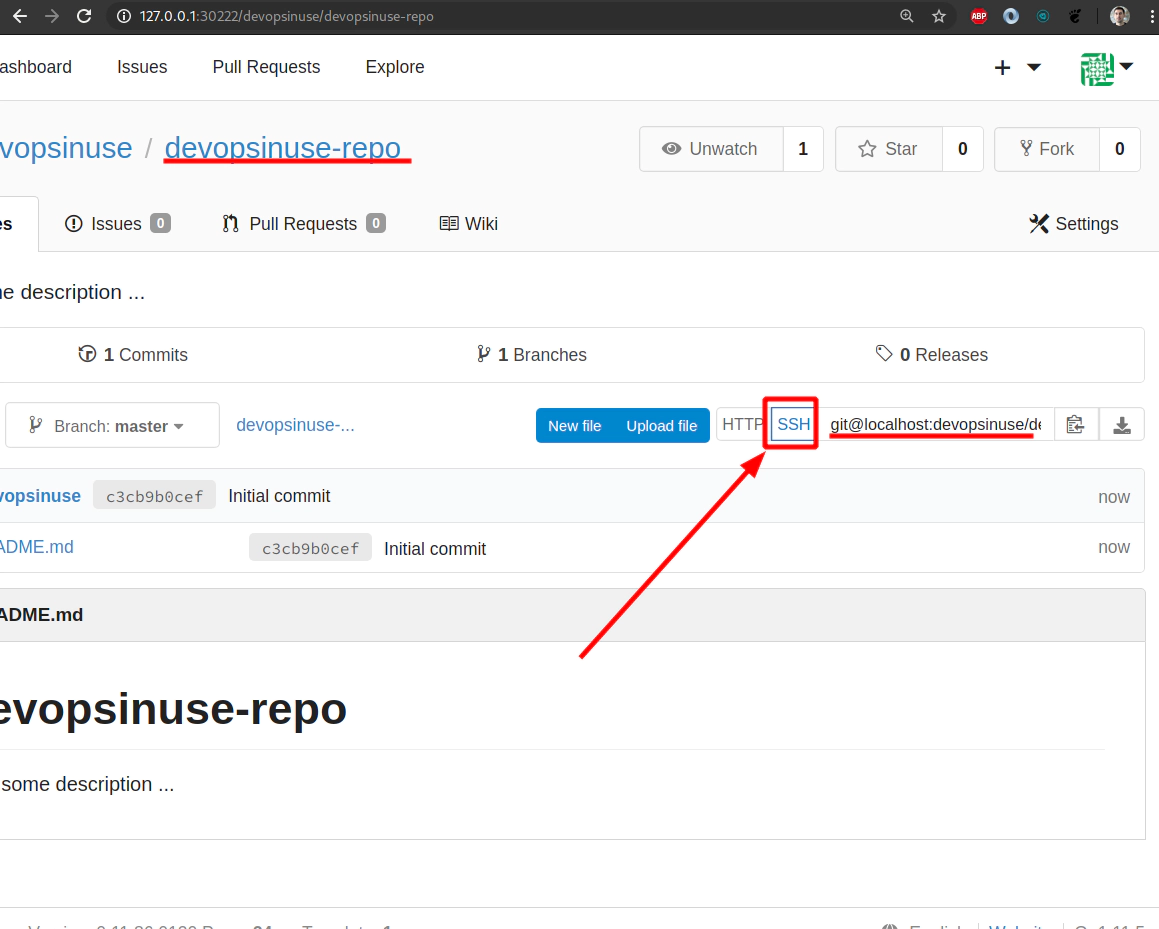 Original SSH link copied from web browser
git@localhost:devopsinuse/devopsinuse-repo.git
Adjust your SSH URL accordingly
ssh://git@127.0.0.1:30111/devopsinuse/devopsinuse-repo.git

# open up a new SSH tunnel for port 30111
ssh -L30111:127.0.0.1:30111 \
-i ~/.ssh/udemy_devopsinuse admin@18.184.212.193
 Clone your git via SSH project/repository from self-hosted Gogs in your Kubernetes cluster
git clone ssh://git@127.0.0.1:30111/devopsinuse/devopsinuse-repo.git
Clone your git via HTTP project/repository from self-hosted Gogs in your Kubernetes cluster
git clone http://127.0.0.1:30222/devopsinuse/devopsinuse-repo.git
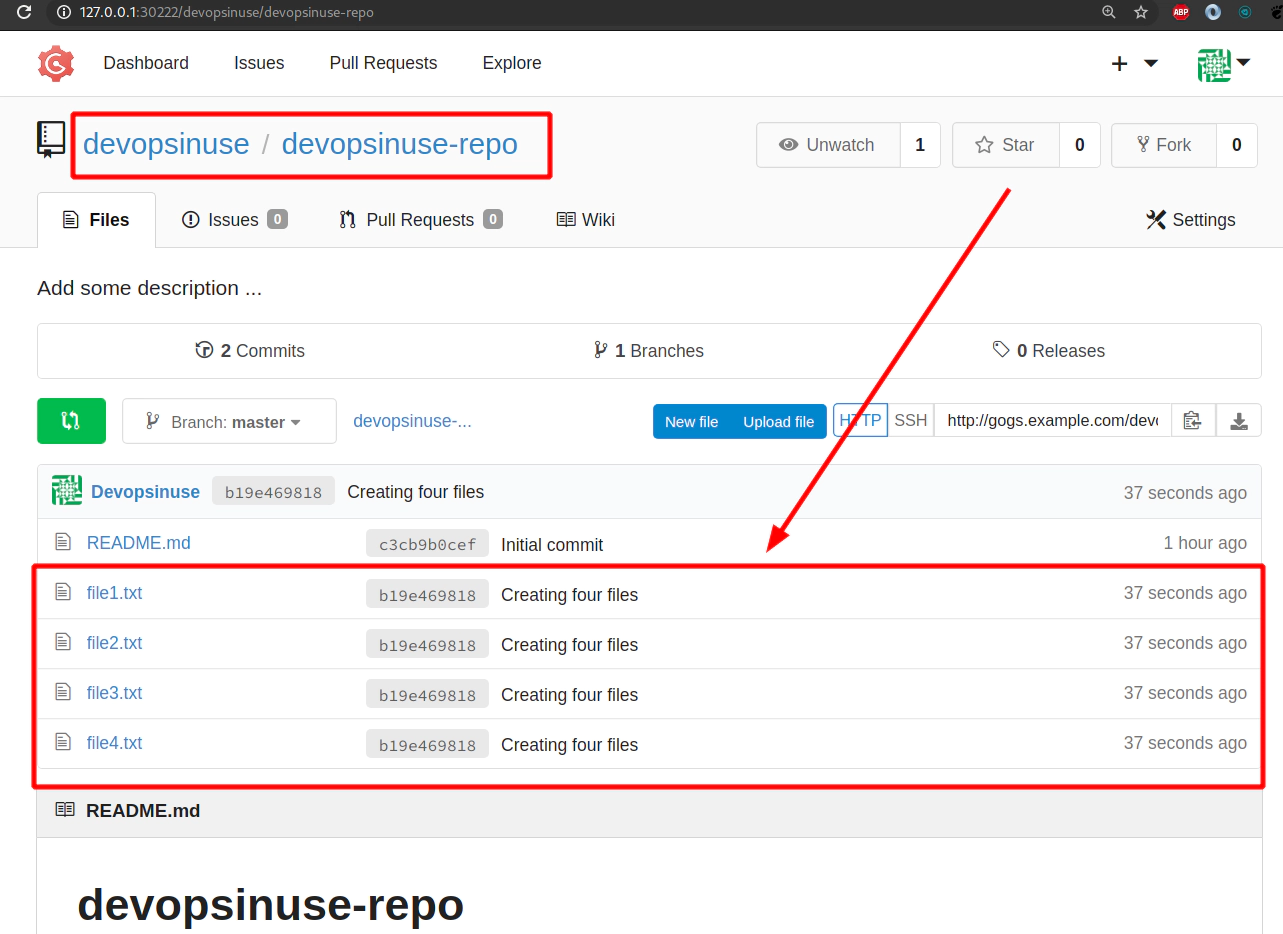
26. Add some content to devopsinuse-repo and git push to your self-hosted Gogs running in Kubernetes
Clone your project first if you did not do so yet
# via SSH
git clone ssh://git@127.0.0.1:30111/devopsinuse/devopsinuse-repo.git

# via HTTP
git clone http://127.0.0.1:30222/devopsinuse/devopsinuse-repo.git

cd devopsinuse-repo
git status
git remote -v
touch file{1..4}.txt
git status
git add .
git config --global user.email "devopsinuse@devopsinuse.com"
git config --global user.name "Devopsinuse"
git commit -m "Creating four files"
git push
git push origin master
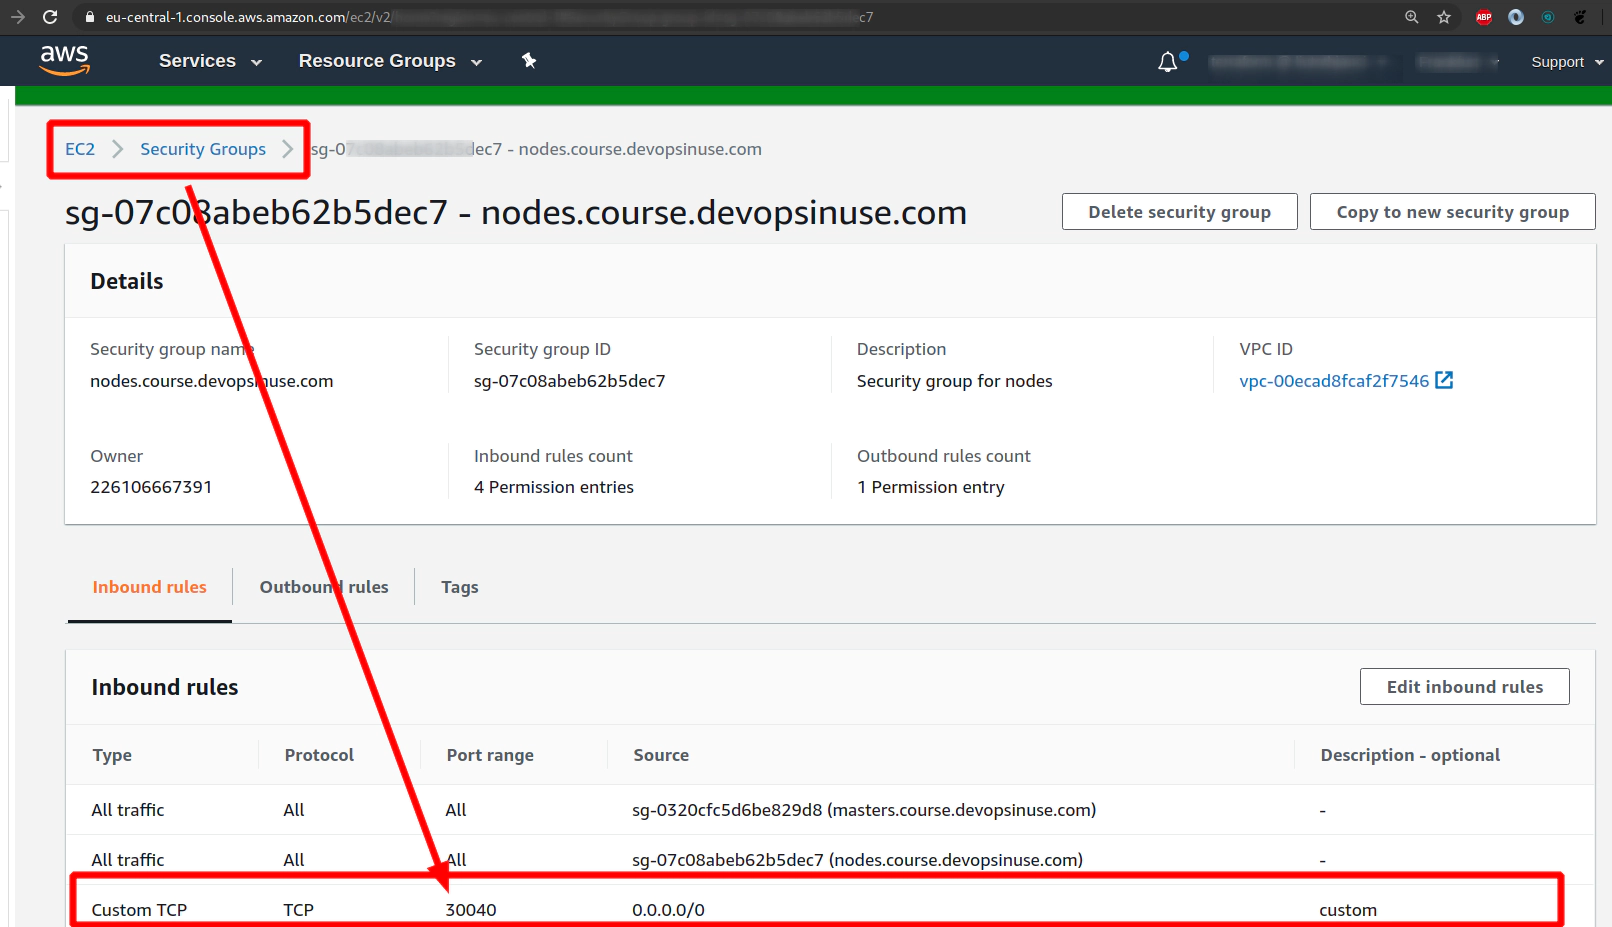
27. Allow NodePort in AWS Security Group section manually in case you like it more
# open up a new HTTP tunnel for port 30222
ssh -L30222:127.0.0.1:30222 \
-i ~/.ssh/udemy_devopsinuse admin@18.184.212.193

# open up a new SSH tunnel for port 30111
ssh -L30111:127.0.0.1:30111 \
-i ~/.ssh/udemy_devopsinuse admin@18.184.212.193

# Create SSH tunnel to avoid opening
# of an extra nodePort: 31412 for "example" helm chart
ssh -L31412:127.0.0.1:31412 \
-i ~/.ssh/udemy_devopsinuse \
admin@18.184.212.193
In case you like to set up NodePorts for your Kubernetes deploymnt better in AWS web console in the section of Security group feel free to do so. In such a case you can skip pretty much all SSH tunnels and instead please us one of the IP Addresses of your Kubenretes nodes.
To retrieve IP Addresses of your physical EC2 instances within your Kubenretes cluster - run this command:
kubectl get nodes -o wide | awk -F" " '{print $3"\t"$1"\t"$7}'
ROLES	NAME	EXTERNAL-IP
master	ip-172-20-34-241.eu-central-1.compute.internal	18.184.212.193
node	ip-172-20-50-50.eu-central-1.compute.internal	3.120.179.150
node	ip-172-20-52-232.eu-central-1.compute.internal	18.196.157.47
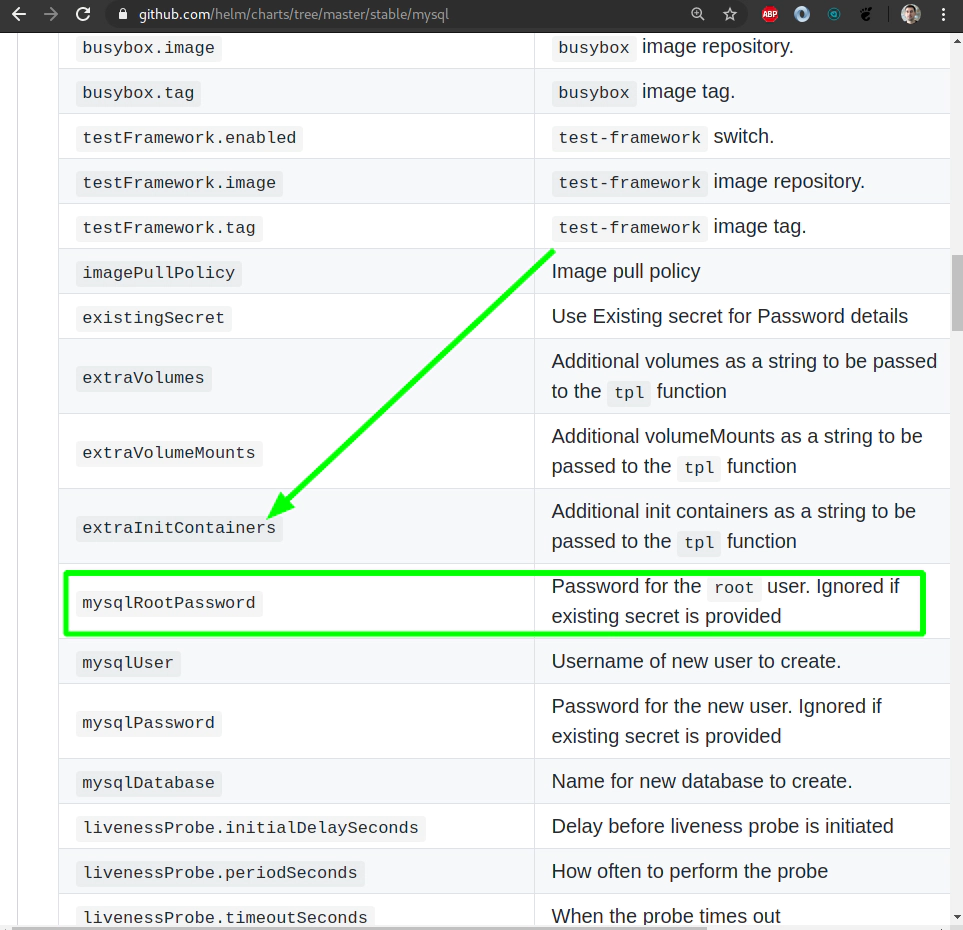
28. MySQL helm chart deployment with Persistent Volume
Search for MySQL helm chart (helm v3):
helm3 repo list
NAME     	URL
stable   	https://kubernetes-charts.storage.googleapis.com/
incubator	https://kubernetes-charts-incubator.storage.googleapis.com/

helm3 search repo stable/mysql -l | head
NAME            	CHART VERSION	APP VERSION	DESCRIPTION
stable/mysql    	1.6.2        	5.7.28     	Fast, reliable, scalable, and easy to use open-..
Try to use helm3 template command to see what you are about to be deploying to your Kubernetes cluster in AWS
# template your mysql helm chart
# before you going to deploy it to Kubenretes cluster
helm3 template \
mysql \
--set persistence.enabled=true \
--set persistence.size=1Gi \
--set mysqlRootPassword=Start123 \
stable/mysql | less
Deploy MySQL helm chart from a “stable” helm chart repository
helm3 install \
mysql \
--set persistence.enabled=true \
--set persistence.size=1Gi \
--set mysqlRootPassword=Start123 \
stable/mysql

...

To get your root password run:

    MYSQL_ROOT_PASSWORD=$(kubectl get secret --namespace default mysql -o jsonpath="{.data.mysql-root-password}" | base64 --decode; echo)

To connect to your database:

1. Run an Ubuntu pod that you can use as a client:

    kubectl run -i --tty ubuntu --image=ubuntu:16.04 --restart=Never -- bash -il

2. Install the mysql client:

    $ apt-get update && apt-get install mysql-client -y

3. Connect using the mysql cli, then provide your password:
    $ mysql -h mysql -p

To connect to your database directly from outside the K8s cluster:
    MYSQL_HOST=127.0.0.1
    MYSQL_PORT=3306

    # Execute the following command to route the connection:
    kubectl port-forward svc/mysql 3306

    mysql -h ${MYSQL_HOST} -P${MYSQL_PORT} -u root -p${MYSQL_ROOT_PASSWORD}
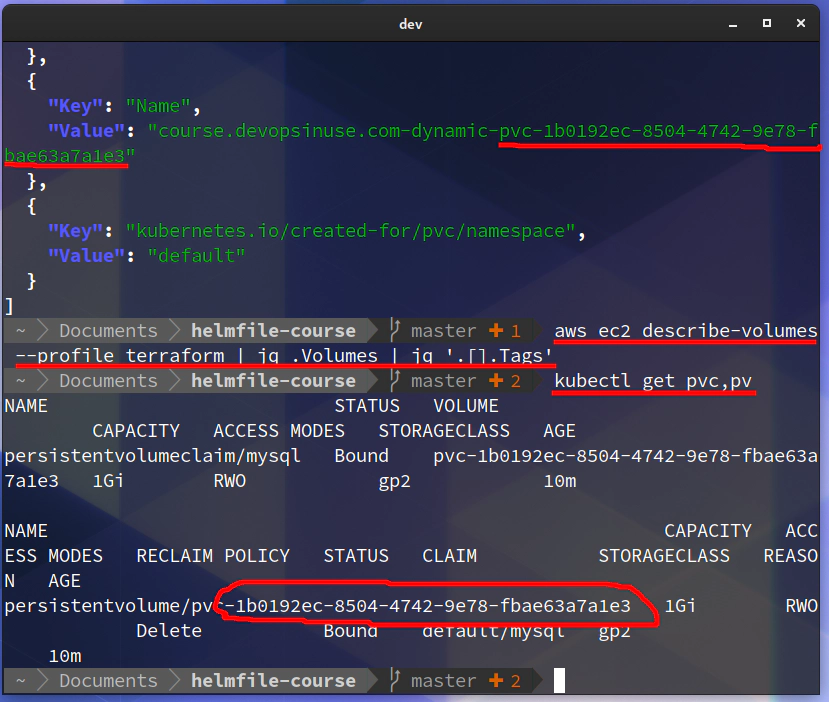
aws ec2 describe-volumes --profile terraform | jq .Volumes | jq '.[].Tags'

...
[
  {
    "Key": "kubernetes.io/created-for/pv/name",
    "Value": "pvc-1b0192ec-8504-4742-9e78-fbae63a7a1e3"
  },
  {
    "Key": "kubernetes.io/created-for/pvc/name",
    "Value": "mysql"
  },
  {
    "Key": "kubernetes.io/cluster/course.devopsinuse.com",
    "Value": "owned"
  },
  {
    "Key": "KubernetesCluster",
    "Value": "course.devopsinuse.com"
  },
  {
    "Key": "Name",
    "Value": "course.devopsinuse.com-dynamic-pvc-1b0192ec-8504-4742-9e78-fbae63a7a1e3"
  },
  {
    "Key": "kubernetes.io/created-for/pvc/namespace",
    "Value": "default"
  }
]
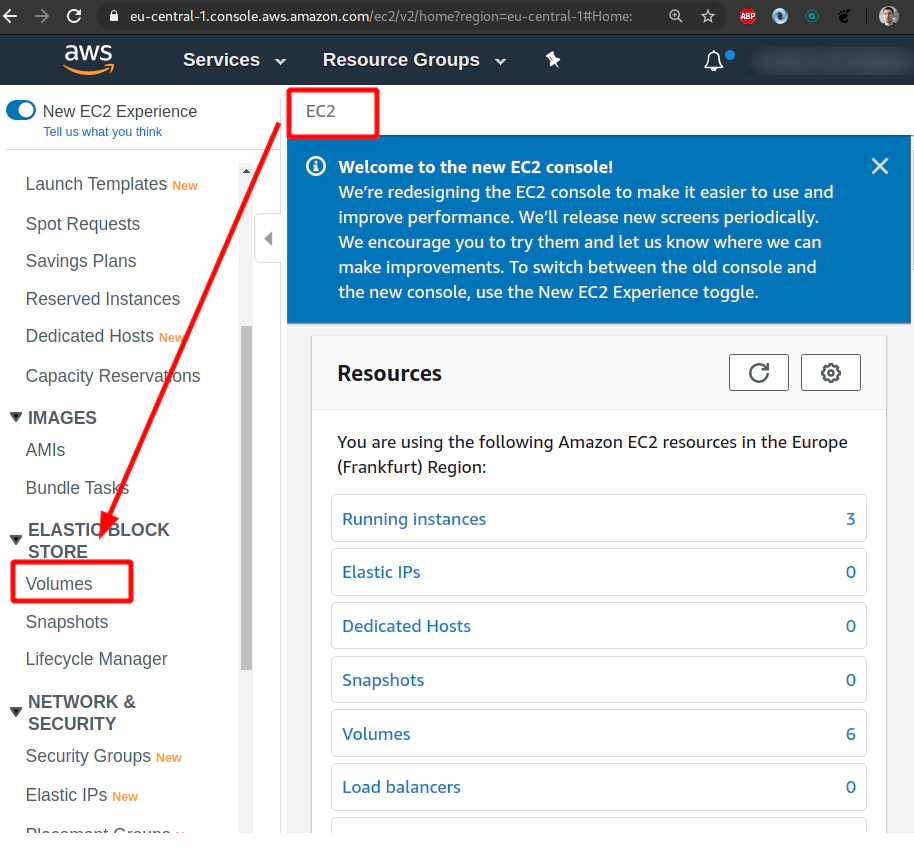
Please check that one persistent volume has been crerated in your Kubenretes cluster as well as in your AWS console.

29. Connect to your MySQL deployment running in your Kubernetes cluster in AWS via an extra ubuntu pod
To get your root password run:
MYSQL_ROOT_PASSWORD=$(kubectl get secret --namespace default mysql -o jsonpath="{.data.mysql-root-password}" | base64 --decode; echo)
To connect to your database:
-
Run an Ubuntu pod that you can use as a client:
kubectl run -i –tty ubuntu –image=ubuntu:16.04 –restart=Never – bash -il
-
Install the mysql client:
$ apt-get update && apt-get install mysql-client -y
-
Connect using the mysql cli, then provide your password:
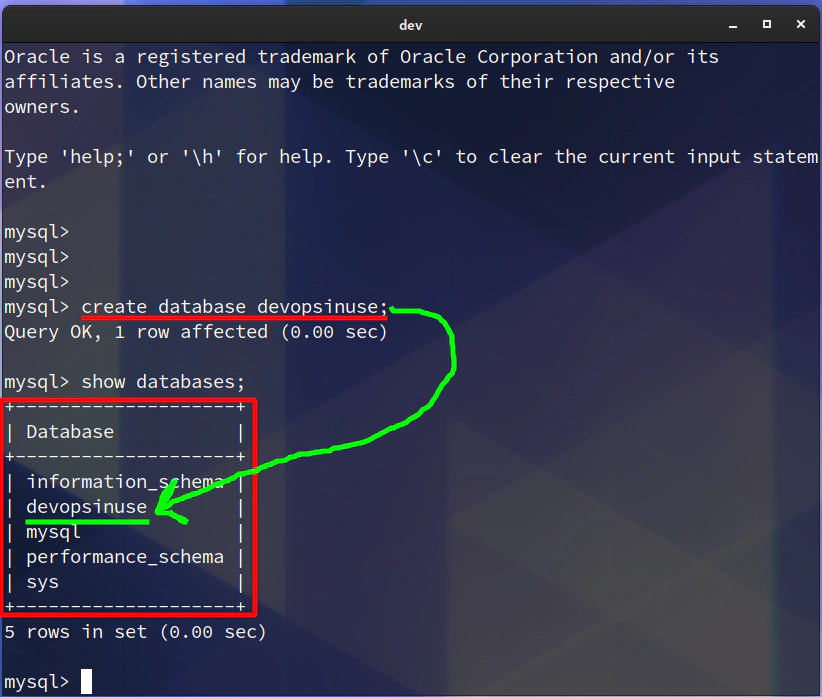
    $ mysql -h mysql -p
    $ create database devopsinuse;
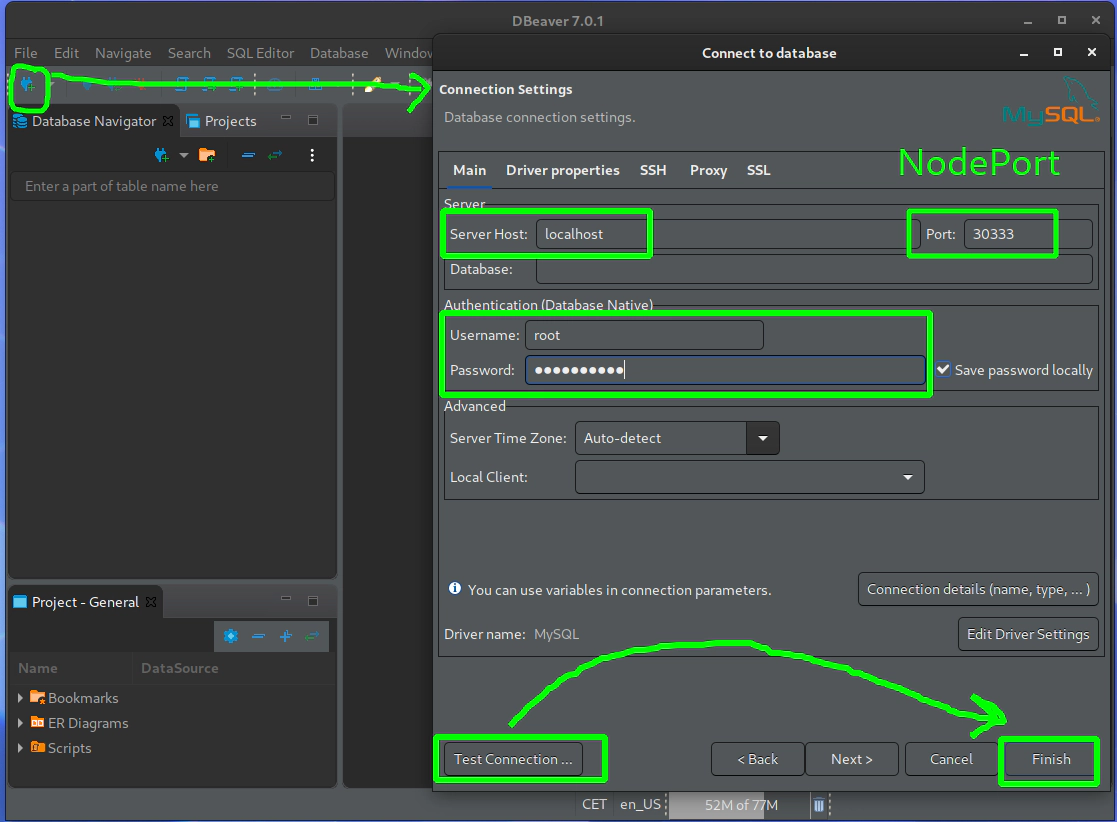
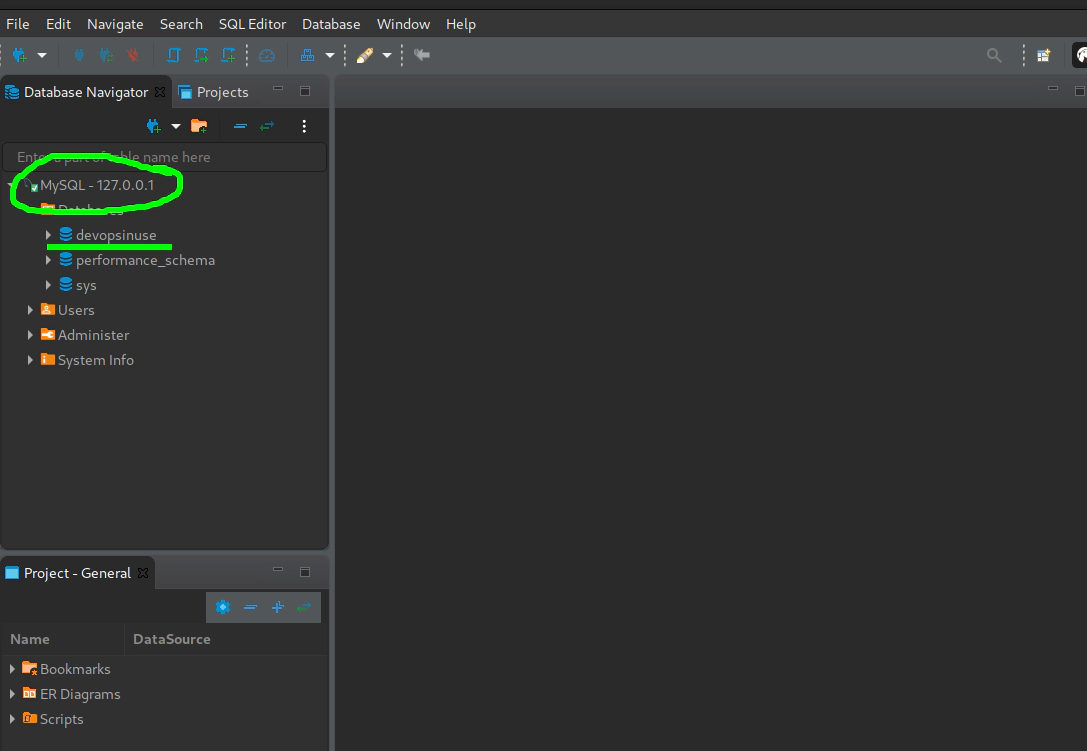
30. Connect to your MySQL deployment running in your Kubernetes cluster in AWS via dbeaver or your favourite GUI program

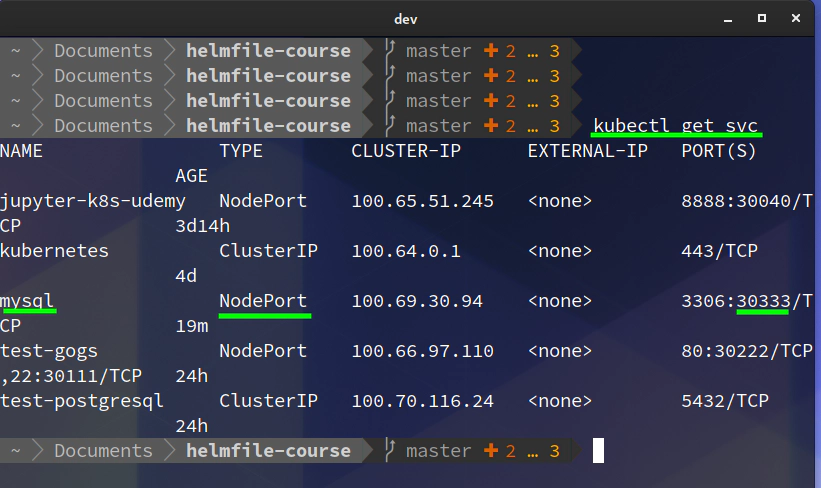
Upgrade your MySQL deployment and add NodePort type of Kubernetes service and set nodePort value to 30333
helm3 template mysql stable/mysql \
--set mysqlRootPassword=Start123 \
--set persistence.enabled=true \
--set persistence.size=1Gi \
--set service.type=NodePort \
--set service.nodePort=30333 | less

helm3 upgrade mysql stable/mysql \
--set mysqlRootPassword=Start123 \
--set persistence.enabled=true \
--set persistence.size=1Gi \
--set service.type=NodePort \
--set service.nodePort=30333
 Setup SSH tunnel to MySQL NodePort 20333
ssh -L30333:127.0.0.1:30333 \
-i ~/.ssh/udemy_devopsinuse \
admin@18.184.212.193
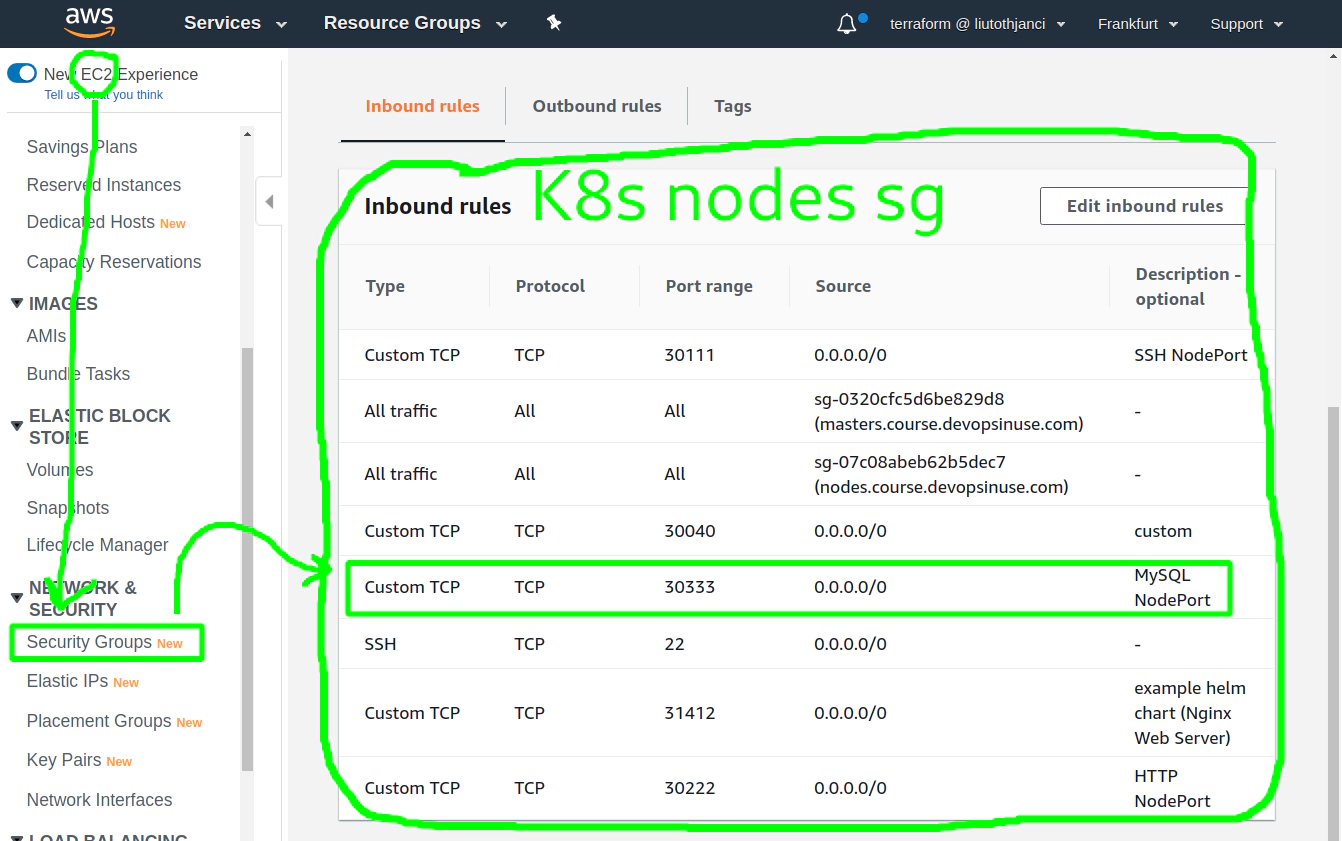
If this is more convinient way to setup Security Group for your Kubenretes nodes - please see image below:
To delete mysql helm chart deployment from a Kubernetes cluster in AW
helm3 delete mysql
31. Understand helmfile specification for example and gogs helm charts via helmfile binary
Install helmfile binary if you have not done so
sudo curl -L --output /usr/bin/helmfile https://github.com/roboll/helmfile/releases/download/v0.104.0/helmfile_linux_amd64
sudo chmod +x /usr/bin/helmfile

# Create symbolic link from helm3 to helm
ln -s /usr/local/bin/helm3 /usr/bin/helm
Define your helmfile specification for “example” helm chart deployment to your Kubernetes cluster file: helmfiles/helmfile-for-example-and-gogs-helm-charts.yaml
repositories:
# To use official "stable" charts
- name: stable
  url: https://kubernetes-charts.storage.googleapis.com

# Export your environment e.g "learning", "dev", ..., "prod"
# export HELMFILE_ENVIRONMENT="learning"

environments:
  {{ requiredEnv "HELMFILE_ENVIRONMENT" }}:
    values:
      - values.yaml

releases:
  # "example" helm chart release specification
  - name: example
    labels:
      key: example
      app: nginx

    chart: ../helm-charts/example
    version: 0.1.0
    set:
    - name: service.type
      value: NodePort
    - name: service.nodePortValue
      value: 31412
   # Example helm chart (Nginx Web Server)
   # helm3 install example helm-charts/example \
   # --set service.type=NodePort \
   # --set service.nodePortValue=31412


  # "Gogs" helm chart release specification
  - name: test
    labels:
      key: gogs
      app: gogs

    chart: ../helm-charts/gogs
    version: 0.7.11
    set:
    - name: service.httpNodePort
      value: 30222
    - name: service.sshNodePort
      value: 30111

    # Gogs helm chart via helm v3
    # helm3 install test \
    # --set service.httpNodePort=30222 \
    # --set service.sshNodePort=30111 .
32. Deploy example and gogs helm charts via helmfile to your Kubernetes cluster
Do not forget to create SSH tunnel to open up NodePort values
# Create SSH tunnel to avoid opening
# of an extra nodePorts:
#     - 31412 (Nginx Web server)
#     - 30111 (SSH)
#     - 30222 (HTTP)

ssh \
-L31412:127.0.0.1:31412 \
-L30111:127.0.0.1:30111 \
-L30222:127.0.0.1:30222 \
-i ~/.ssh/udemy_devopsinuse \
admin@35.158.122.228
Alternatively you can allow this port 31412 in “Security group” section in your AWS console
Deploy “example” and “gogs” helm charts via helmfile to your Kubernetes cluster in AWS
export HELMFILE_ENVIRONMENT="learning"
# deploy without usig --selector flag
helmfile \
--environment learning \
--file helmfiles/helmfile-for-example-and-gogs-helm-charts.yaml sync

# deploy "example" helm chart via helmfile using  --selector flag
helmfile \
--environment learning \
--selector key=example \
--file helmfiles/helmfile-for-example-and-gogs-helm-charts.yaml sync

# deploy "example" helm chart via helmfile using  --selector flag
helmfile \
--environment learning \
--selector app=nginx \
--file helmfiles/helmfile-for-example-and-gogs-helm-charts.yaml sync

# deploy "Gogs" helm chart via helmfile using  --selector flag
helmfile \
--environment learning \
--selector key=gogs \
--file helmfiles/helmfile-for-example-and-gogs-helm-charts.yaml sync

# deploy "Gogs" helm chart via helmfile using  --selector flag
helmfile \
--environment learning \
--selector app=gogs \
--file helmfiles/helmfile-for-example-and-gogs-helm-charts.yaml sync
33. Explore helmfile specification for gogs and example helm charts via helmfile template
Explore helmfile template command for “example” helm chart deployment
# template "example" helm chart via helmfile

export HELMFILE_ENVIRONMENT="learning"
# template without usig --selector flag
helmfile \
--environment learning \
--file helmfiles/helmfile-for-example-and-gogs-helm-charts.yaml template | less

# template "example" helm chart via helmfile using  --selector flag
helmfile \
--environment learning \
--selector key=example \
--file helmfiles/helmfile-for-example-and-gogs-helm-charts.yaml template | less

# template "example" helm chart via helmfile using  --selector flag
helmfile \
--environment learning \
--selector app=nginx \
--file helmfiles/helmfile-for-example-and-gogs-helm-charts.yaml template | less

# template "Gogs" helm chart via helmfile using  --selector flag
helmfile \
--environment learning \
--selector key=gogs \
--file helmfiles/helmfile-for-example-and-gogs-helm-charts.yaml template | less

# template "Gogs" helm chart via helmfile using  --selector flag
helmfile \
--environment learning \
--selector app=gogs \
--file helmfiles/helmfile-for-example-and-gogs-helm-charts.yaml template | less
Please check current releases deployed in your Kubernetes cluster in AWS
helm3 ls -A
Destroy “gogs” and “example” helm charts via helmfile from your Kubernetes cluster in AWS
export HELMFILE_ENVIRONMENT="learning"
# destroy all without usig --selector flag
helmfile \
--environment learning \
--file helmfiles/helmfile-for-example-and-gogs-helm-charts.yaml destroy

# destroy "example" helm chart via helmfile using  --selector flag
helmfile \
--environment learning \
--selector key=example \
--file helmfiles/helmfile-for-example-and-gogs-helm-charts.yaml destroy

# destroy "example" helm chart via helmfile using  --selector flag
helmfile \
--environment learning \
--selector app=nginx \
--file helmfiles/helmfile-for-example-and-gogs-helm-charts.yaml destroy

# destroy "Gogs" helm chart via helmfile using  --selector flag
helmfile \
--environment learning \
--selector key=gogs \
--file helmfiles/helmfile-for-example-and-gogs-helm-charts.yaml destroy

# destroy "Gogs" helm chart via helmfile using  --selector flag
helmfile \
--environment learning \
--selector app=gogs \
--file helmfiles/helmfile-for-example-and-gogs-helm-charts.yaml destroy
34. Deploy MySQL helm chart from stable helm chart repository to your Kubernetes cluster running in AWS
Explore helmfiles/helmfile-for-mysql-helm-chart.yaml helmfile for MySQL deployment to Kubernetes
repositories:
# To use official "stable" charts
- name: stable
  url: https://kubernetes-charts.storage.googleapis.com

# Export your environment e.g "learning", "dev", ..., "prod"
# export HELMFILE_ENVIRONMENT="learning"

environments:
  {{ requiredEnv "HELMFILE_ENVIRONMENT" }}:
    values:
      - values.yaml

releases:
  # "example" helm chart release specification
  - name: mysql
    labels:
      key: database
      app: mysql

    chart: stable/mysql
    version: 1.6.2
    set:
    - name: service.type
      value: NodePort
    - name: service.nodePort
      value: 30333
    - name: mysqlRootPassword
      value: Start123
    - name: persistence.enabled
      value: true
    - name: persistence.size
      value: 1Gi
Compare it with an original helm3 command used to deploy “mysql” helm chart to your Kubernetes cluster in AWS
helm3 install mysql stable/mysql \
--set mysqlRootPassword=Start123 \
--set persistence.enabled=true \
--set persistence.size=1Gi \
--set service.type=NodePort \
--set service.nodePort=30333
Helmfile template mysql helm chart deployment
helmfile --environment learning \
--file helmfiles/helmfile-for-mysql-helm-chart.yaml template
Helmfile deploy mysql helm chart deployment
helmfile --environment learning \
--file helmfiles/helmfile-for-mysql-helm-chart.yaml sync
Helmfile destroy mysql helm chart deployment
helmfile --environment learning \
--file helmfiles/helmfile-for-mysql-helm-chart.yaml destroy
Establish SSH tunnel to open up NodePort value for MySQL
# Create SSH tunnel to avoid opening
# of an extra nodePorts:
#     - 30333 (MySQL)

ssh \
-L30333:127.0.0.1:30333 \
-i ~/.ssh/udemy_devopsinuse \
admin@35.158.122.228
You can allow this port 30333 in “Security group” section in your AWS console
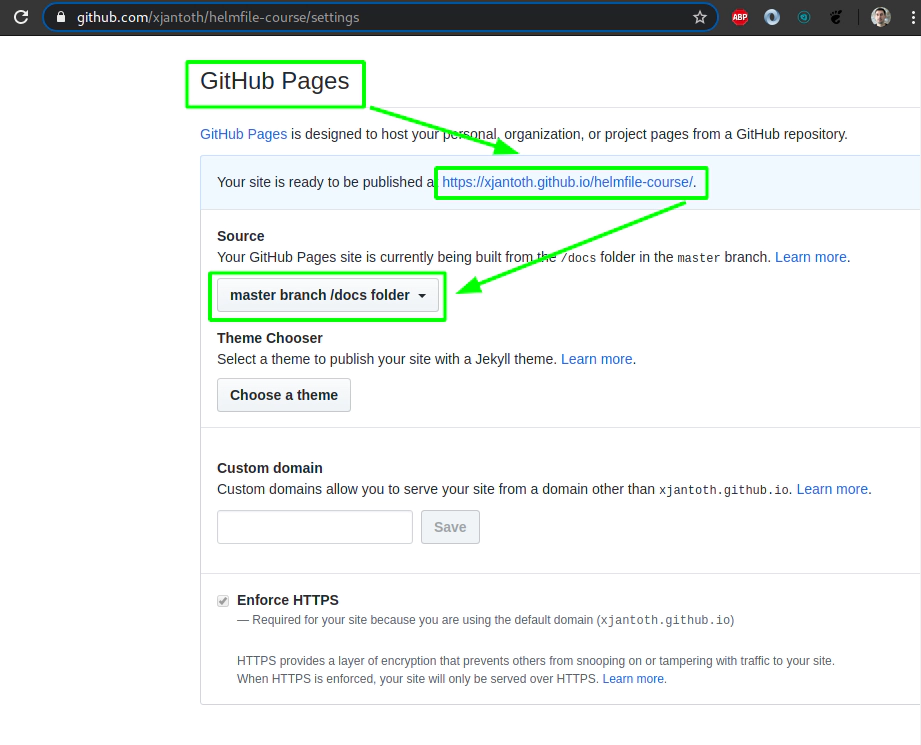
35. Create helm chart repository at your Github account
Create helm v3 helm chart repository at your Github repository
git clone https://github.com/xjantoth/helmfile-course.git
cd helmfile-course
mkdir -p docs/hc-v3-repo
helm3 repo add stable https://kubernetes-charts.storage.googleapis.com/
helm3 repo update
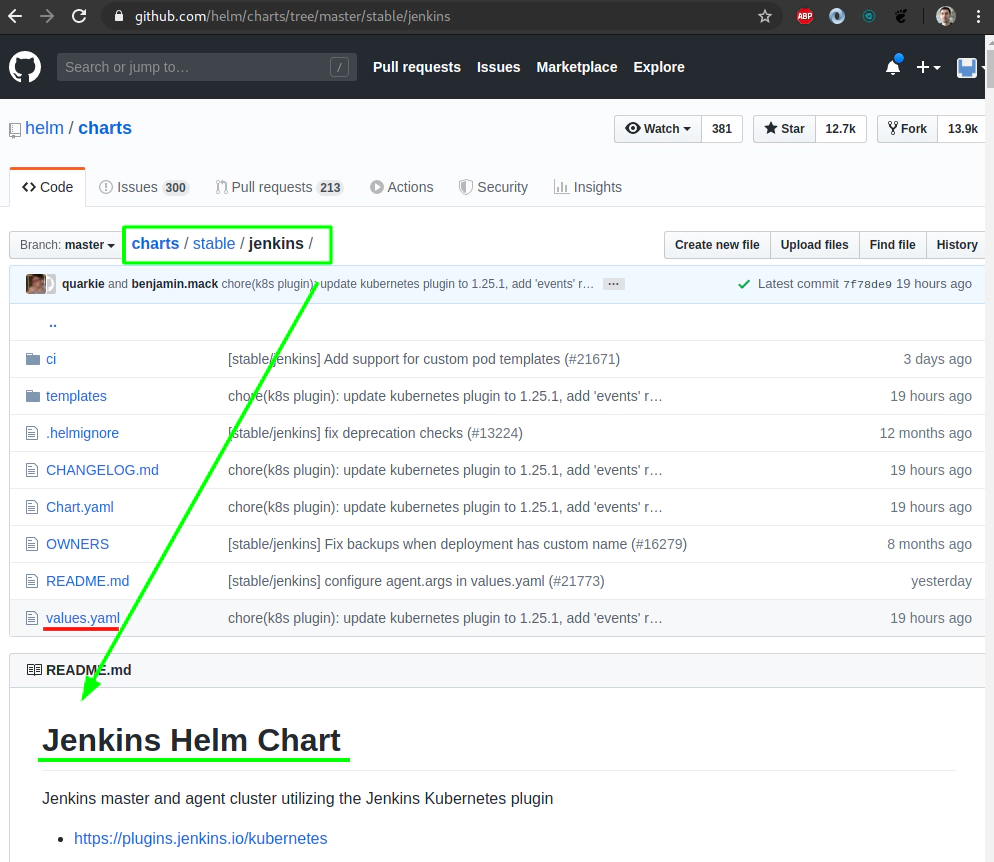
helm3 search repo stable/jenkins -l | head -n 2
NAME CHART VERSION APP VERSION DESCRIPTION
stable/jenkins 1.11.3 lts Open source continuous integration server. It s...
# Fetch Jenkins helm chart from a "stable" helm chart repo
helm3 fetch stable/jenkins --destination docs/hc-v3-repo/
ls -l docs/hc-v3-repo/
helm3 repo index docs/hc-v3-repo
# git add .; git commit -m "..." and git push your changes to remote
git add docs/hc-v3-repo
git commit -m "Creating helm v3 chart repository docs/hc-v3-repo"
git push
Add hc-v3-repo to your local helm chart repositories
helm3 repo add hc-v3-repo https://xjantoth.github.io/helmfile-course/hc-v3-repo
helm3 repo update
helm3 repo list
helm3 search repo hc-v3-repo/
Check your list of available helm chart repositories at your local machine
helm3 repo ls
NAME      	URL
stable    	https://kubernetes-charts.storage.googleapis.com
incubator 	https://kubernetes-charts-incubator.storage.googleapis.com/
hc-v3-repo	https://xjantoth.github.io/helmfile-course/hc-v3-repo

helm3 repo update
Hang tight while we grab the latest from your chart repositories...
...Successfully got an update from the "hc-v3-repo" chart repository
...Successfully got an update from the "incubator" chart repository
...Successfully got an update from the "stable" chart repository
Update Complete. ⎈ Happy Helming!⎈
Try to search through your own helm chart repository at your Github account
helm3 search repo hc-v3-repo/
NAME              	CHART VERSION	APP VERSION	DESCRIPTION
hc-v3-repo/jenkins	1.11.3       	lts        	Open source continuous integration server. It s...
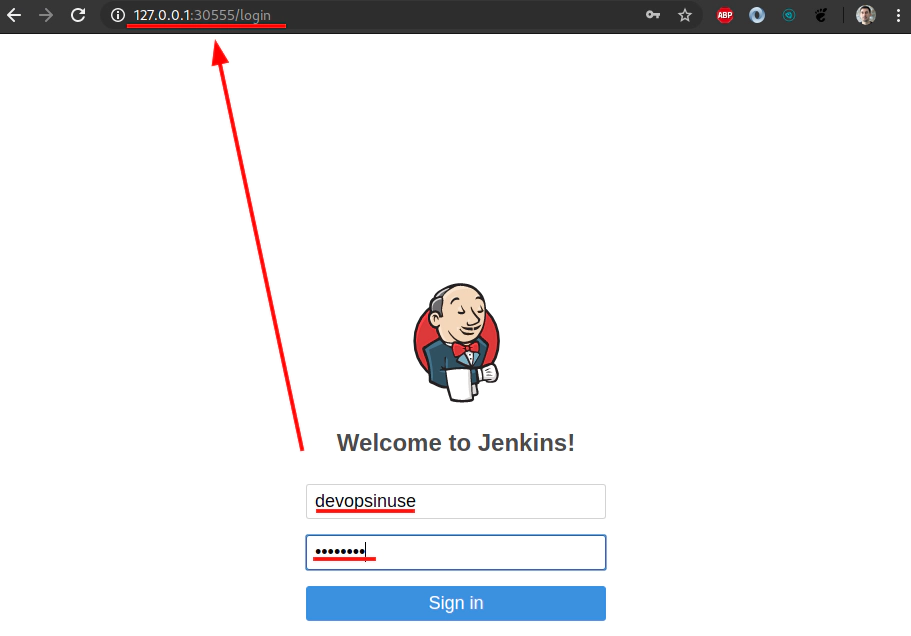
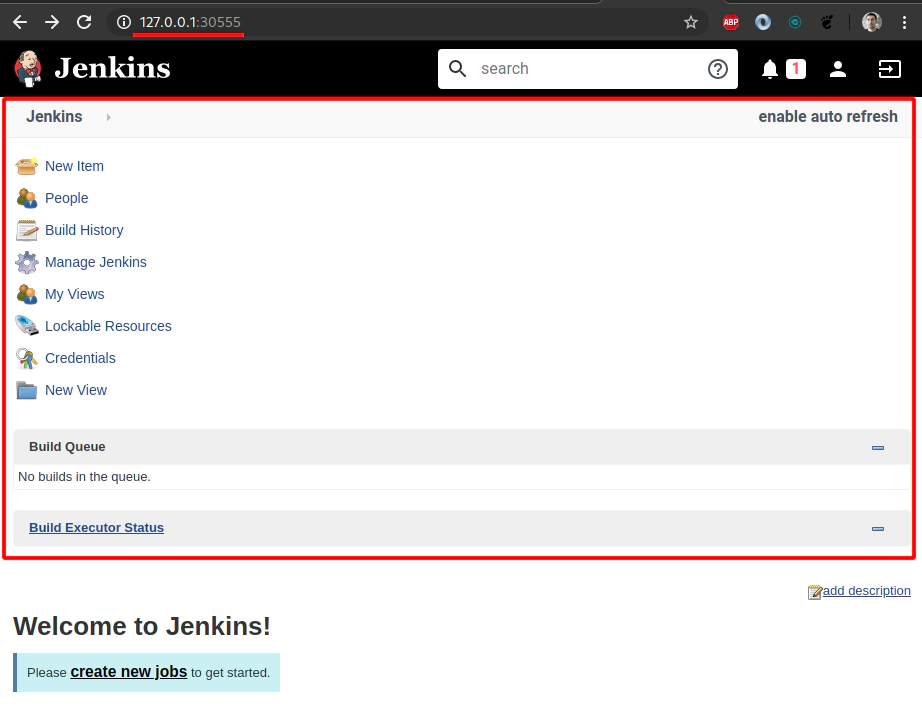
36. Deploy Jenkins via helmfile from your own Github helm chart repository
file: helmfiles/helmfile-for-jenkins.yaml
Run: export HELMFILE_ENVIRONMENT="learning"
repositories:
# To use Github helm chart repo
- name: hc-v3-repo
url: https://xjantoth.github.io/helmfile-course/hc-v3-repo
# Export your environment e.g "learning", "dev", ..., "prod"
# export HELMFILE_ENVIRONMENT="learning"
environments:
{{ requiredEnv "HELMFILE_ENVIRONMENT" }}:
values:
- values.yaml
releases:
# "jenkins" helm chart release specification
- name: jenkins
labels:
key: ci
app: jenkins
chart: hc-v3-repo/jenkins
version: 1.11.3
set:
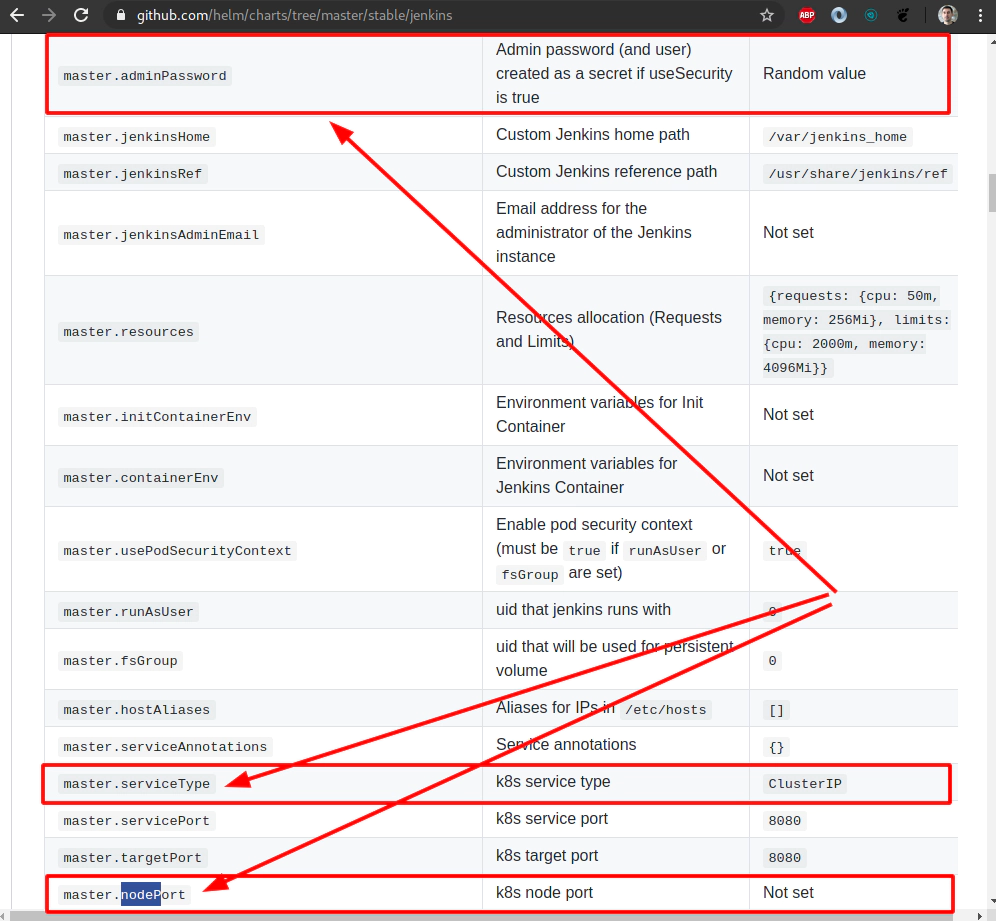
- name: master.serviceType
value: NodePort
- name: master.nodePort
value: 30555
- name: master.adminUser
value: "devopsinuse"
- name: master.adminPassword
value: "Start123"
- name: persistence.enabled
value: true
- name: persistence.size
value: 1Gi
- name: agent.enabled
value: false
Template jenkins deployment via helmfile to your Kubernetes cluster in AWS
export HELMFILE_ENVIRONMENT="learning"

helmfile  \
--environment "learning" \
-f helmfiles/helmfile-for-jenkins.yaml \
template
Establish SSH tunnel to open up NodePort value for Jenkins
# Create SSH tunnel to avoid opening
# of an extra nodePorts:
#     - 30555 (Jenkins)

ssh \
-L30555:127.0.0.1:30555 \
-i ~/.ssh/udemy_devopsinuse \
admin@35.158.122.228
Alternatively allow NodePort in “Security group” section in AWS console
Execute jenkins deployment via helmfile to your Kubernetes cluster in AWS
export HELMFILE_ENVIRONMENT="learning"

helmfile  \
--environment "learning" \
-f helmfiles/helmfile-for-jenkins.yaml \
sync
 Destroy jenkins deployment via
 helmfile from your Kubernetes cluster in AWS
export HELMFILE_ENVIRONMENT="learning"

helmfile  \
--environment "learning" \
-f helmfiles/helmfile-for-jenkins.yaml \
destroy
37. Deploy Chartmuseum as a helm chart repository running as another deployment within your Kubernetes cluster in AWS
file: helmfiles/helmfile-for-chartmuseum.yaml
repositories:
# To use official "stable" charts
# a.k.a https://github.com/helm/charts/tree/master/stable
- name: stable
  url: https://kubernetes-charts.storage.googleapis.com

# This is helm chart repository made of Chartmuseum
# which is running as regular deployment within our cluster
#- name: k8s
#  url: http://127.0.0.1:30444/chartmuseum
#  username: devopsinuse
#  password: Start123

# Export your environment e.g "learning", "dev", ..., "prod"
# export HELMFILE_ENVIRONMENT="learning"
environments:
  {{ requiredEnv "HELMFILE_ENVIRONMENT" }}:
    values:
      - values.yaml

releases:
  # (Helm v3) Upgrade your deployment with basic auth
  - name: chartmuseum
    labels:
      key: chartmuseum
      app: chartmuseum

    chart: stable/chartmuseum
    version: 2.10.0
    set:
    - name: service.type
      value: NodePort
    - name: service.nodePort
      value: 30444
    - name: persistence.pv.enabled
      value: false
    - name: env.open.DISABLE_API
      value: false
    - name: env.open.CONTEXT_PATH
      value: "/chartmuseum"
    - name: ingress.enabled
      value: true
    - name: ingress.hosts[0].name
      value: "*"
    - name: ingress.hosts[0].path
      value: "/chartmuseum"
    - name: env.secret.BASIC_AUTH_USER
      value: "devopsinuse"
    - name: env.secret.BASIC_AUTH_PASS
      value: "Start123"
Compare helm deployment for Chartmuseum via helm3 binary
# (Helm v3) Upgrade your deployment with basic auth
helm3 install \
chartmuseum \
--set persistence.pv.enabled=false \
--set env.open.DISABLE_API=false \
--set env.open.CONTEXT_PATH="/chartmuseum" \
--set ingress.enabled=true \
--set ingress.hosts[0].name="chartmuseum" \
--set ingress.hosts[0].path="/chartmuseum" \
--set env.secret.BASIC_AUTH_USER="devopsinuse" \
--set env.secret.BASIC_AUTH_PASS="Start123" \
--set service.type=NodePort \
--set service.nodePort=30444 \
stable/chartmuseum
Establish SSH tunnel to open up NodePort value for Chartmuseum
# Create SSH tunnel to avoid opening
# of an extra nodePorts:
#     - 30444 (Chartmuseum)

ssh \
-L30444:127.0.0.1:30444 \
-i ~/.ssh/udemy_devopsinuse \
admin@35.158.122.228
Alternatively allow NodePort in “Security group” section in AWS console
# template only chartmuseum via helmfile using  --selector flag
helmfile \
--selector key=chartmuseum  \
--environment learning \
--file helmfiles/helmfile-for-chartmuseum.yaml \
 template

# deploy Chartmuseum via helmfile
helmfile  \
--selector key=chartmuseum  \
--environment "learning" \
-f helmfiles/helmfile-for-chartmuseum.yaml \
sync

# destroy Chartmuseum via helmfile if neceassary
helmfile  \
--selector key=chartmuseum  \
--environment "learning" \
-f helmfiles/helmfile-for-chartmuseum.yaml \
destroy
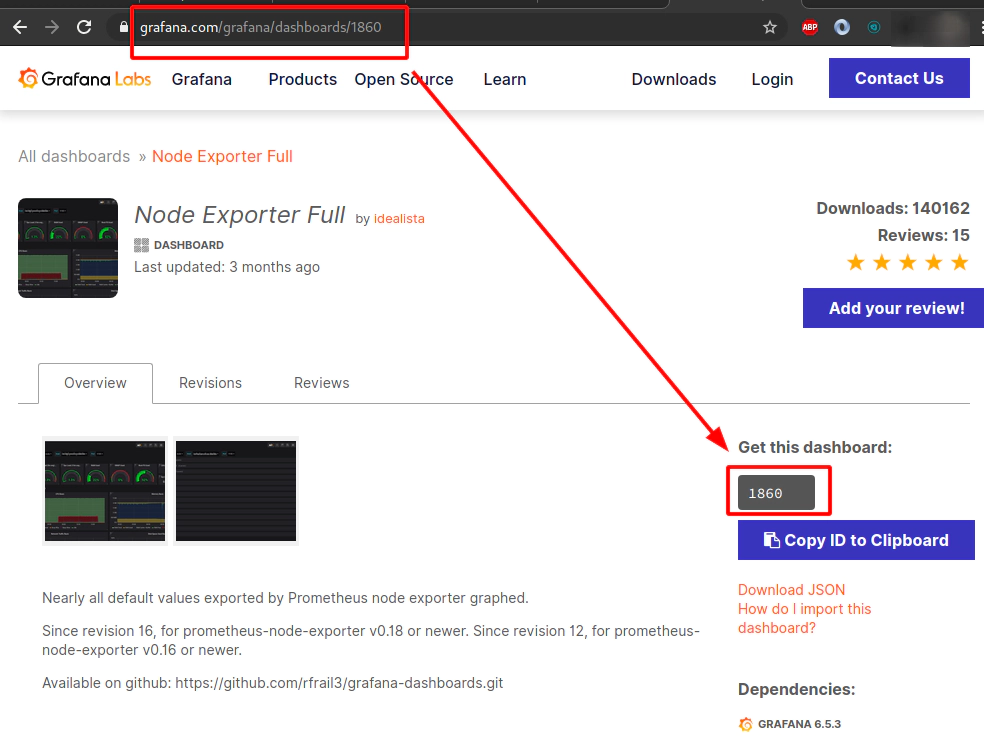
Fetch two helm charts Grafana, Prometheus to your local
helm3 fetch stable/grafana --destination docs/hc-v3-repo/
helm3 fetch stable/prometheus --destination docs/hc-v3-repo/

ls docs/hc-v3-repo/
total 108
-rw-r--r-- 1  1183 Apr index.yaml
-rw-r--r-- 1 46226 Apr jenkins-1.11.3.tgz
-rw-r--r-- 1 32899 Apr prometheus-11.0.6.tgz
-rw-r--r-- 1 19523 Apr grafana-5.0.11.tgz
Push helm chart to Chartmuseum with authentication
curl -u devopsinuse -XPOST --data-binary "@docs/hc-v3-repo/grafana-5.0.11.tgz" http://127.0.0.1:30444/chartmuseum/api/charts
{"saved":true}
curl -u devopsinuse -XPOST --data-binary "@docs/hc-v3-repo/prometheus-11.0.6.tgz" http://127.0.0.1:30444/chartmuseum/api/charts
{"saved":true}
Add Chartmuseum to the list of available helm chart repsitories
helm3 repo add k8s http://127.0.0.1:30444/chartmuseum --username devopsinuse --password Start123
helm3 repo update
helm3 search repo k8s/

# List all the helm chart present in Chartmuseum via API
curl -u devopsinuse -XGET http://127.0.0.1:30444/chartmuseum/api/charts
Delete (Helm v3) Chartmuseum deployment
helm3 delete chartmuseum
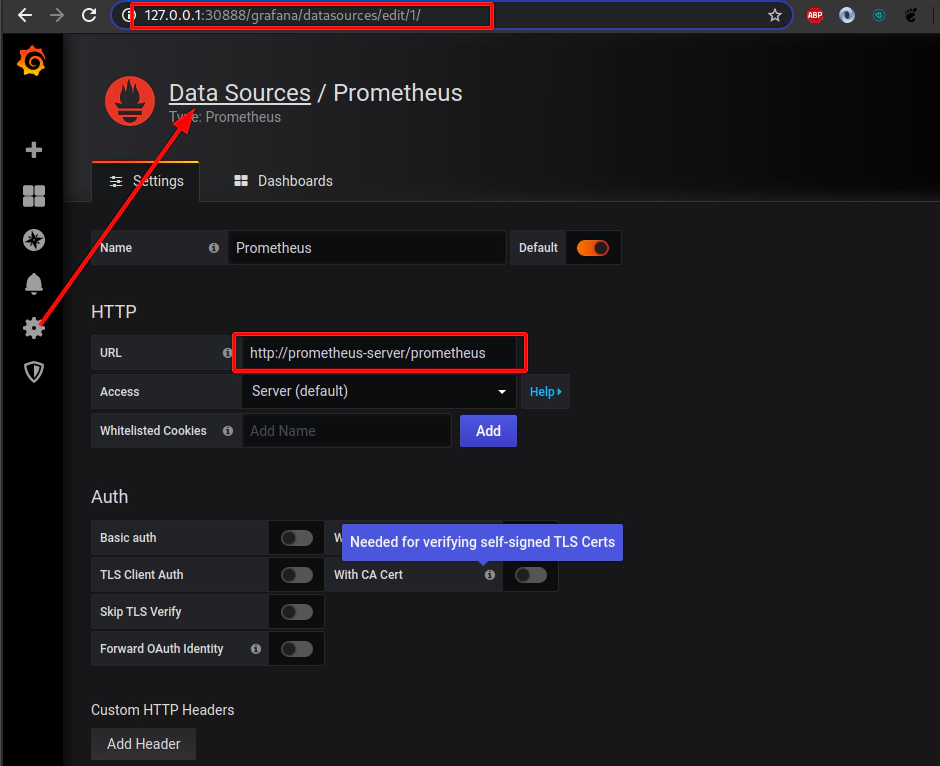
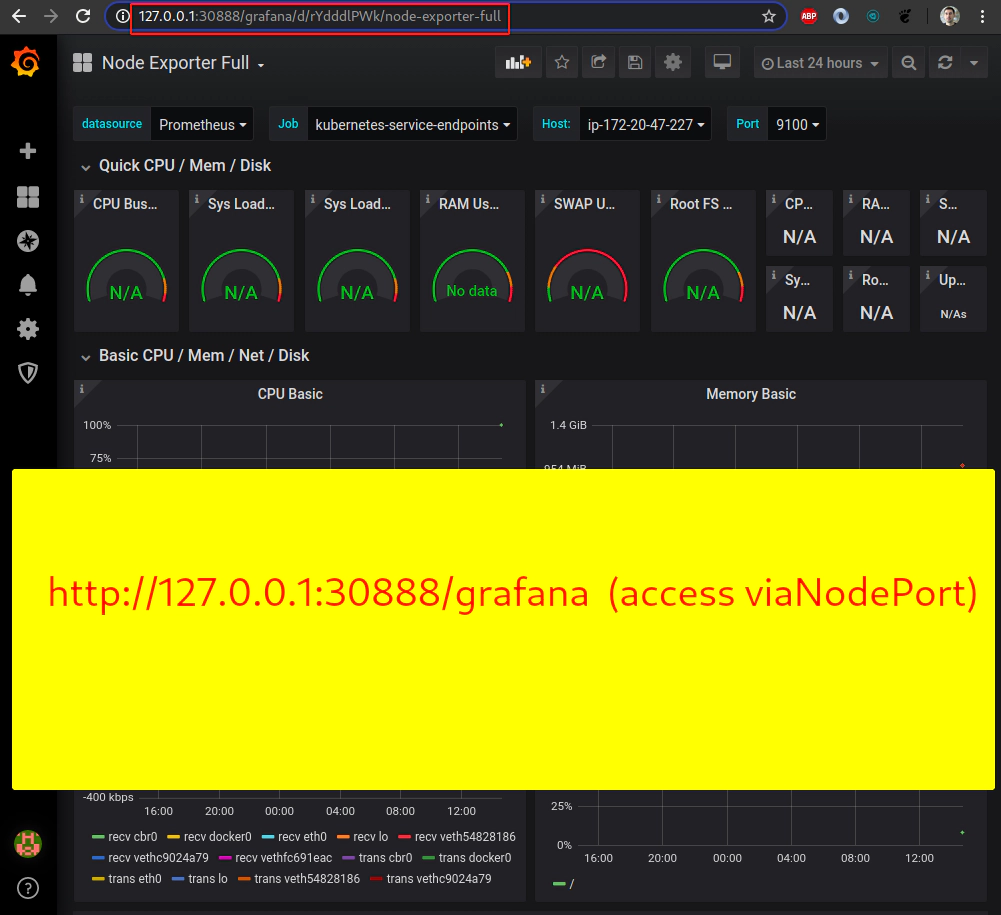
38. Grafana and Prometheus helm charts from Chartmuseum helm chart repository
file: helmfiles/helmfile-for-grafana-prometheus-from-chartmuseum.yaml
repositories:
# To use official "stable" charts
# a.k.a https://github.com/helm/charts/tree/master/stable
- name: stable
url: https://kubernetes-charts.storage.googleapis.com
# This is helm chart repository made of Chartmuseum
# which is running as regular deployment within our cluster
- name: k8s
url: http://127.0.0.1:30444/chartmuseum
username: devopsinuse
password: Start123
# Export your environment e.g "learning", "dev", ..., "prod"
# export HELMFILE_ENVIRONMENT="learning"
environments:
{{ requiredEnv "HELMFILE_ENVIRONMENT" }}:
values:
- values.yaml
releases:
# (Helm v3) Upgrade your deployment with basic auth
- name: grafana
labels:
key: monitoring
app: grafana
#chart: k8s/grafana
chart: k8s/grafana
version: 5.0.11
set:
- name: service.type
value: NodePort
- name: service.nodePort
value: 30888
# Change context path for grafana to /grafana
- name: "grafana\\.ini.server.root_url"
value: "%(protocol)s://%(domain)s:%(http_port)s/grafana/"
- name: "grafana\\.ini.server.serve_from_sub_path"
value: true
# Ingress related settings
#- name: ingress.enabled
# value: true
#- name: ingress.hosts[0]
# value: "devopsinuse"
#- name: "ingress.annotations.nginx\\.ingress\\.kubernetes\\.io\\/rewrite-target"
# value: "\\/$1"
#- name: ingress.path
# value: "/grafana/?(.*)"
# ./prometheus --config.file=prometheus.yml \
# --web.external-url http://localhost:19090/prometheus/ \
# --web.route-prefix=/prometheus
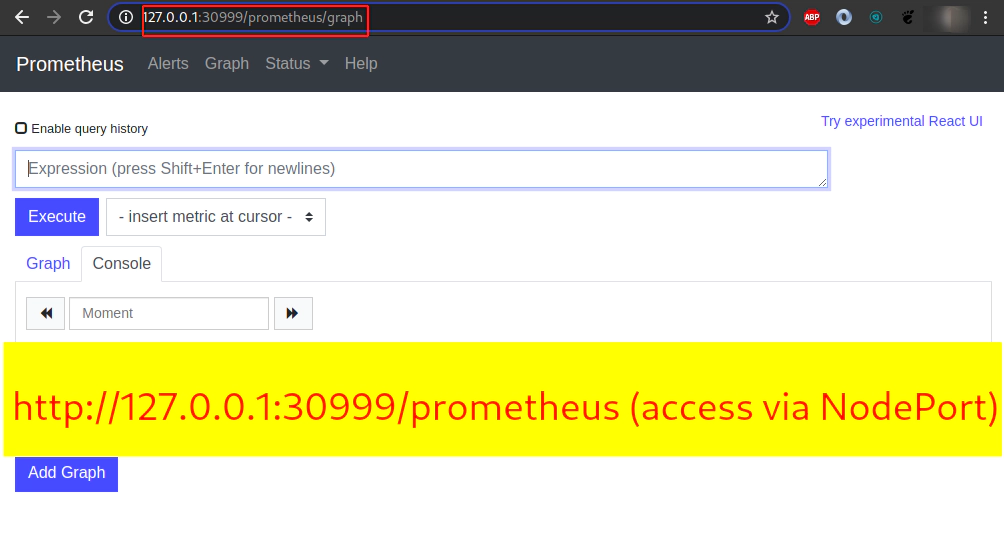
- name: prometheus
labels:
key: monitoring
app: prometheus
# chart: k8s/prometheus
chart: k8s/prometheus
version: 11.0.6
set:
# Modify service type to NodePort
- name: server.service.type
value: NodePort
- name: server.service.nodePort
value: 30999
# Disable Persistent data
- name: server.persistentVolume.enabled
value: false
# Disable extra Prometheus components
- name: pushgateway.enabled
value: false
- name: kubeStateMetrics.enabled
value: false
- name: alertmanager.enabled
value: false
# Change default / to /prometheus in runtime
- name: server.baseURL
value: "http://localhost:9090/prometheus"
- name: server.prefixURL
value: "/prometheus"
values:
- server:
extraArgs:
"web.route-prefix": "/prometheus"
# Ingress settings
#- name: server.ingress.enabled
# value: true
#- name: server.ingress.hosts[0]
# value: "devopsinuse/prometheus"
Template helm chart deployments with/without using --selectors
export HELMFILE_ENVIRONMENT="learning"

ssh \
-L30444:127.0.0.1:30444 \
-i ~/.ssh/udemy_devopsinuse \
admin@35.158.122.228

# template grafana, prometheus via helmfile
helmfile \
--environment learning \
--file helmfiles/helmfile-for-grafana-prometheus-from-chartmuseum.yaml \
 template

# template grafana, prometheus via helmfile
helmfile \
--selector key=monitoring  \
--environment learning \
--file helmfiles/helmfile-for-grafana-prometheus-from-chartmuseum.yaml \
 template

# template grafana via helmfile
helmfile \
--selector app=grafana  \
--environment learning \
--file helmfiles/helmfile-for-grafana-prometheus-from-chartmuseum.yaml \
 template

# template prometheus via helmfile
helmfile \
--selector app=prometheus  \
--environment learning \
--file helmfiles/helmfile-for-grafana-prometheus-from-chartmuseum.yaml \
 template
39. Deploy Grafana and Prometheus from Chartmuseum helm chart repository via helmfile to your Kubernetes cluster in AWS
Create SSH tunnel to open up NodePort values for Grafana and Prometheus deployment via helmfile
# Create SSH tunnel to avoid opening
# of an extra nodePorts:
#     - 30444 (Chartmuseum k8s helm chart repository)
#     - 30888 (Grafana)
#     - 30999 (Prometheus)

ssh \
-L30444:127.0.0.1:30444 \
-L30888:127.0.0.1:30888 \
-L30999:127.0.0.1:30999 \
-i ~/.ssh/udemy_devopsinuse \
admin@18.197.49.166
Alternatively you can allow this ports 30888, 30999 in “Security group” section in your AWS console
Deploy helm chart deployments with/without using --selectors
# deploy grafana, prometheus via helmfile
helmfile  \
--environment "learning" \
-f helmfiles/helmfile-for-grafana-prometheus-from-chartmuseum.yaml \
sync


# deploy grafana, prometheus via helmfile
helmfile  \
--selector key=monitoring  \
--environment "learning" \
-f helmfiles/helmfile-for-grafana-prometheus-from-chartmuseum.yaml \
sync


# deploy grafana via helmfile selectively via --selector app=grafana
helmfile  \
--selector app=grafana  \
--environment "learning" \
-f helmfiles/helmfile-for-grafana-prometheus-from-chartmuseum.yaml \
sync

# deploy prometheus via helmfile selectively via --selector app=prometheus
helmfile  \
--selector app=prometheus  \
--environment "learning" \
-f helmfiles/helmfile-for-grafana-prometheus-from-chartmuseum.yaml \
sync
Destroy helm chart deployments with/without using --selectors
# destroy grafana, prometheus via helmfile if neceassary
helmfile  \
--environment "learning" \
-f helmfiles/helmfile-for-grafana-prometheus-from-chartmuseum.yaml \
destroy

# destroy grafana, prometheus via helmfile if neceassary
helmfile  \
--selector key=monitoring  \
--environment "learning" \
-f helmfiles/helmfile-for-grafana-prometheus-from-chartmuseum.yaml \
destroy

# destroy grafana via helmfile if neceassary
helmfile  \
--selector app=grafana  \
--environment "learning" \
-f helmfiles/helmfile-for-grafana-prometheus-from-chartmuseum.yaml \
destroy

# destroy prometheus via helmfile if neceassary
helmfile  \
--selector app=prometheus  \
--environment "learning" \
-f helmfiles/helmfile-for-grafana-prometheus-from-chartmuseum.yaml \
destroy
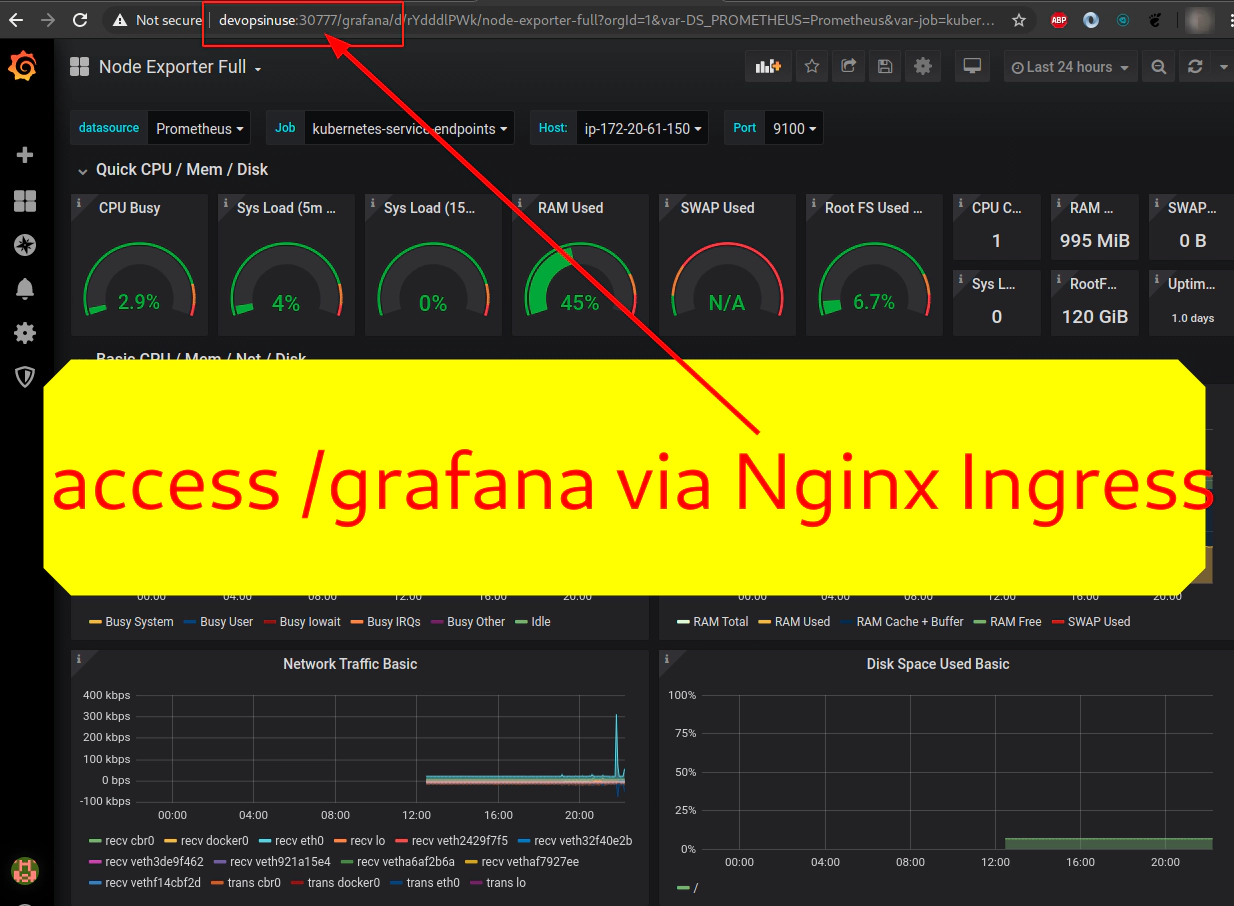
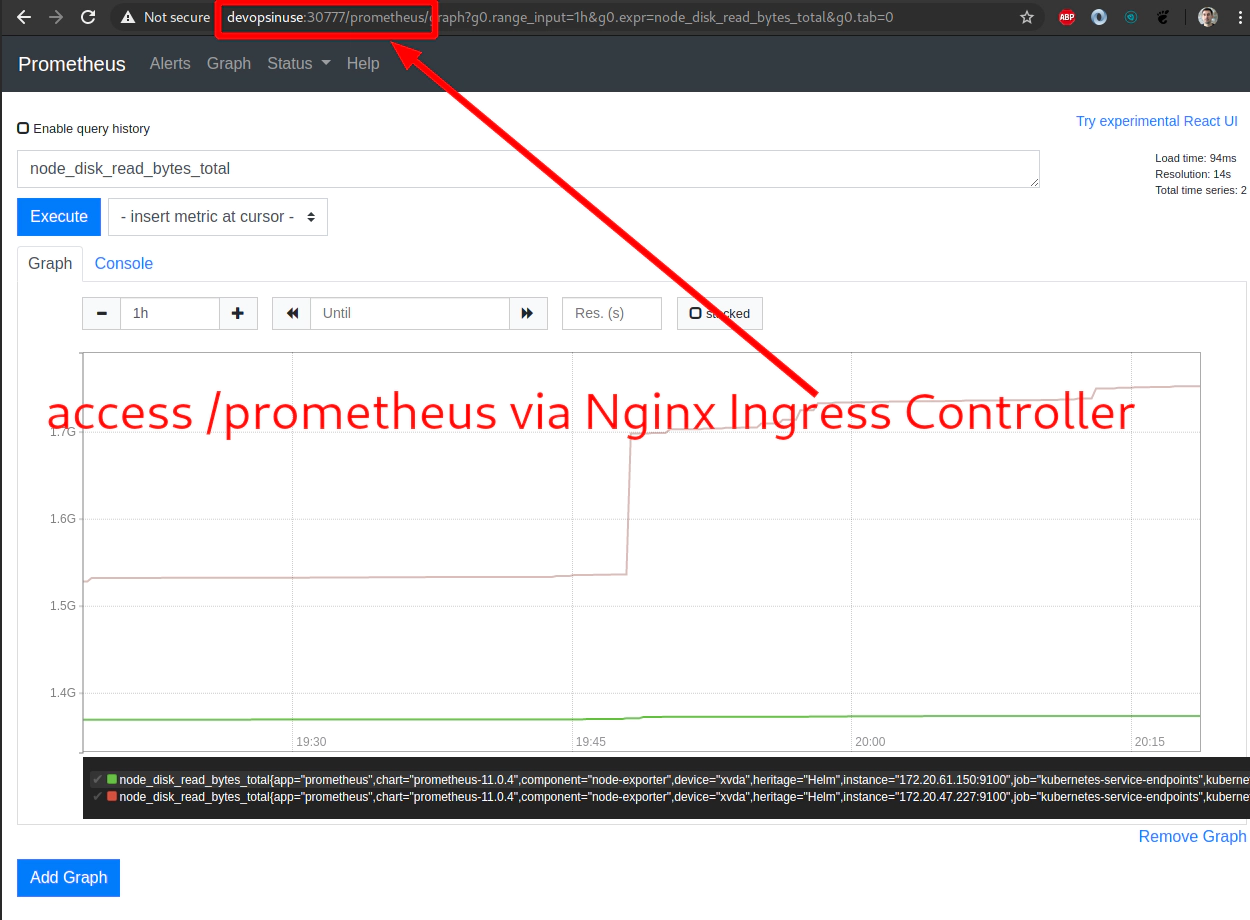
40. Explore deployment of Nginx ingress controller with NodePort to your Kubernetes cluster in AWS
file: helmfiles/helmfile-for-grafana-prometheus-nginx-from-chartmuseum.yaml
repositories:
- name: stable
  url: https://kubernetes-charts.storage.googleapis.com

# This is helm chart repository made of Chartmuseum which is running as regular deployment within our cluster
- name: k8s
  url: http://127.0.0.1:30444/chartmuseum
  username: devopsinuse
  password: Start123

# Export your environment e.g "learning", "dev", ..., "prod"
# export HELMFILE_ENVIRONMENT="learning"
environments:
  {{ requiredEnv "HELMFILE_ENVIRONMENT" }}:
    values:
      - values.yaml

releases:
  # (Helm v3) Upgrade your deployment with basic auth
  - name: grafana
    labels:
      key: monitoring
      app: grafana

    #chart: k8s/grafana
    chart: k8s/grafana
    version: 5.0.11
    set:
    #- name: service.type
    #  value: NodePort
    #- name: service.nodePort
    #  value: 30888

    # Change context path for grafana to  /grafana
    - name: "grafana\\.ini.server.root_url"
      value: "%(protocol)s://%(domain)s:%(http_port)s/grafana/"
    - name: "grafana\\.ini.server.serve_from_sub_path"
      value: true

    # Ingress related settings for Grafana
    - name: ingress.enabled
      value: {{ index .Environment.Values "grafana" "ingress.enabled" }}
    - name: ingress.hosts[0]
      value: {{ index .Environment.Values "grafana" "ingress.hosts[0]" }}
    - name: "ingress.annotations.nginx\\.ingress\\.kubernetes\\.io\\/rewrite-target"
      value: {{ index .Environment.Values "grafana" "ingress.annotations.nginx\\.ingress\\.kubernetes\\.io\\/rewrite-target" }}
    - name: ingress.path
      value: {{ index .Environment.Values "grafana" "ingress.path" }}

  # ./prometheus --config.file=prometheus.yml --web.external-url http://localhost:19090/prometheus/  --web.route-prefix=/prometheus

  - name: prometheus
    labels:
      key: monitoring
      app: prometheus

    chart: k8s/prometheus
    version: 11.0.6
    set:
    # Modify service type to NodePort
    #- name: server.service.type
    #  value: NodePort
    #- name: server.service.nodePort
    #  value: 30999

    # Disable Persistent data
    - name: server.persistentVolume.enabled
      value: false

    # Disable extra Prometheus components
    - name: pushgateway.enabled
      value: false
    - name: kubeStateMetrics.enabled
      value: false
    - name: alertmanager.enabled
      value: false

    # Ingress settings for Prometheus
    - name: server.ingress.enabled
      value: {{ index .Environment.Values "prometheus" "server.ingress.enabled" }}
    - name: server.ingress.hosts[0]
      value: {{ index .Environment.Values "prometheus" "server.ingress.hosts[0]" }}

    # Change default / to /prometheus in runtime
    - name: server.baseURL
      value: "http://localhost:9090/prometheus"
    - name: server.prefixURL
      value: "/prometheus"
    values:
      - server:
          extraArgs:
            "web.route-prefix": "/prometheus"

  # nginx-ingress deployment
  - name: nginx-ingress
    labels:
      key: proxy
      app: nginx-ingress

    #chart: k8s/grafana
    chart: stable/nginx-ingress
    version: 1.36.0
    set:
    - name: controller.service.type
      value: NodePort
    - name: controller.service.nodePorts.http
      value: 30777
file: helmfiles/values.yaml
grafana:
  # Ingress related settings for Grafana
  ingress.enabled: true
  ingress.hosts[0]: "devopsinuse"
  "ingress.annotations.nginx\\.ingress\\.kubernetes\\.io\\/rewrite-target": "\\/$1"
  ingress.path: "/grafana/?(.*)"

prometheus:
  # Ingress settings for Prometheus
  server.ingress.enabled: true
  server.ingress.hosts[0]: "devopsinuse/prometheus"
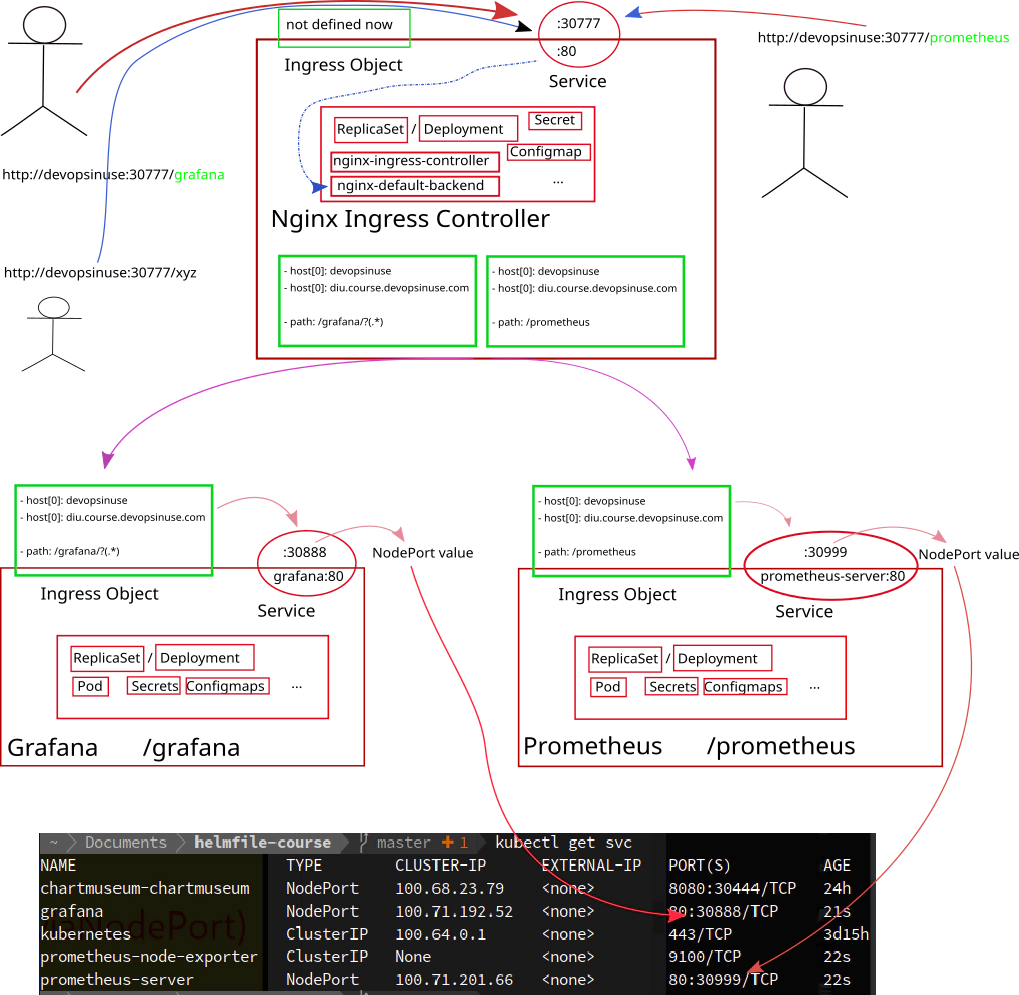
41. Deploy Nginx Ingress Controller and remove NodePorts for Grafana and Prometheus
Make sure you have Grafana and Prometheus helm charts in Chartmuseum
curl -u devopsinuse -XPOST --data-binary "@docs/hc-v3-repo/grafana-5.0.11.tgz" http://127.0.0.1:30444/chartmuseum/api/charts
{"saved":true}
curl -u devopsinuse -XPOST --data-binary "@docs/hc-v3-repo/prometheus-11.0.6.tgz" http://127.0.0.1:30444/chartmuseum/api/charts
{"saved":true}

helm3 repo update
helm3 search repo k8s/
Create SSH tunnel to open up NodePort values for Grafana and Prometheus deployment via helmfile
export HELMFILE_ENVIRONMENT="learning"

# Create SSH tunnel to avoid opening
# of an extra nodePorts:
#     - 30444 (Chartmuseum k8s helm chart repository)
#     - 30777 (Nginx Ingress Controller)

ssh \
-L30444:127.0.0.1:30444 \
-L30777:127.0.0.1:30777 \
-i ~/.ssh/udemy_devopsinuse \
admin@18.197.49.166
Alternatively you can allow this ports 30777, 30444 in “Security group” section in your AWS console
Template nginx-ingress deployment
export HELMFILE_ENVIRONMENT="learning"

# template nginx-ingress, grafana, prometheus
helmfile \
--selector app=grafana \
--selector app=prometheus \
--selector app=nginx-ingress \
--environment learning \
-f  helmfiles/helmfile-for-grafana-prometheus-nginx-from-chartmuseum.yaml \
template

# template grafana
helmfile \
--selector app=grafana \
--environment learning \
-f  helmfiles/helmfile-for-grafana-prometheus-nginx-from-chartmuseum.yaml \
template

# template prometheus
helmfile \
--selector app=prometheus \
--environment learning \
-f  helmfiles/helmfile-for-grafana-prometheus-nginx-from-chartmuseum.yaml \
template


# template nginx-ingress
helmfile \
--selector app=nginx-ingress \
--environment learning \
-f  helmfiles/helmfile-for-grafana-prometheus-nginx-from-chartmuseum.yaml \
template
Deploy nginx-ingress, grafana, prometheus deployment
# sync nginx-ingress, grafana, prometheus
helmfile \
--selector app=grafana \
--selector app=prometheus \
--selector app=nginx-ingress \
--environment learning \
-f  helmfiles/helmfile-for-grafana-prometheus-nginx-from-chartmuseum.yaml \
sync

# sync grafana
helmfile \
--selector app=grafana \
--environment learning \
-f  helmfiles/helmfile-for-grafana-prometheus-nginx-from-chartmuseum.yaml \
sync

# sync prometheus
helmfile \
--selector app=prometheus \
--environment learning \
-f  helmfiles/helmfile-for-grafana-prometheus-nginx-from-chartmuseum.yaml \
sync


# sync nginx-ingress
helmfile \
--selector app=nginx-ingress \
--environment learning \
-f  helmfiles/helmfile-for-grafana-prometheus-nginx-from-chartmuseum.yaml \
sync
Retrive Grafana admin password
kubectl get secret --namespace default grafana -o jsonpath="{.data.admin-password}" | base64 --decode ; echo
 cat /etc/hosts
# Static table lookup for hostnames.
# See hosts(5) for details.
#
#

...
127.0.0.1 devopsinuse
...
Take a look to Nginx Ingress controller from a running pod
kubectl get pods  | grep nginx
nginx-ingress-controller-794878944b-cvp7d        1/1     Running   0          14m
nginx-ingress-default-backend-5b967cf596-qm595   1/1     Running   0          14m


kubectl exec -it \
nginx-ingress-controller-794878944b-cvp7d \
-- cat /etc/nginx/nginx.conf > nginx-ingress-cong-from-running-pod.conf
Destroy nginx-ingress, grafana, prometheus deployment
# destroy nginx-ingress
helmfile \
--selector app=grafana \
--selector app=prometheus \
--selector app=nginx-ingress \
--environment learning \
-f  helmfiles/helmfile-for-grafana-prometheus-nginx-from-chartmuseum.yaml \
destroy
42. Explore Nginx Ingress Controller as LoadBalancer
file: helmfiles/helmfile-for-grafana-prometheus-nginx-loadbalancer-from-chartmuseum.yaml
repositories:
# To use official "stable" charts
# a.k.a https://github.com/helm/charts/tree/master/stable
- name: stable
  url: https://kubernetes-charts.storage.googleapis.com

# This is helm chart repository made of Chartmuseum
# which is running as regular deployment within our cluster
- name: k8s
  url: http://127.0.0.1:30444/chartmuseum
  username: devopsinuse
  password: Start123

# Export your environment e.g "learning", "dev", ..., "prod"
# export HELMFILE_ENVIRONMENT="learning"
environments:
  {{ requiredEnv "HELMFILE_ENVIRONMENT" }}:
    values:
      - values.yaml

releases:
  # (Helm v3) Upgrade your deployment with basic auth
  - name: grafana
    labels:
      key: monitoring
      app: grafana

    #chart: k8s/grafana
    chart: k8s/grafana
    version: 5.0.11
    set:
    #- name: service.type
    #  value: NodePort
    #- name: service.nodePort
    #  value: 30888

    # Change context path for grafana to  /grafana
    - name: "grafana\\.ini.server.root_url"
      value: "%(protocol)s://%(domain)s:%(http_port)s/grafana/"
    - name: "grafana\\.ini.server.serve_from_sub_path"
      value: true

    # Ingress related settings for Grafana
    - name: ingress.enabled
      value: {{ index .Environment.Values "grafana" "ingress.enabled" }}
    - name: ingress.hosts[0]
      value: {{ index .Environment.Values "grafana" "ingress.hosts[0]" }}
    - name: ingress.hosts[1]
      value: {{ index .Environment.Values "grafana" "ingress.hosts[1]" }}
    - name: "ingress.annotations.nginx\\.ingress\\.kubernetes\\.io\\/rewrite-target"
      value: {{ index .Environment.Values "grafana" "ingress.annotations.nginx\\.ingress\\.kubernetes\\.io\\/rewrite-target" }}
    - name: ingress.path
      value: {{ index .Environment.Values "grafana" "ingress.path" }}

  # ./prometheus --config.file=prometheus.yml \
  # --web.external-url http://localhost:19090/prometheus/ \
  # --web.route-prefix=/prometheus

  - name: prometheus
    labels:
      key: monitoring
      app: prometheus

    chart: k8s/prometheus
    version: 11.0.6
    set:
    # Modify service type to NodePort
    #- name: server.service.type
    #  value: NodePort
    #- name: server.service.nodePort
    #  value: 30999

    # Disable Persistent data
    - name: server.persistentVolume.enabled
      value: false

    # Disable extra Prometheus components
    - name: pushgateway.enabled
      value: false
    - name: kubeStateMetrics.enabled
      value: false
    - name: alertmanager.enabled
      value: false


    # Ingress settings for Prometheus
    - name: server.ingress.enabled
      value: {{ index .Environment.Values "prometheus" "server.ingress.enabled" }}
    - name: server.ingress.hosts[0]
      value: {{ index .Environment.Values "prometheus" "server.ingress.hosts[0]" }}
    - name: server.ingress.hosts[1]
      value: {{ index .Environment.Values "prometheus" "server.ingress.hosts[1]" }}

    # Change default / to /prometheus in runtime
    - name: server.baseURL
      value: "http://localhost:9090/prometheus"
    - name: server.prefixURL
      value: "/prometheus"
    values:
      - server:
          extraArgs:
            "web.route-prefix": "/prometheus"

  # nginx-ingress deployment
  - name: nginx-ingress
    labels:
      key: proxy
      app: nginx-ingress

    #chart: k8s/grafana
    chart: stable/nginx-ingress
    version: 1.36.0
    set:
    - name: controller.service.type
      value: LoadBalancer
    #- name: controller.service.nodePorts.http
    #  value: 30777
file: helmfiles/values.yaml
grafana:
  # Ingress related settings for Grafana
  ingress.enabled: true
  ingress.hosts[0]: "devopsinuse"
  ingress.hosts[1]: "diu.course.devopsinuse.com"
  "ingress.annotations.nginx\\.ingress\\.kubernetes\\.io\\/rewrite-target": "\\/$1"
  ingress.path: "/grafana/?(.*)"

prometheus:
  # Ingress settings for Prometheus
  server.ingress.enabled: true
  server.ingress.hosts[0]: "devopsinuse/prometheus"
  server.ingress.hosts[1]: "diu.course.devopsinuse.com/prometheus"
43. Deploy Nginx Ingress Controller as LoadBalancer type of service
Create SSH tunnel to open up NodePort values for Grafana and Prometheus deployment via helmfile
export HELMFILE_ENVIRONMENT="learning"

# Create SSH tunnel to avoid opening
# of an extra nodePorts:
#     - 30444 (Chartmuseum k8s helm chart repository)

ssh \
-L30444:127.0.0.1:30444 \
-i ~/.ssh/udemy_devopsinuse \
admin@18.197.49.166
Alternatively you can allow this port 30444 in “Security group” section in your AWS console
Template grafana, prometheus and nginx-ingress controller deployments
helmfile \
--selector app=grafana \
--selector app=prometheus \
--selector app=nginx-ingress \
--environment learning \
-f helmfiles/helmfile-for-grafana-prometheus-nginx-loadbalancer-from-chartmuseum.yaml \
template
Deploy Nginx Ingress Controller as LoadBalancer type of service
helmfile \
--selector app=grafana \
--selector app=prometheus \
--selector app=nginx-ingress \
--environment learning \
-f helmfiles/helmfile-for-grafana-prometheus-nginx-loadbalancer-from-chartmuseum.yaml \
sync
Retrive Grafana Password
kubectl get secret \
--namespace default grafana \
-o jsonpath="{.data.admin-password}" \
| base64 --decode ; echo
Destroy your deployment for grafana, prometheus and nginx ingres controller
helmfile \
--selector app=grafana \
--selector app=prometheus \
--selector app=nginx-ingress \
--environment learning \
-f helmfiles/helmfile-for-grafana-prometheus-nginx-loadbalancer-from-chartmuseum.yaml \
destroy
Create A-record diu.course.devopsinuse.com in Route53 in AWS