Learn AWS EKS Kubernetes cluster and devops in AWS (Part 1)
Starting AWS EKS cluster manually in AWS web console
- 1. Introduction
- 2. EKS cluster costs few cents per hour
- 3. Allow seeing billing data for IAM user
- 4. Create budget in AWS to be notified by email
- 5. Create an extra user and group in AWS with admin privilages
- 6. Install awscli and kubectl binaries
- 7. Retrive programatic access from AWS and configure aws cli
- 8. Create EKS control plane IAM role in AWS web console
- 9. Create EKS node group IAM role in AWS web console
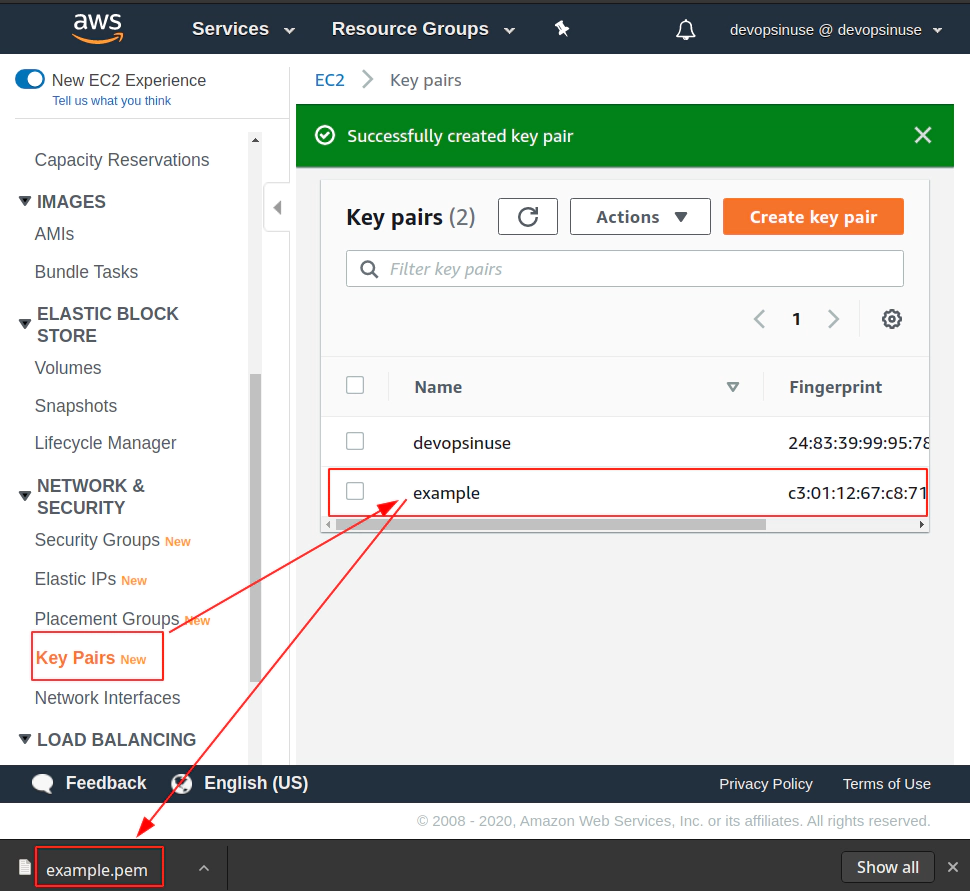
- 10. Create SSH key pair in AWS console
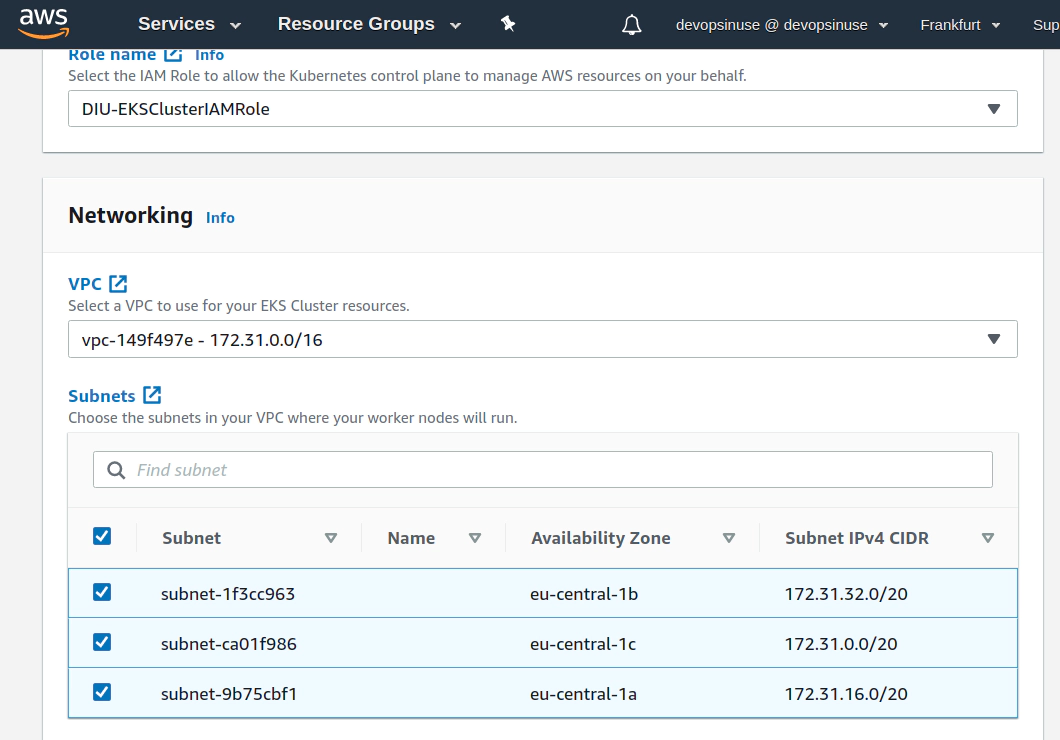
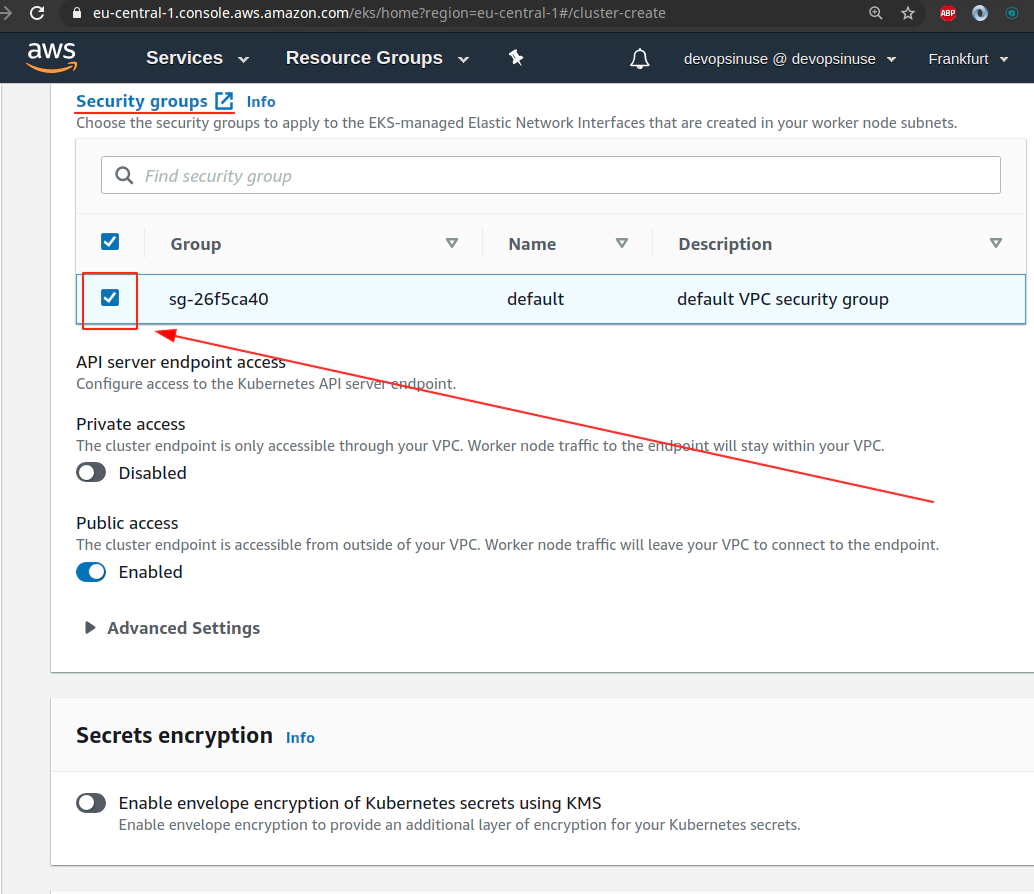
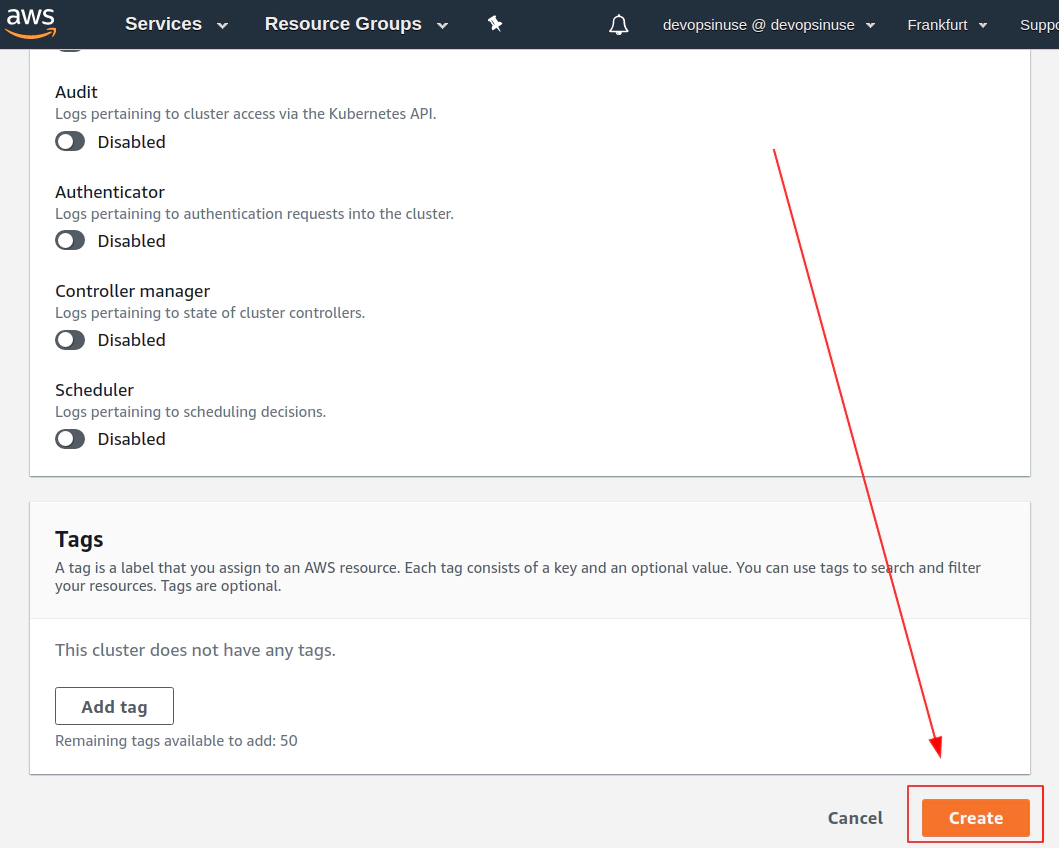
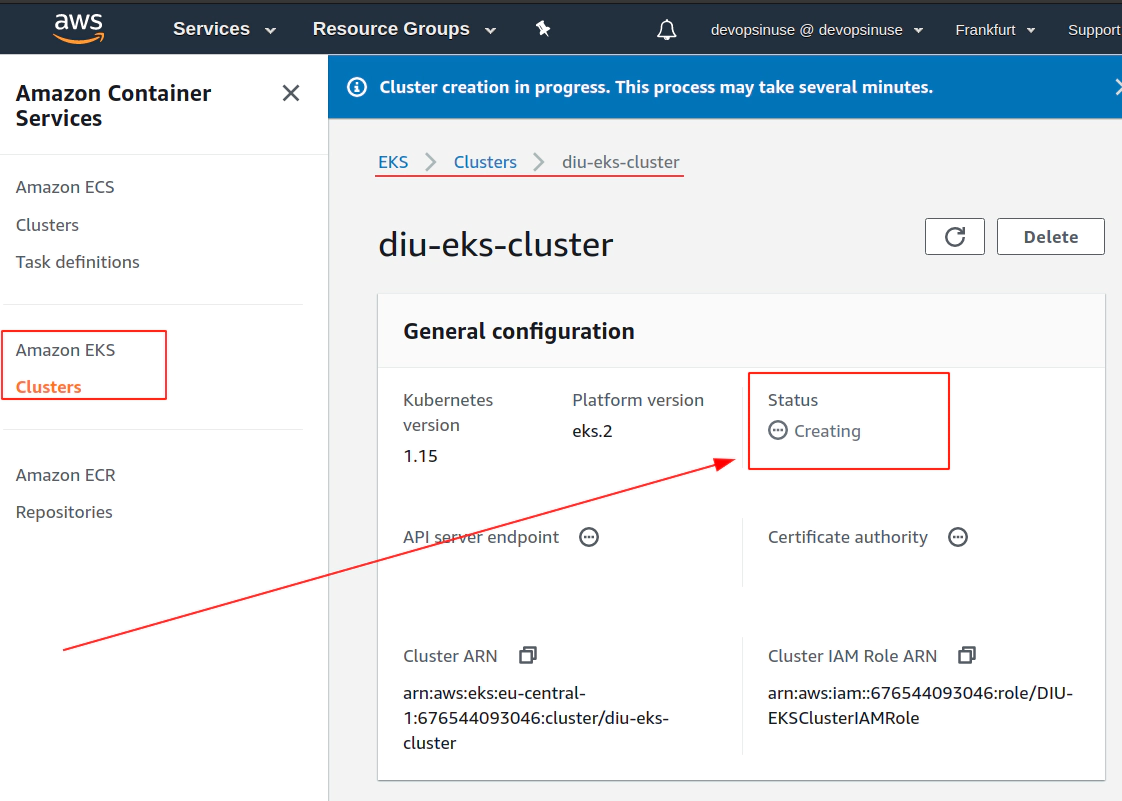
- 11. Create EKS cluster in AWS web console
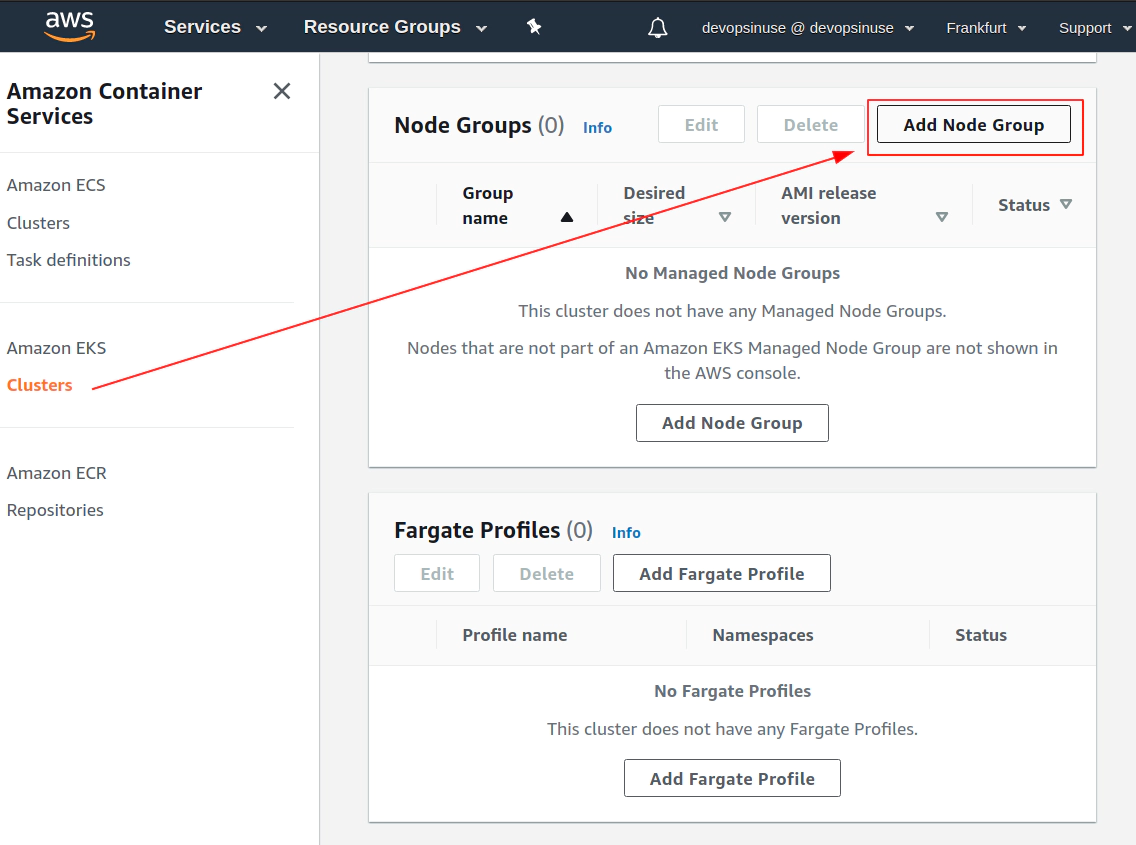
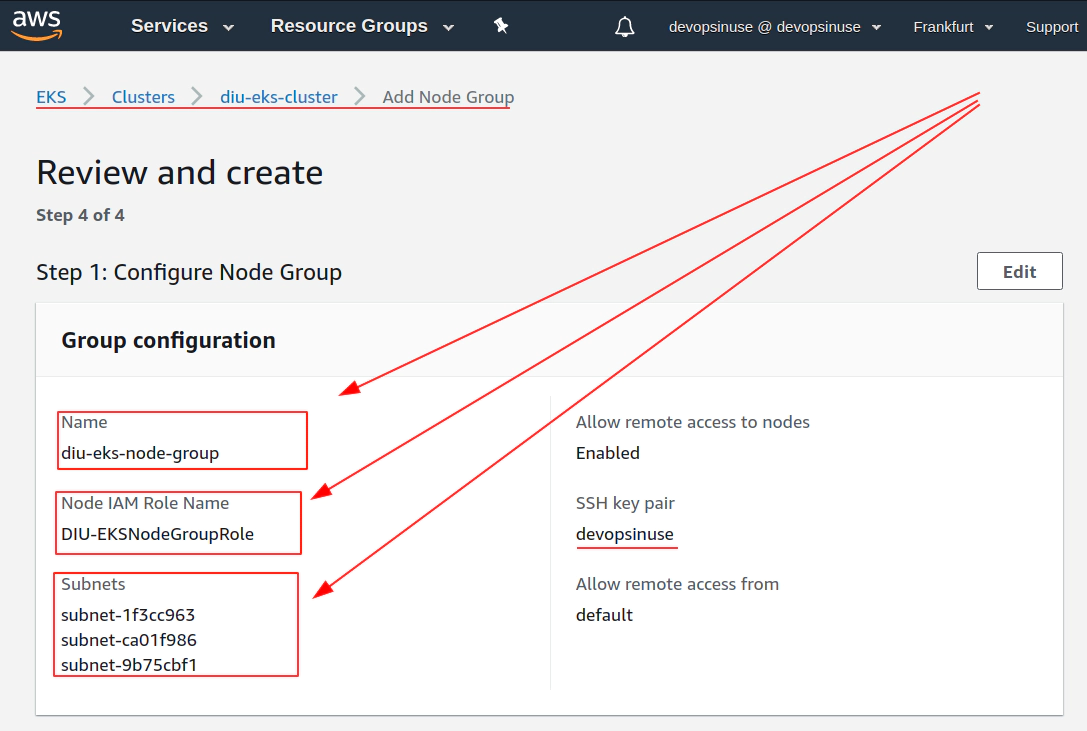
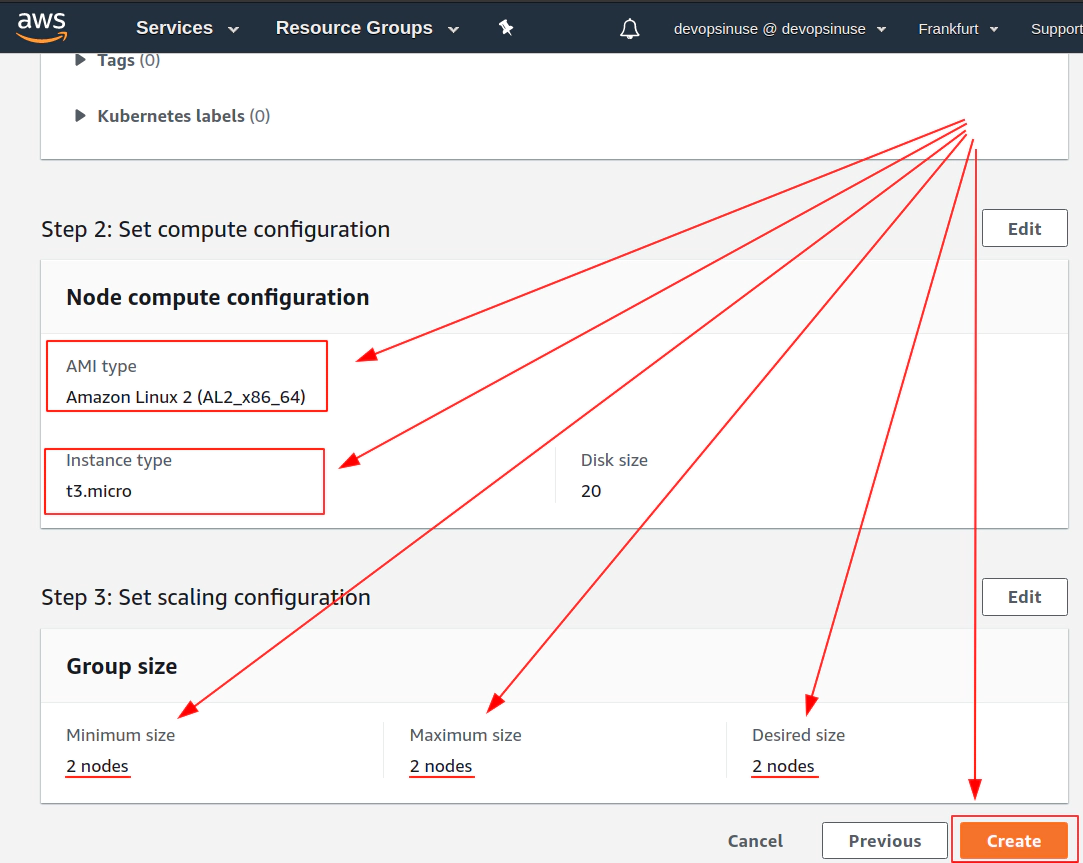
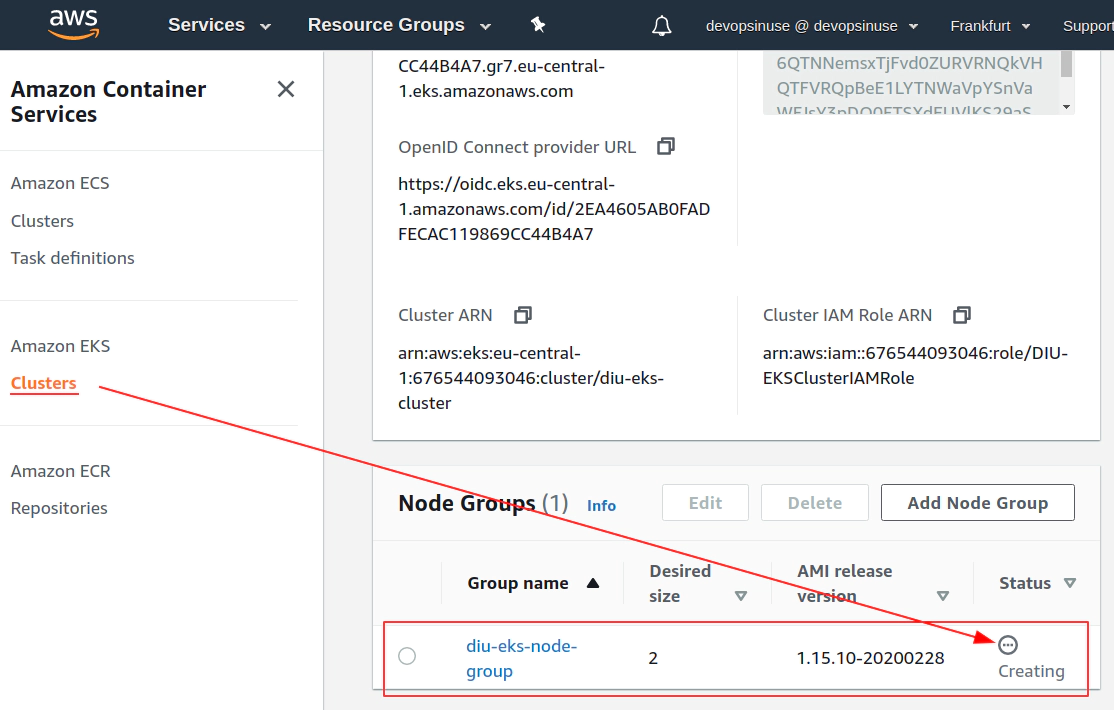
- 12. Create EKS node group in AWS web console
- 13. Create KUBECONFIG at your local
- 14. Create configmap for NGINX deployment to AWS EKS cluster
- 15. Execute Nginx deployment against AWS EKS Kubernetes cluster
- 16. Explore Nginx pod by attaching to a running container
- 17. SSH to physical EC2 instances within your Kubernetes cluster in AWS
- 18. Clean up
Using terrafrom to manage AWS EKS cluster
- 19. Install terrafrom binary at your local
- 20. Run terrafrom init and validate to initialize required plugins
- 21. Fill up terraform.eks.tfvars file with your AWS security credentials
- 22. Run terrafrom plan and terrafrom apply
- 23. Uncomment iam.tf and run terrafrom apply to create mandatory AWS IAM roles
- 24. Run terraform apply uncomment sg.tf to create extra Security Group
- 25. Uncomment file subnets.tf and run terraform apply to create Subnets in AWS
- 26. Uncomment aws eks cluster section in main.tf to create AWS EKS cluster control plane
- 27. Uncomment aws eks node group resource section in main.tf to create AWS EKS node group
- 28. Setup communication between your PC and AWS EKS cluster
- 29. Explore terrafrom console command
- 30. First NGINX deployment by kubectl to AWS EKS cluster created by terraform
- 31. Executing terrafrom destroy will not work when terrafrom run incrementaly
- 32. Provison and destroy AWS EKS Kubernetes cluster with terrafrom
Learn AWS EKS Kubernetes cluster with Helm Charts (Part 2)
Helm charts
- 33. Desired Infrastructure with helm charts
- 34. Setting up Infrastracture via docker-compose at local
- 35. Explore backend part of the setup
- 36. Push docker images to docker hub
- 37. Install helm and helmfile binaries
- 38. Creating backend helm chart
- 39. Modify Chart yaml file for backend helm chart
- 40. Modify values yaml file for backend helm chart
- 41. Modify service yaml file for backend helm chart
- 42. Modify deployment yaml file for backend helm chart
- 43. Create brand new secret yaml file for backend helm chart
- 44. Create helper function in helpers tpl file
- 45. Learn how to template backend helm chart and set values
- 46. Creating frontend React app helm chart
- 47. Setup values yaml file for frontend helm chart
- 48. Setup service yaml file for frontend helm chart
- 49. Setup deployment yaml file for frontend helm chart
- 50. Learn how to template frontend helm chart
Introduction to Part 2 of this course

Section 1. Provisioning of AWS EKS Kubernetes cluster manually in AWS console
- AWS EKS control plane ($0.10/hour per AWS EKS cluster)
- AWS EKS node group
- proceed with a simple Nginx web server Kubernetes deployment
Section 2. Write terrafrom code to provision AWS EKS K8S cluster automatically
- applying terrafrom code “file by file”
- apply all terrafrom code “all at once”
- demonstrate another simple Nginx web server Kubernetes deployment
- Tip:
terraform apply -var-file terraform.eks.tfvars- work with AWS EKS cluster …
helm delete <hc-name>,kubectl delete -f <file-name>.yamlterraform destroy -var-file terraform.eks.tfvars
Section 3. Leveraging helm charts for AWS EKS Kubernetes deployment
- creating frontend / backend + postgresql / nginx ingress controller architecture
- using custom made frontend / backend + postgresql applications
- creating onw frontend and backend helm charts
Important notes:
- please run
terraform destroy -var-file terraform.eks.tfvarswhenever you not using your resources in AWS - all materials can be found at my Github project
https://github.com/xjantoth/aws-eks-devopsinuse
- feel free to post any question into Q&A section
- all videos are recorded in Full HD however Udemy’s player use HD
- I’m greatful for your reviews - please drop some COMMENTS :)
- please setup budget within your Free AWS account to be notified if from some reason AWS is going to charge some fees.
- the best way how to use this cousre: Materials for each lecture at xjantoth Github repository
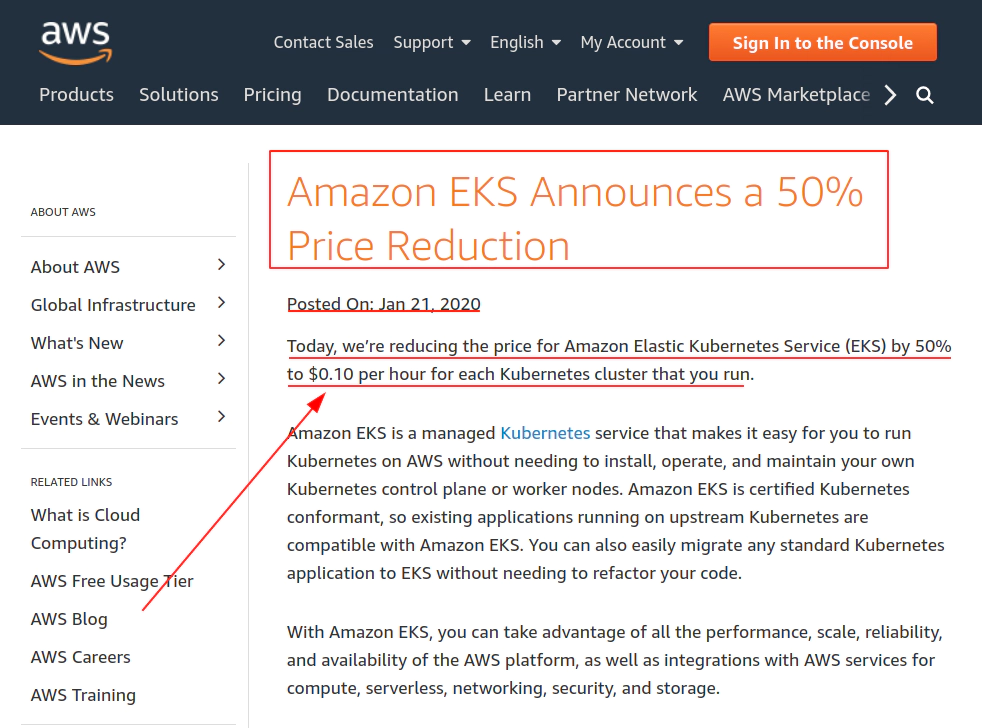
- AWS EKS (Elastic Kubernetes Service) costs $0.10/hour/per K8S cluster !!!
2. EKS cluster costs few cents per hour
Kubernetes is:
- portable,
- extensible,
- open-source platform
for managing containerized workloads and services, that facilitates both:
- declarative configuration,
- automation.
It has a large, rapidly growing ecosystem.
platform helps you to schedule docker containers and perform robust deployments

assuming that AWS Free Tier is used for this course
t2.microinstance (is complient for AWS Free Tier usage)t3.microinstance (is complient for AWS Free Tier usage)
what has to be paid for is AWS EKS control plane (Kubernetes masters)
AWS charges $0.10 / per hour per AWS EKS cluster
if AWS EKS cluster is used for 10 hours:
10h x $0.10 = $1.0plus TAXShut down your AWS EKS Kubernetes cluster whenever not using it !!!
Amazon Container Services section in AWS console
region: Frankfurt (eu-central-1) has been choosen which indicates $0.10 / per hour per AWS EKS cluster

3. Allow seeing billing data for IAM user
Login to your root AWS account in AWS Free Tier.
The access to a billing information is disabled by default for IAM accounts

Input user/password from your phone to authenticate and login to the root account.

Input MFA code from your phone to authenticate and login to the root account.

Click at My Account item from drop down menu

Click Edit to allow - Activate IAM Access for other IAM accounts than root account.

Hit Update button to take Activate IAM Access for other IAM accounts than root account.

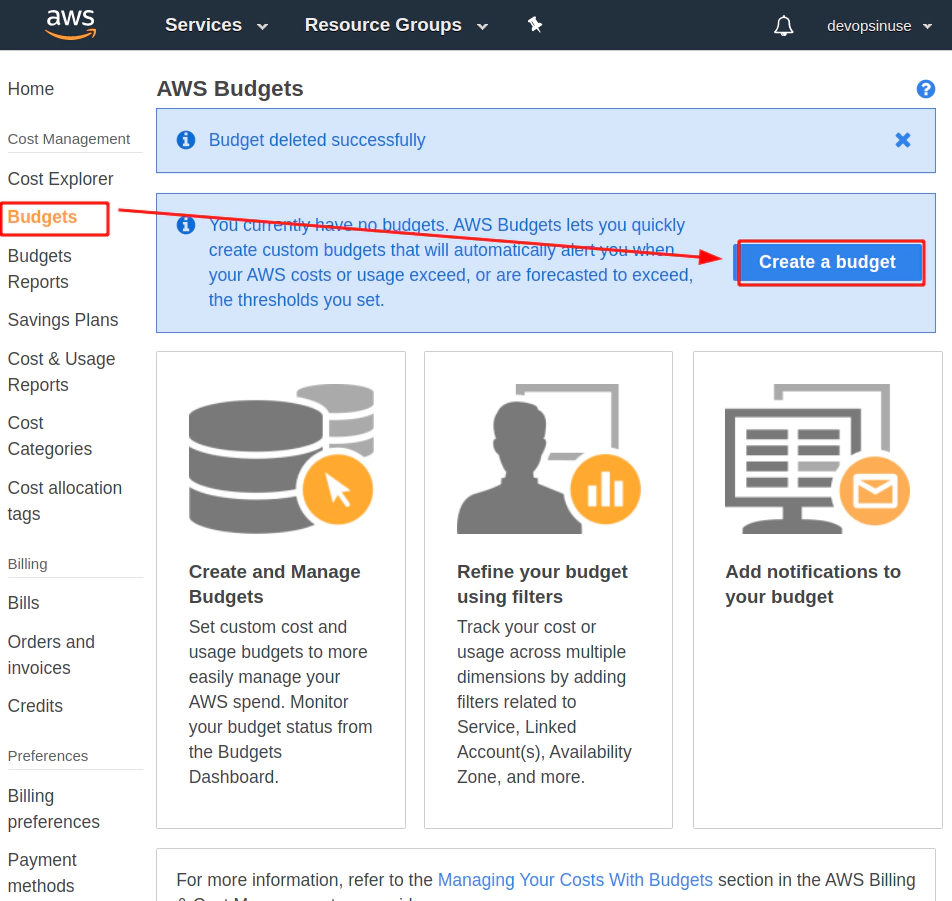
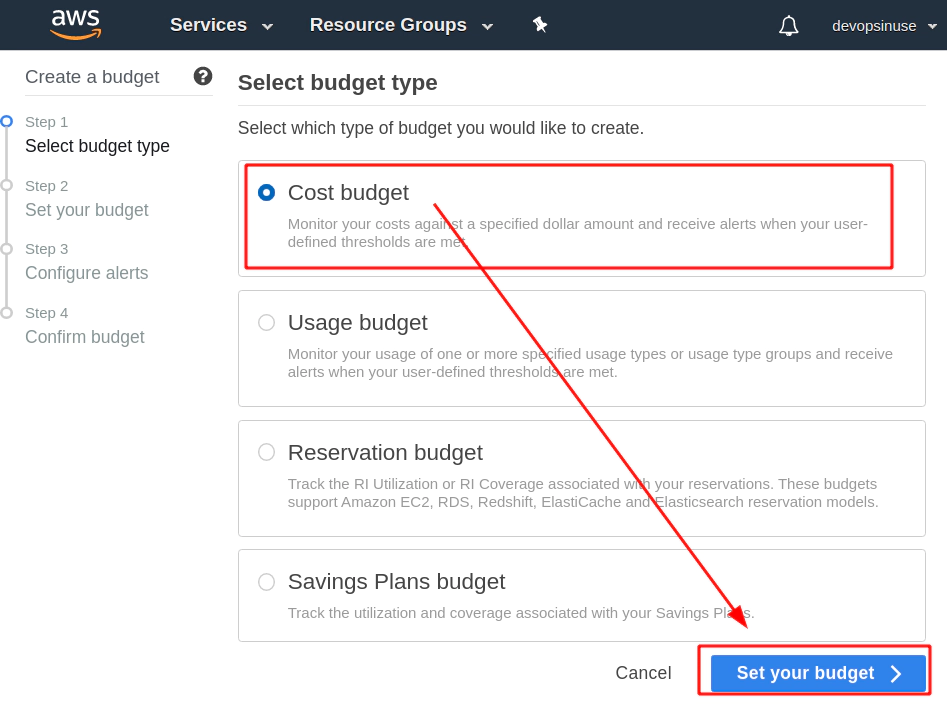
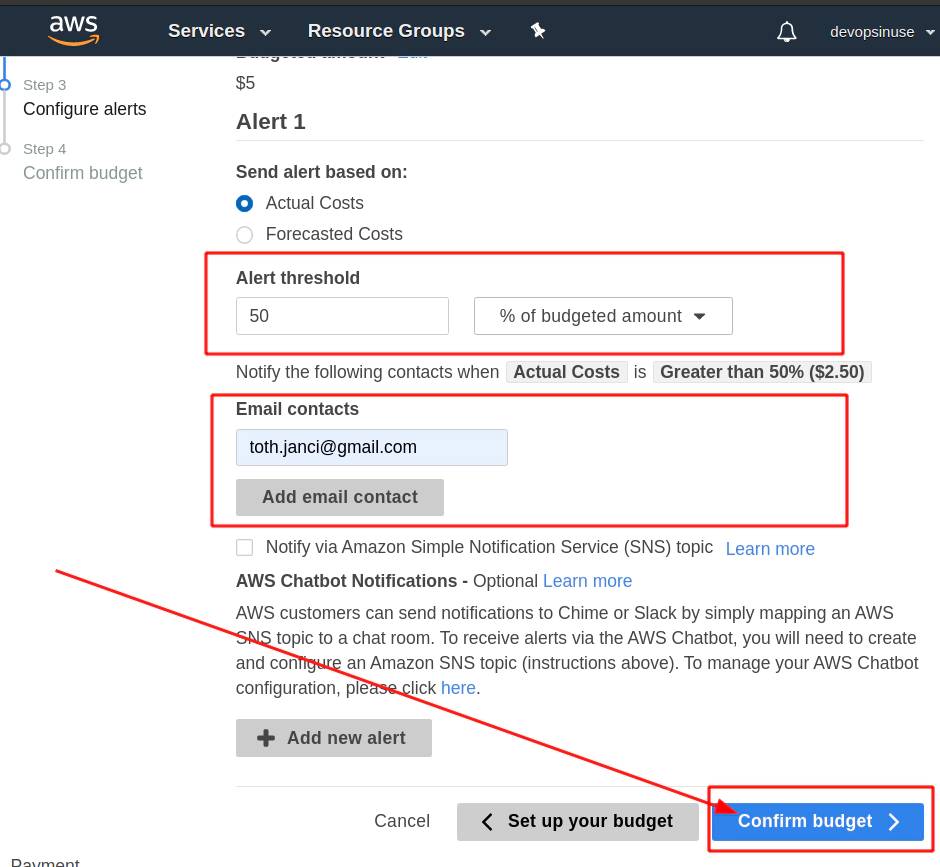
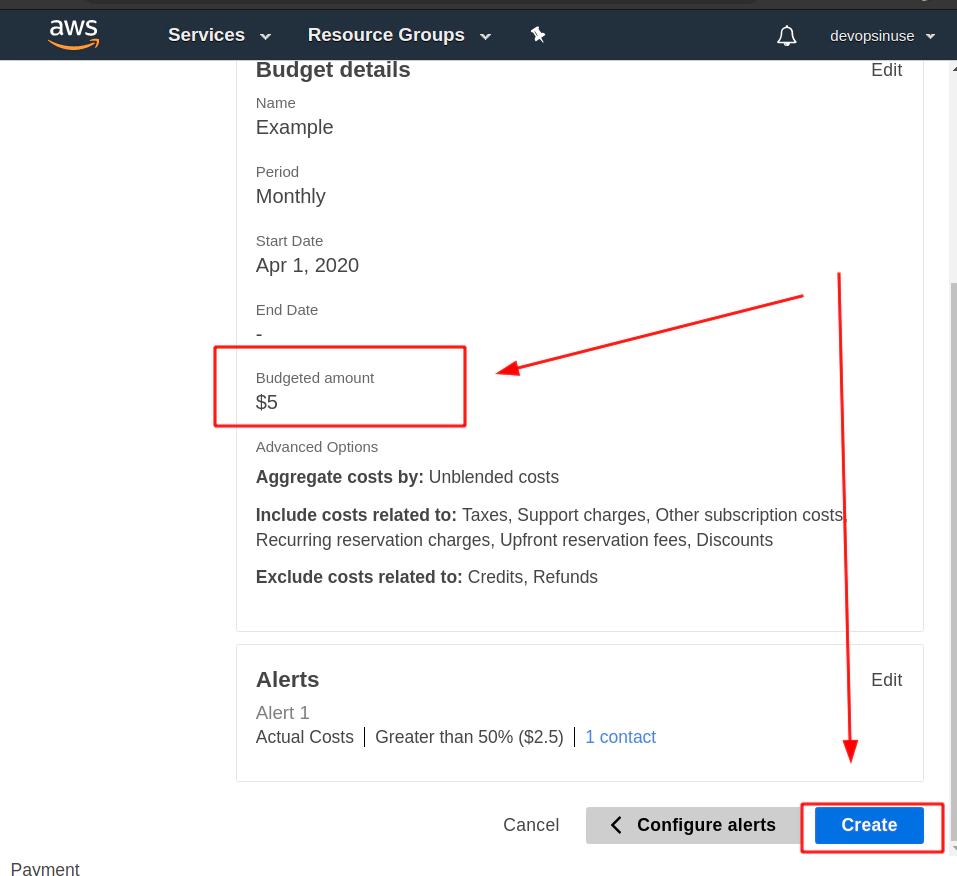
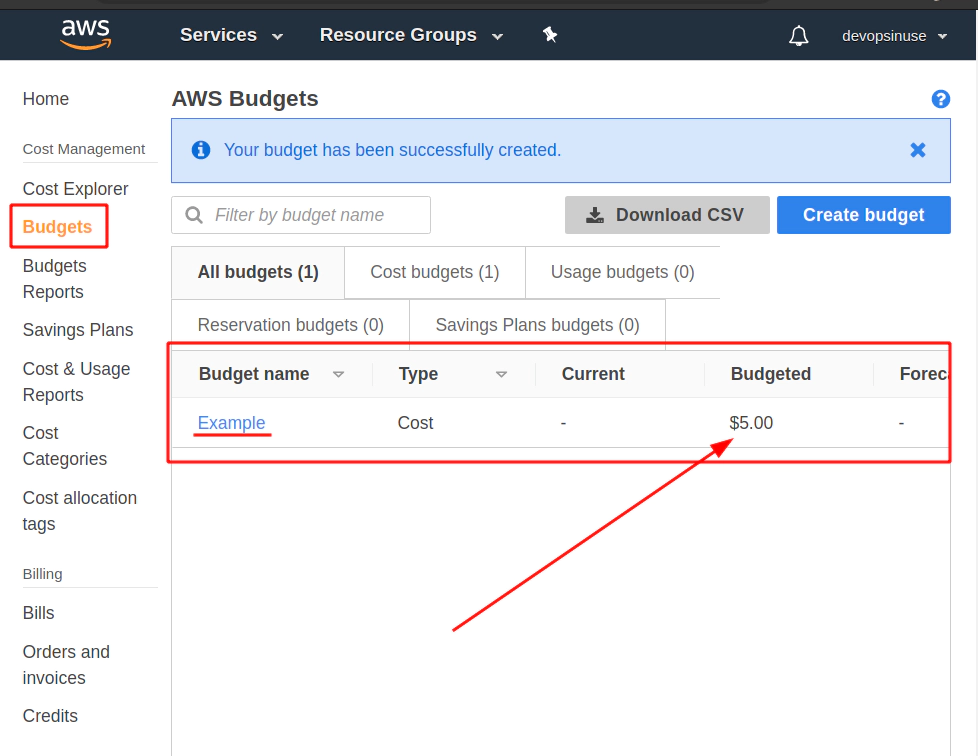
4. Create budget in AWS to be notified by email
Find a Budget section in AWS web console and hit Create a budget button.
Select Cost budget - this is the most simple and reasonable option for now.
Assing some Name to your budget.
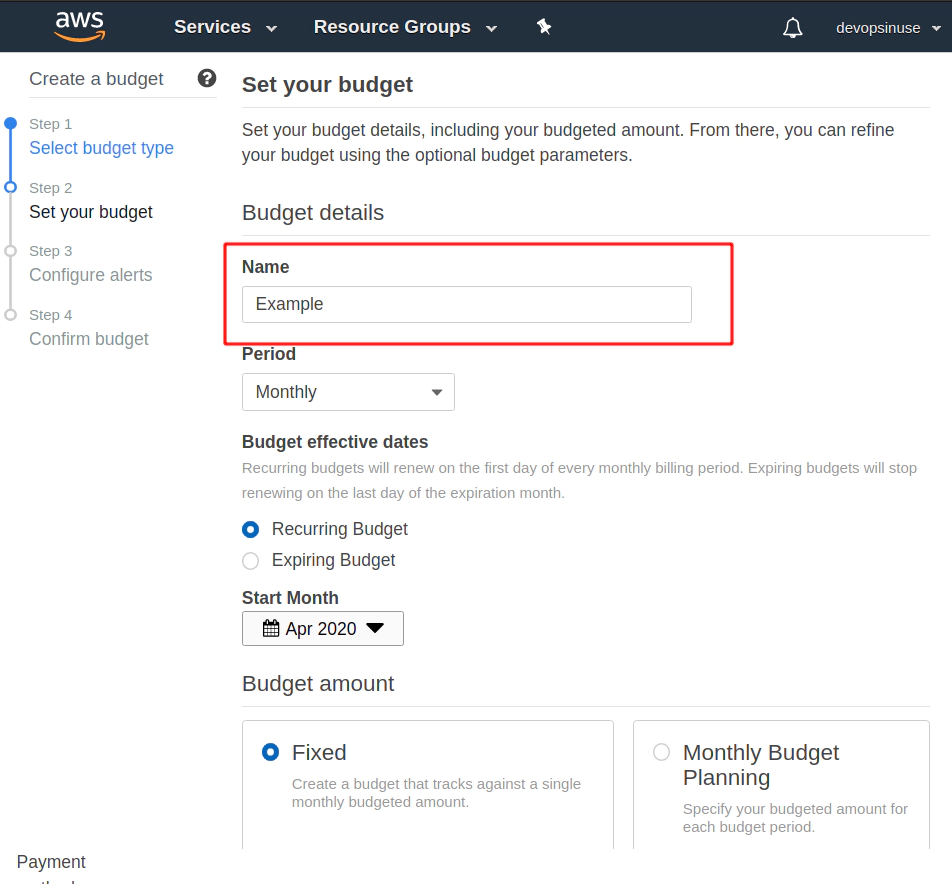
Choose Budget Amount e.g. $5 (Whatever amont you like)
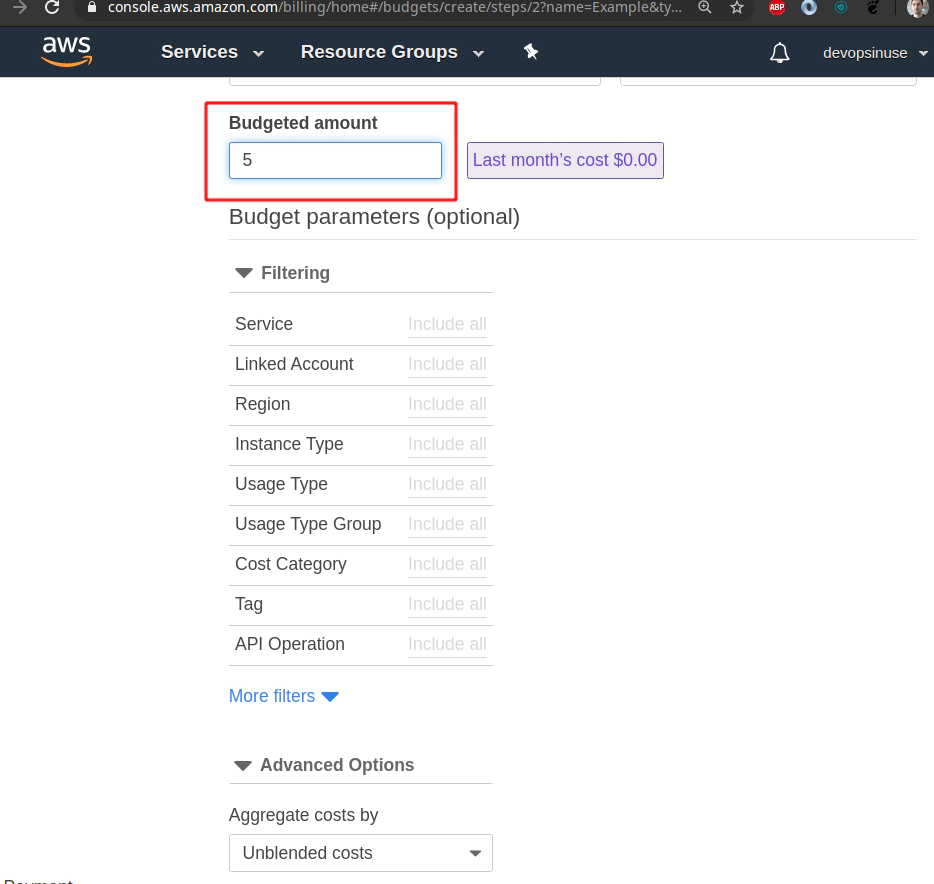
Find Email constacts section and input some email address you would like to be notified at.
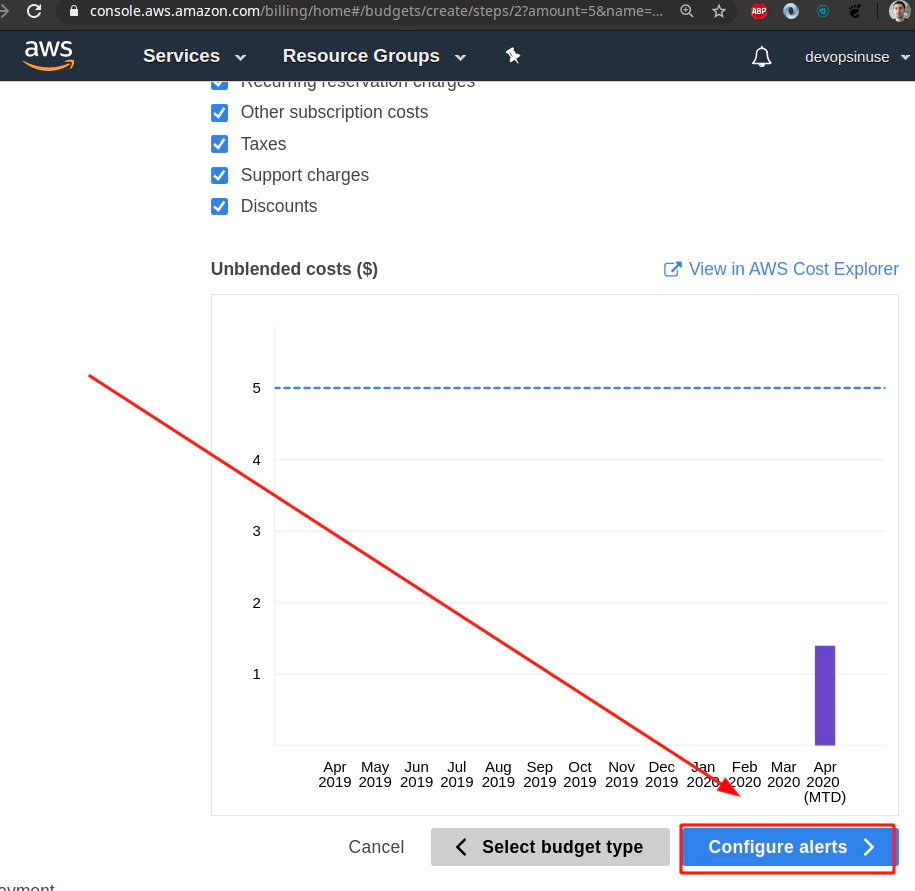
Hit Confirm bufget button and everything should be set up.
Finally hit Create button.
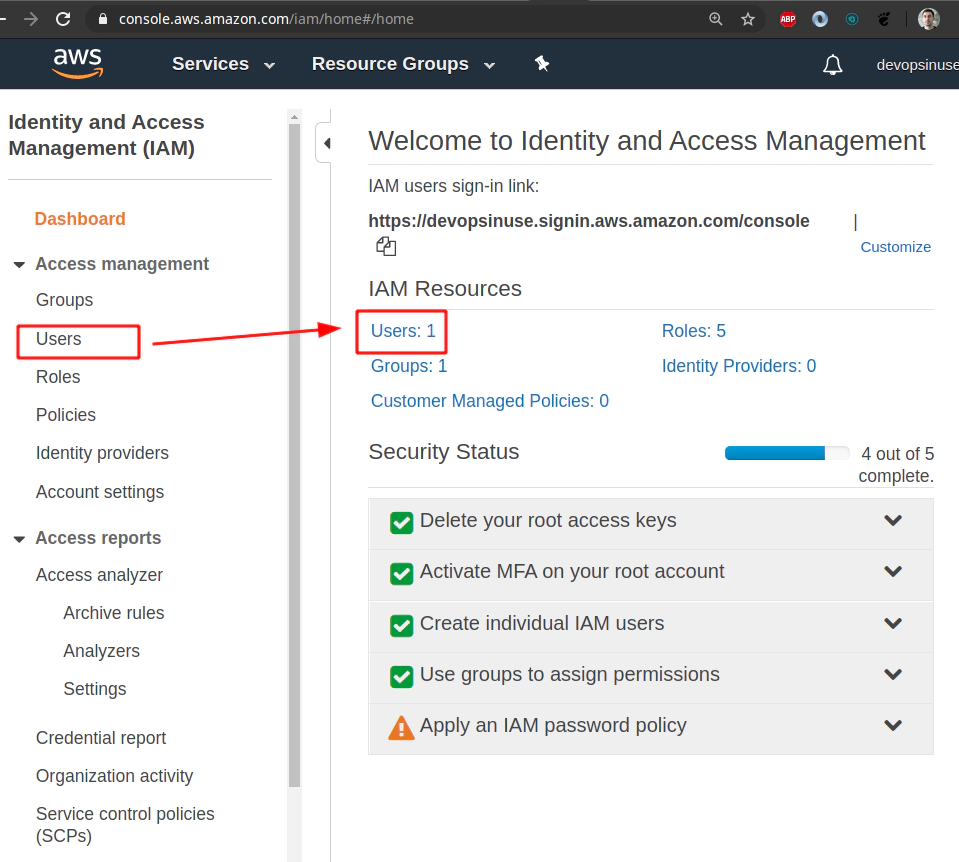
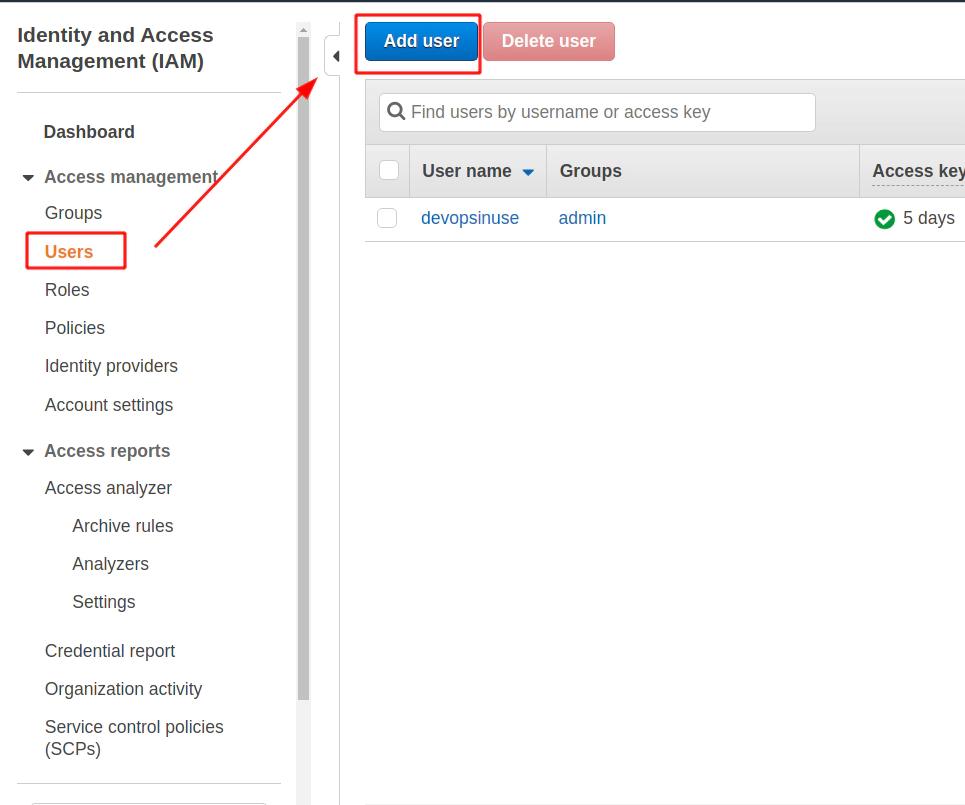
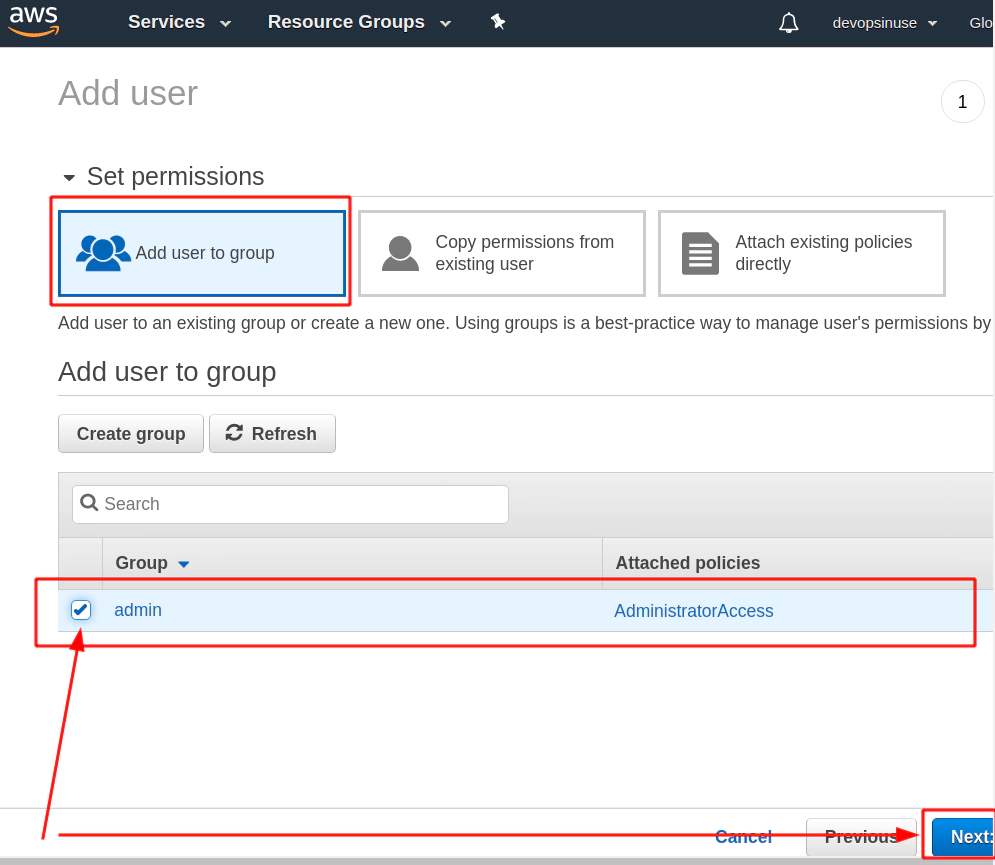
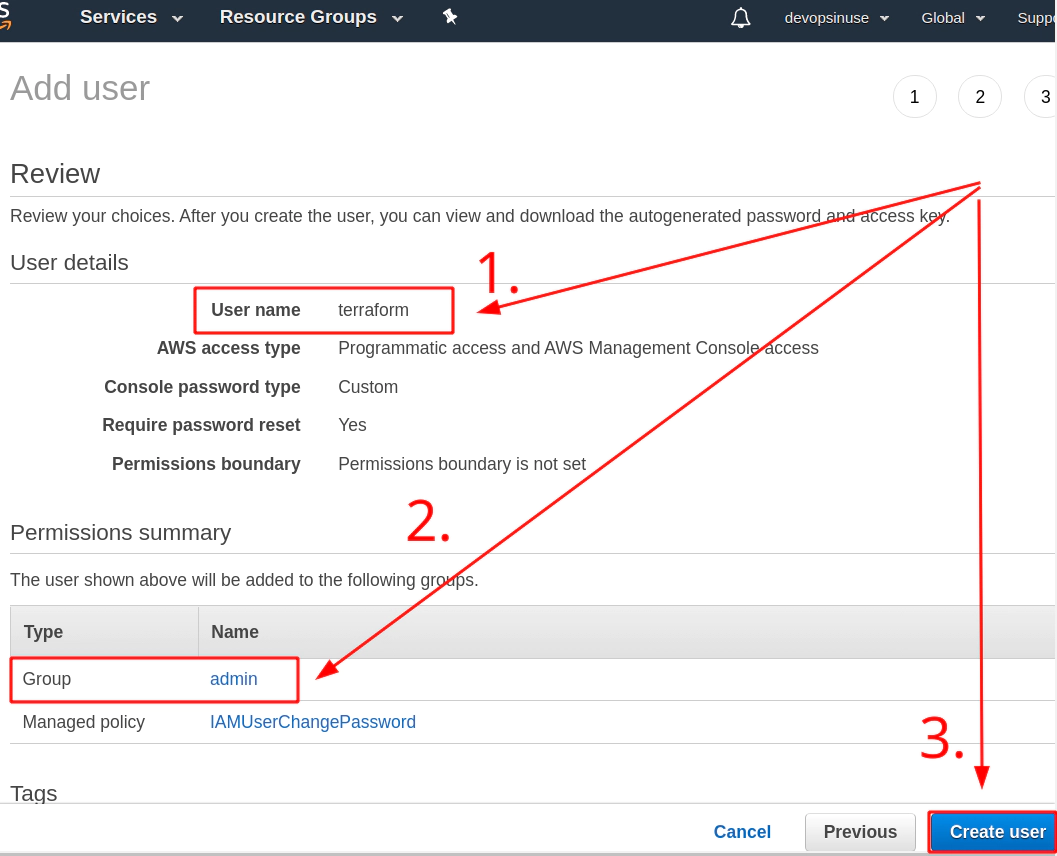
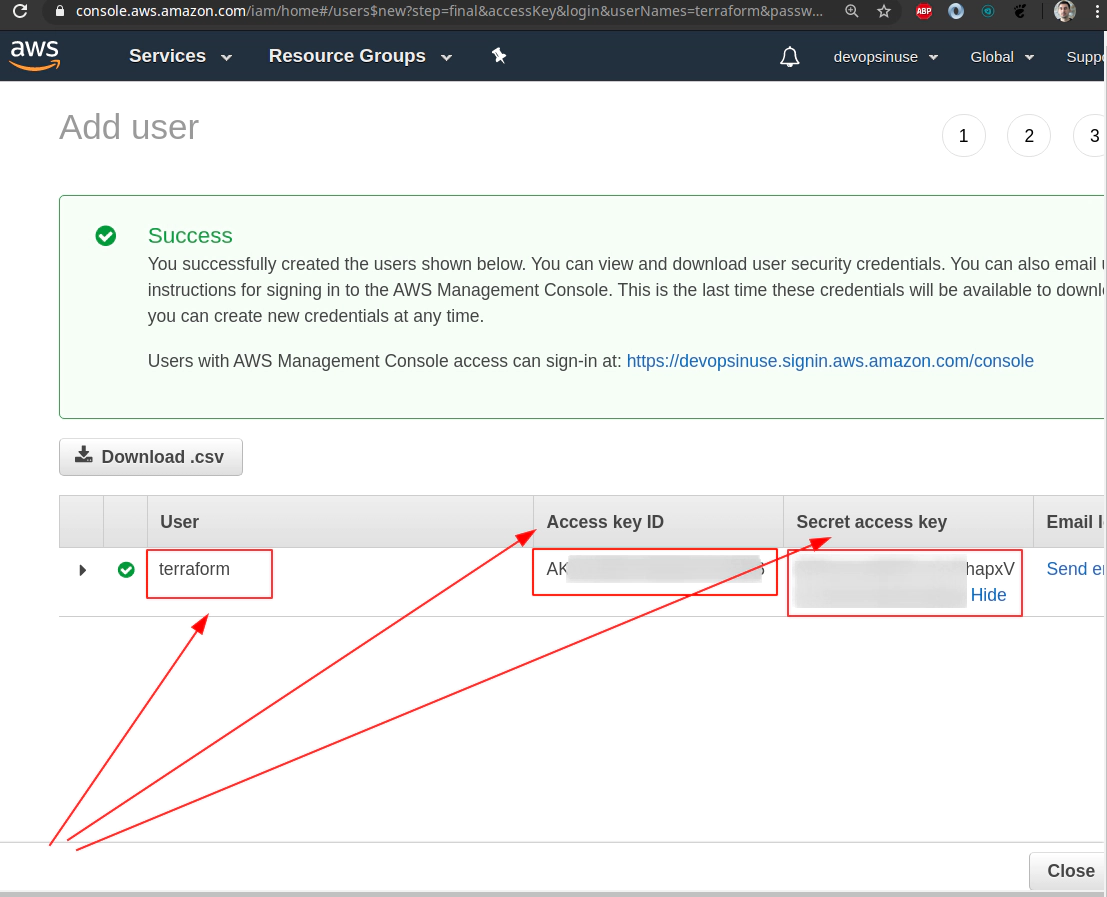
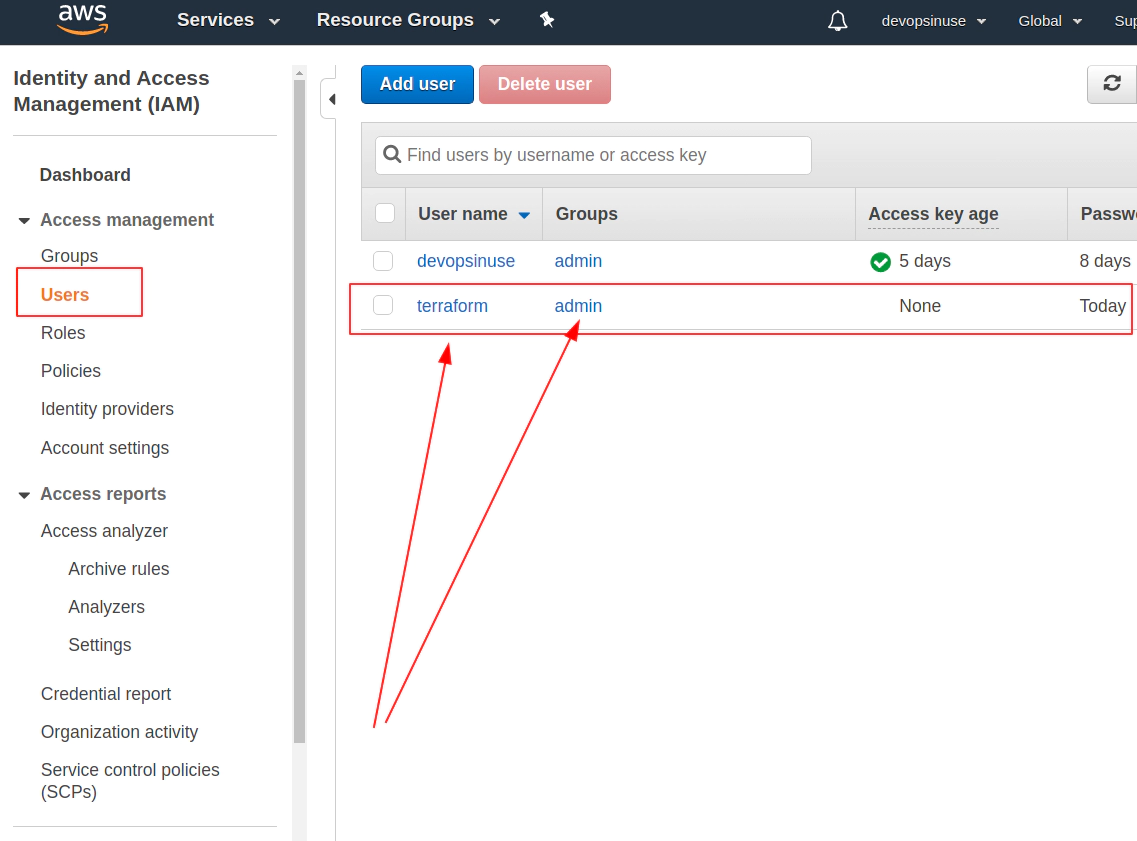
5. Create an extra user and group in AWS with admin privilages

 /images/udemy/aws-eks/img/create-iam-8.png does not exist
6. Install awscli and kubectl binaries
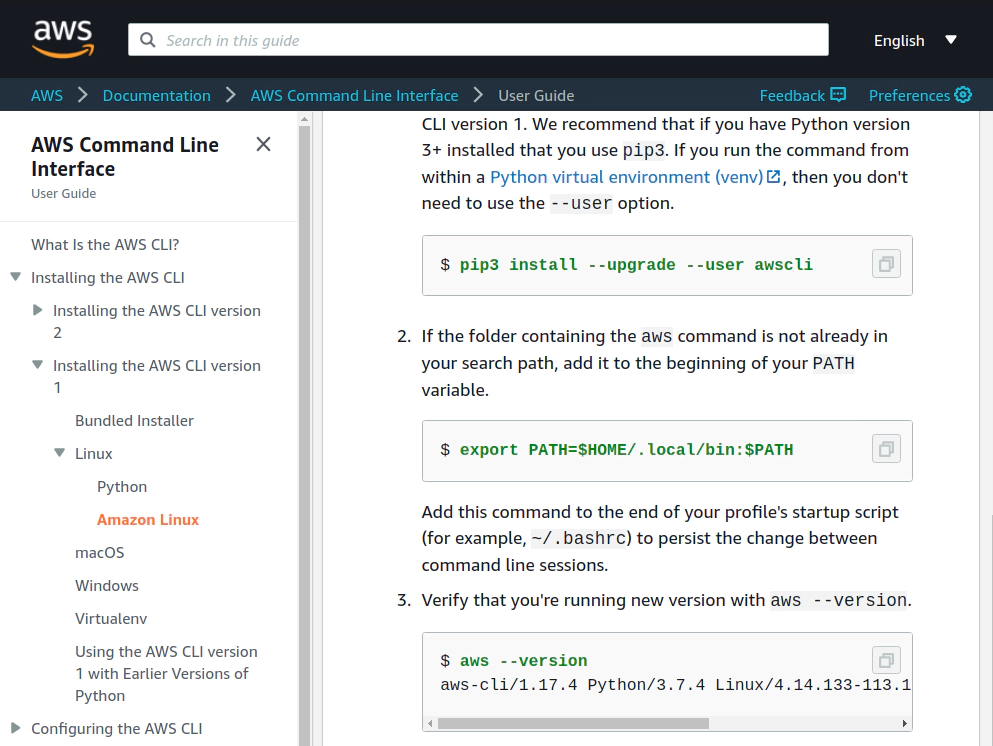
Install awscli binary https://docs.aws.amazon.com/cli/latest/userguide/install-linux-al2017.html
Please configure these two files:
- ~/.aws/credentials
- ~/.aws/config
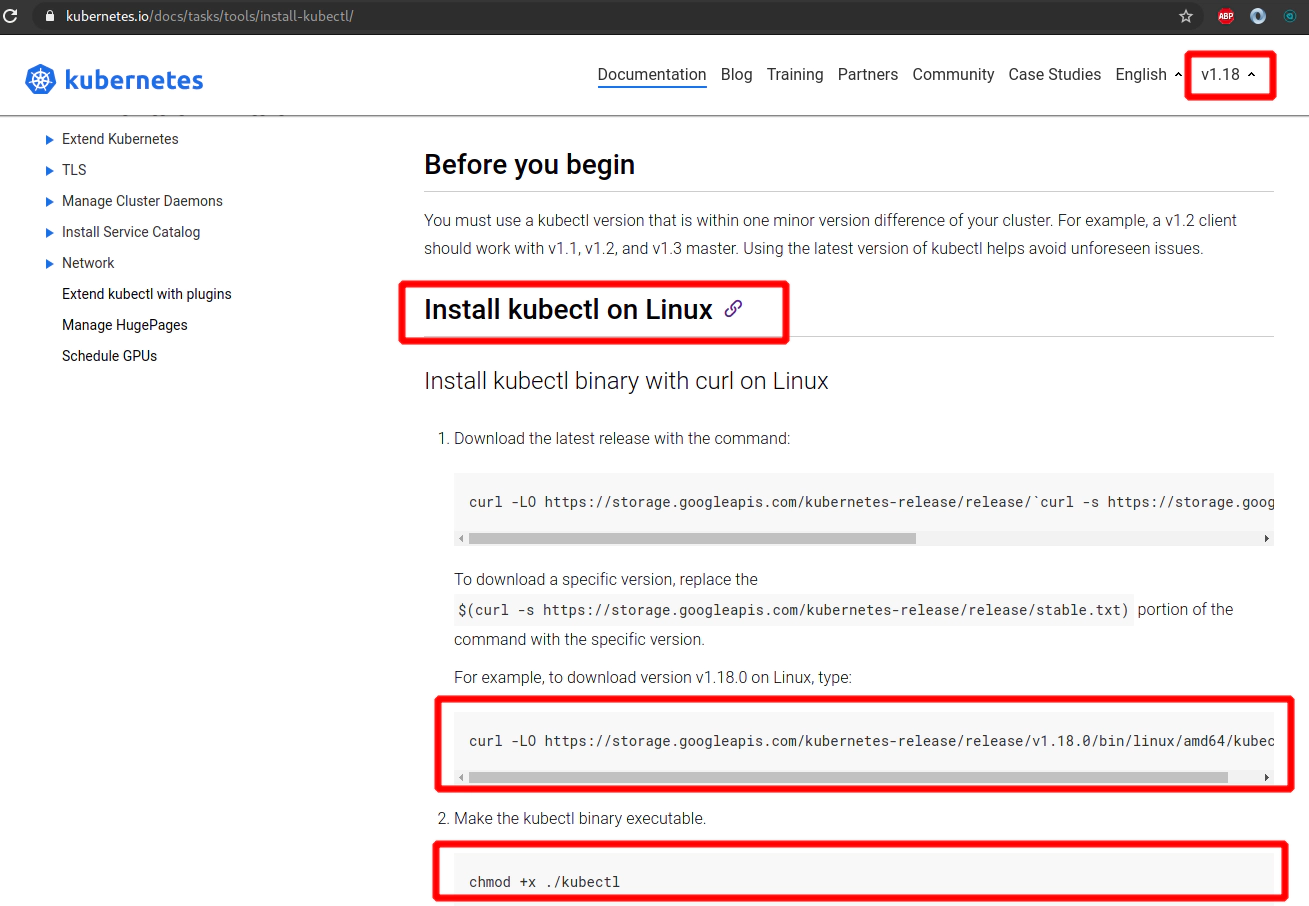
Link: https://kubernetes.io/docs/tasks/tools/install-kubectl/
curl -LO https://storage.googleapis.com/kubernetes-release/release/v1.18.0/bin/linux/amd64/kubectl
chmod +x ./kubectl
sudo mv ./kubectl /usr/local/bin/kubectl
kubectl version --client
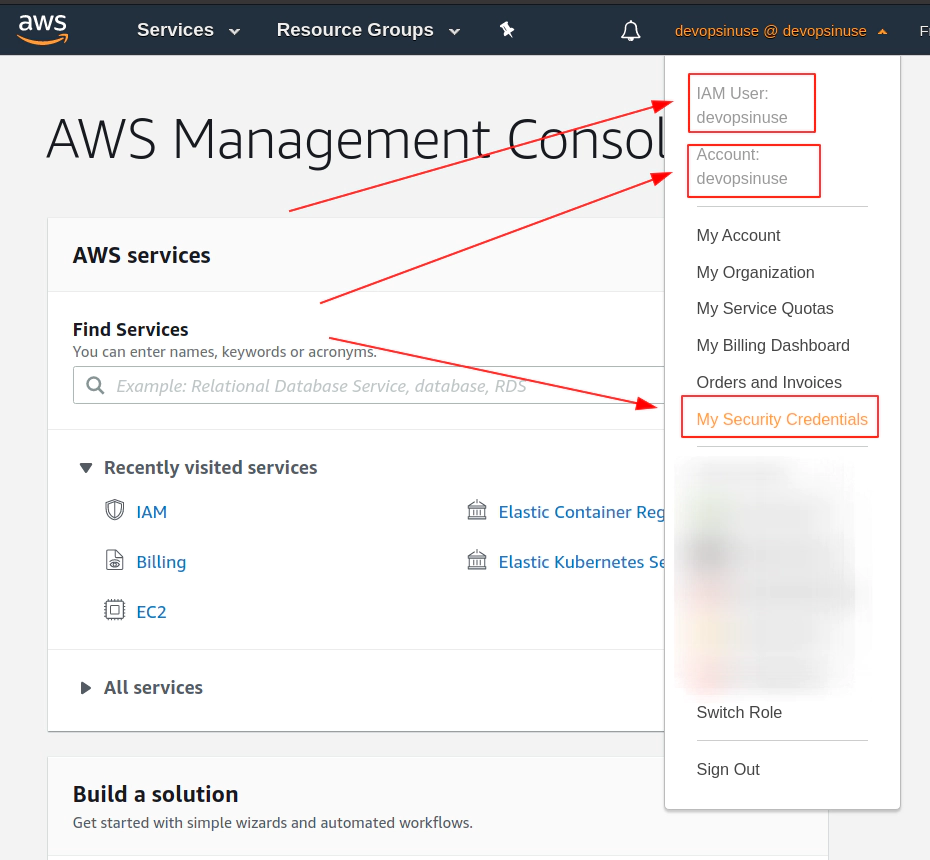
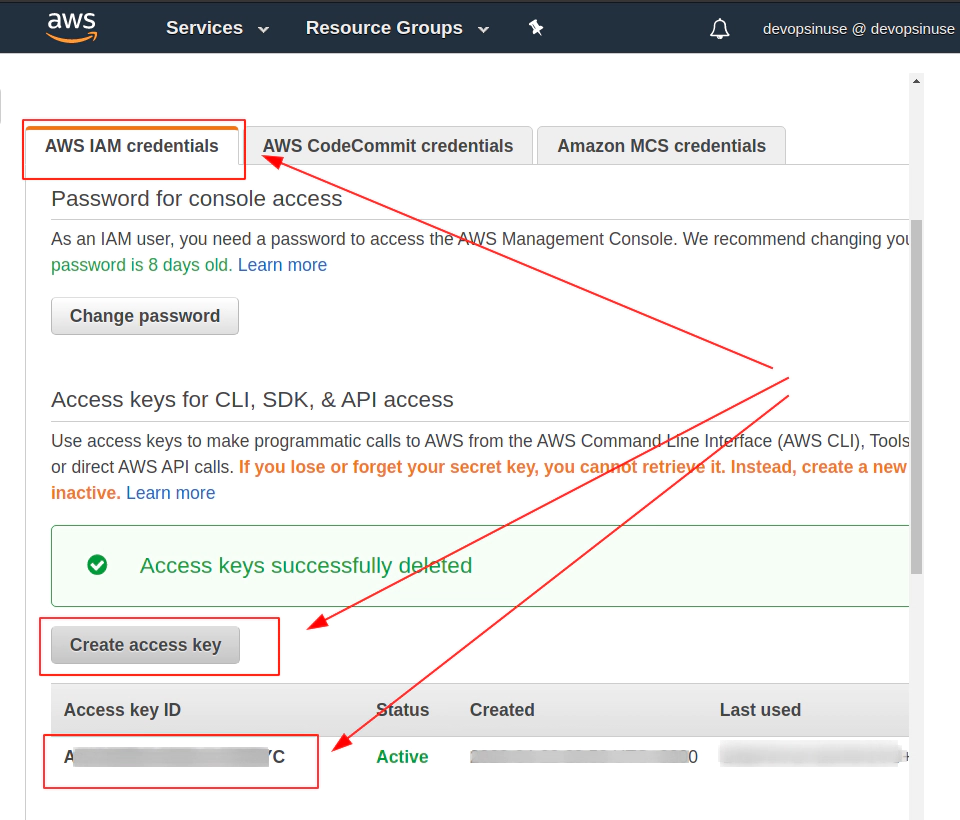
7. Retrive programatic access from AWS and configure aws cli
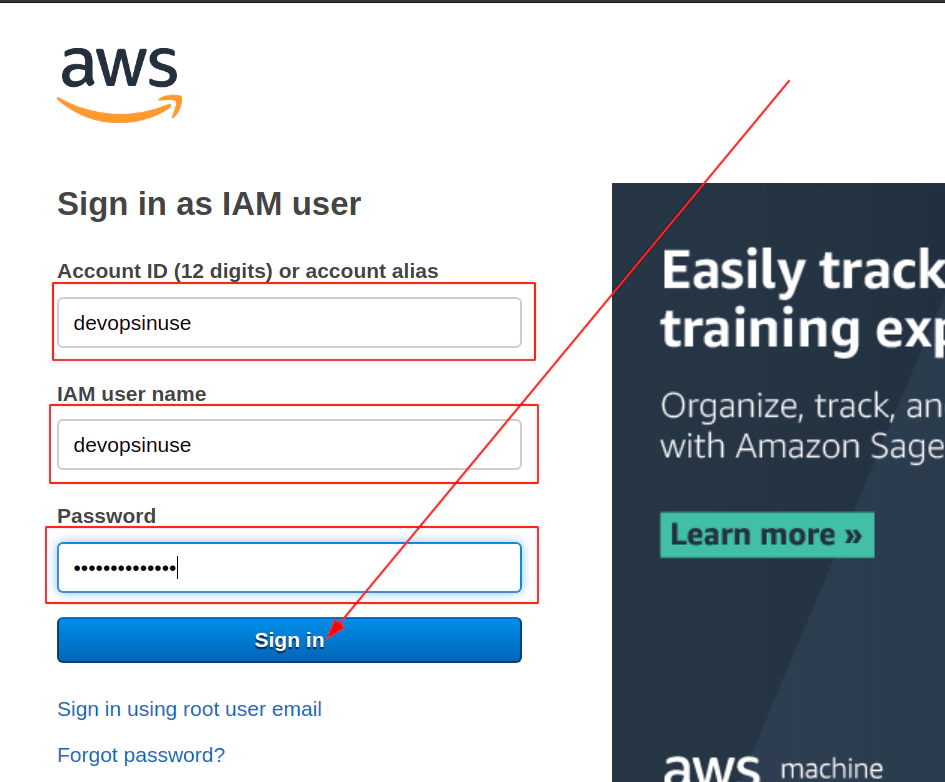
edit file: ~/.aws/credentials
vim  ~/.aws/credentials

...
[terraform]
aws_access_key_id = ...
aws_secret_access_key = ...

[devopsinuse]
aws_access_key_id = ...
aws_secret_access_key = ...
...

:wq!
edit file: ~/.aws/config
vim ~/.aws/config

...
[profile terraform]
region=eu-central-1

[profile devopsinuse]
region=eu-central-1
...

:wq!
Make sure that your aws is configured correctly and can talk to AWS
aws iam list-users --profile devopsinuse
{
    "Users": [
        {
            "Path": "/",
            "UserName": "devopsinuse",
            "UserId": "AFSDFSDFSDFSDFSD",
            "Arn": "arn:aws:iam::61111111116:user/devopsinuse",
            "CreateDate": "...",
            "PasswordLastUsed": "..."
        },
        {
            "Path": "/",
            "UserName": "terraform",
            "UserId": "ADSGDSDASDASFSDFSDB",
            "Arn": "arn:aws:iam::61111111116:user/terraform",
            "CreateDate": "..."
        }
    ]
}
8. Create EKS control plane IAM role in AWS web console
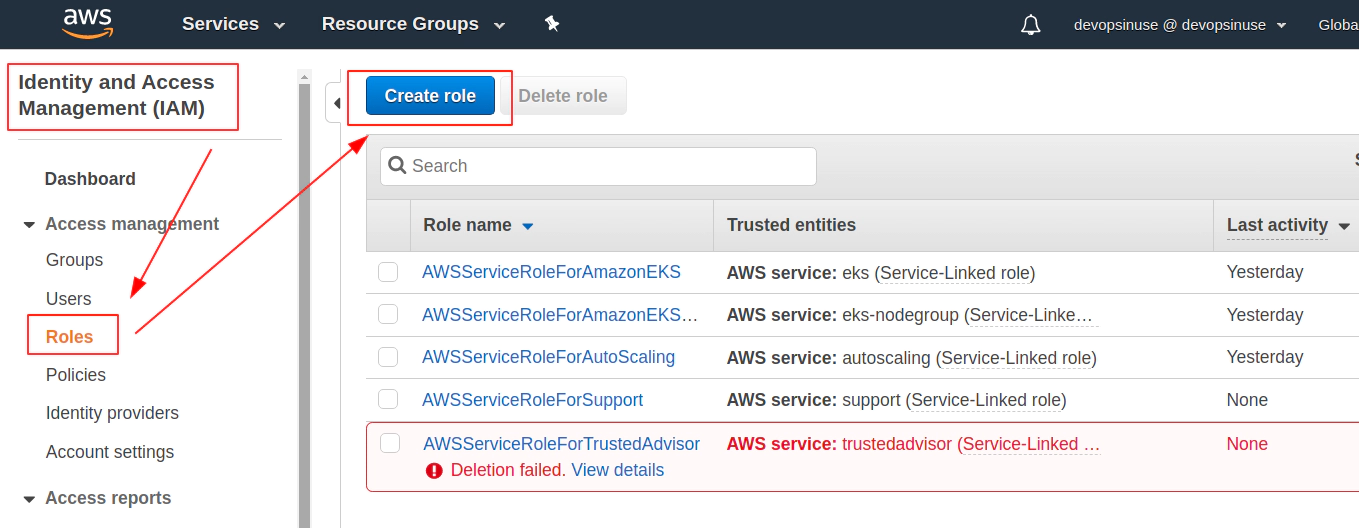

9. Create EKS node group IAM role in AWS web console
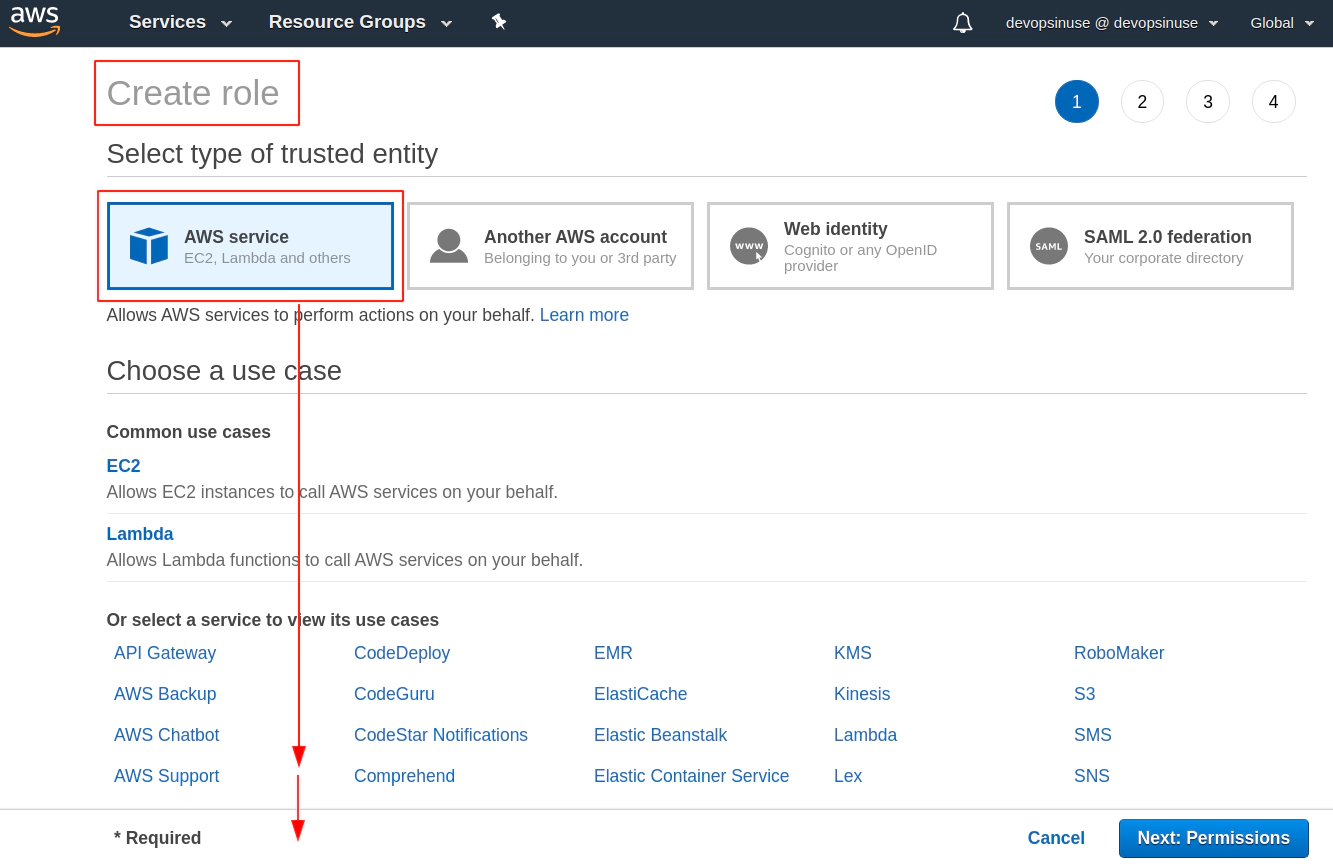
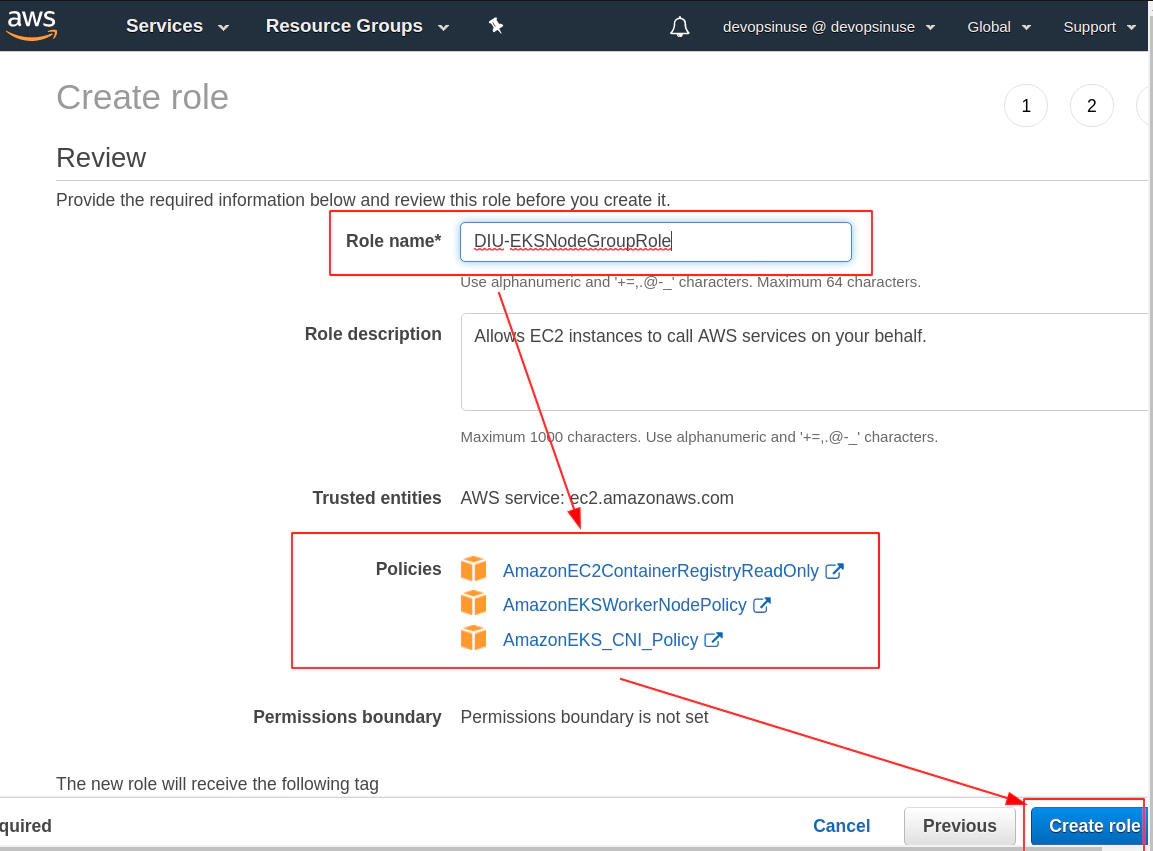
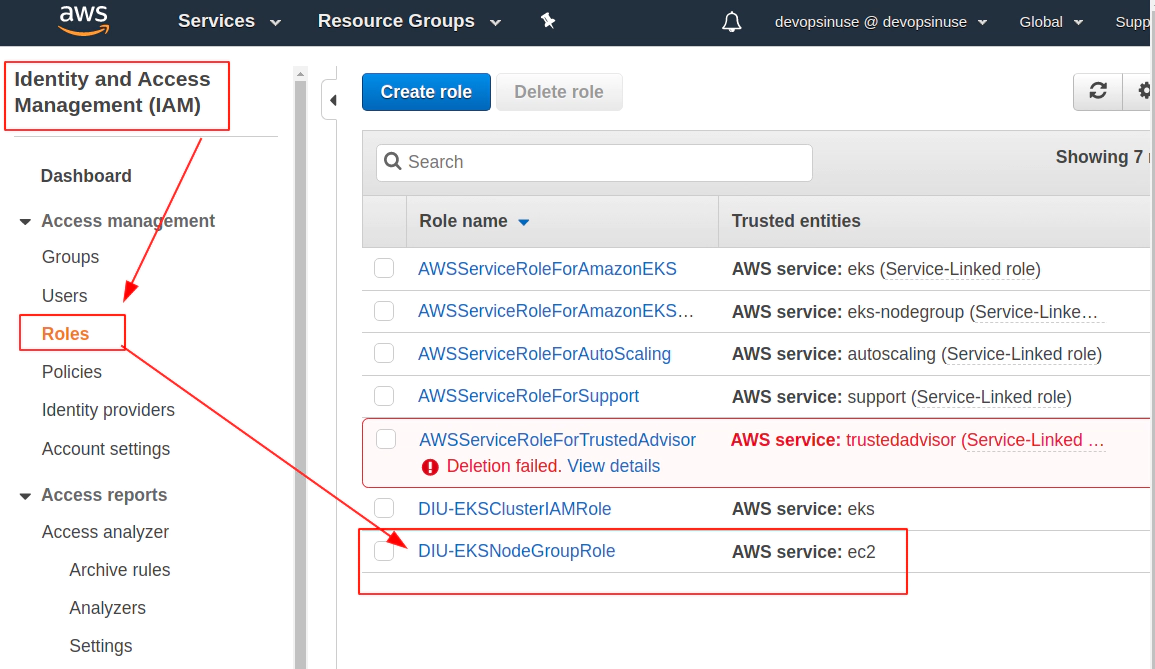
Find Roles section under Identity and Access Management (IAM)
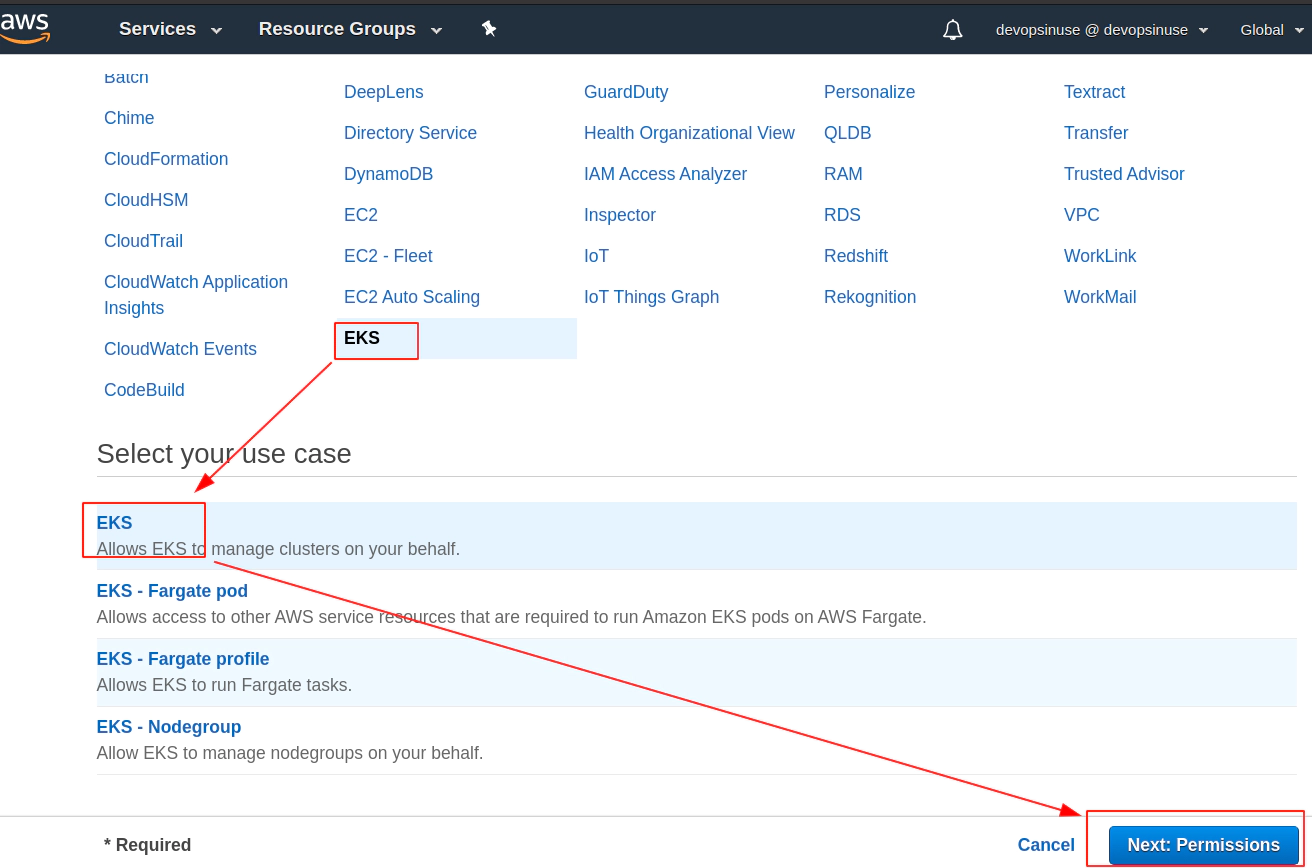
Click at EC2 from Choose a use case menu when creating AWS IAM role for EKS node group
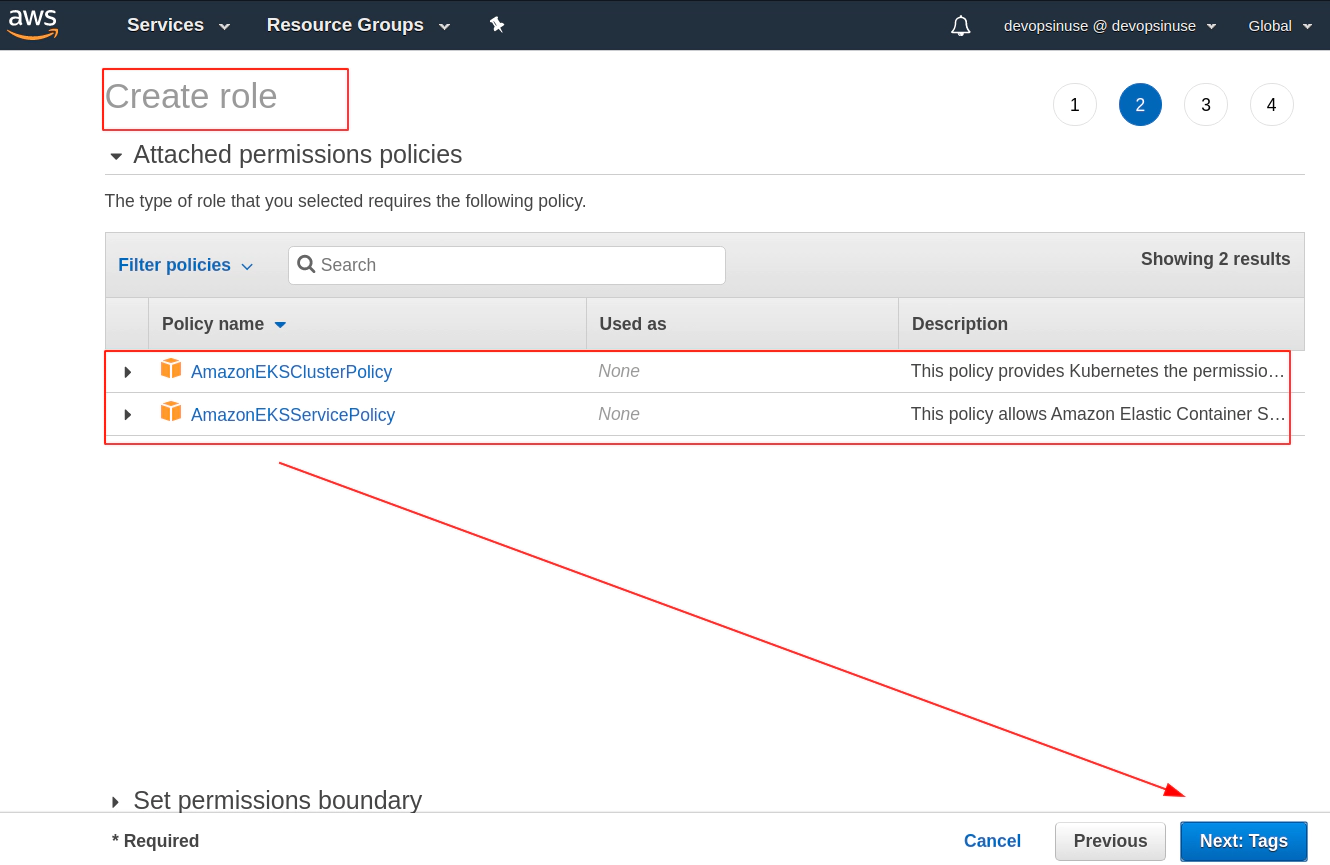
Search manually for these 3 policies for EKS node group and mark then once found in checkbox
AmazonEC2ContainerRegistryReadOnly

Search manually for these 3 policies for EKS node group and mark then once found in checkbox
AmazonEKSWorkerNodePolicy

Search manually for these 3 policies for EKS node group and mark then once found in checkbox
- AmazonEKS_CNI_Policy
This time you can click: Next: Tags blue button if all three IAM Policies are check-boxed
Tags are optional however, they help to identify leftovers once you want to clean your AWS account
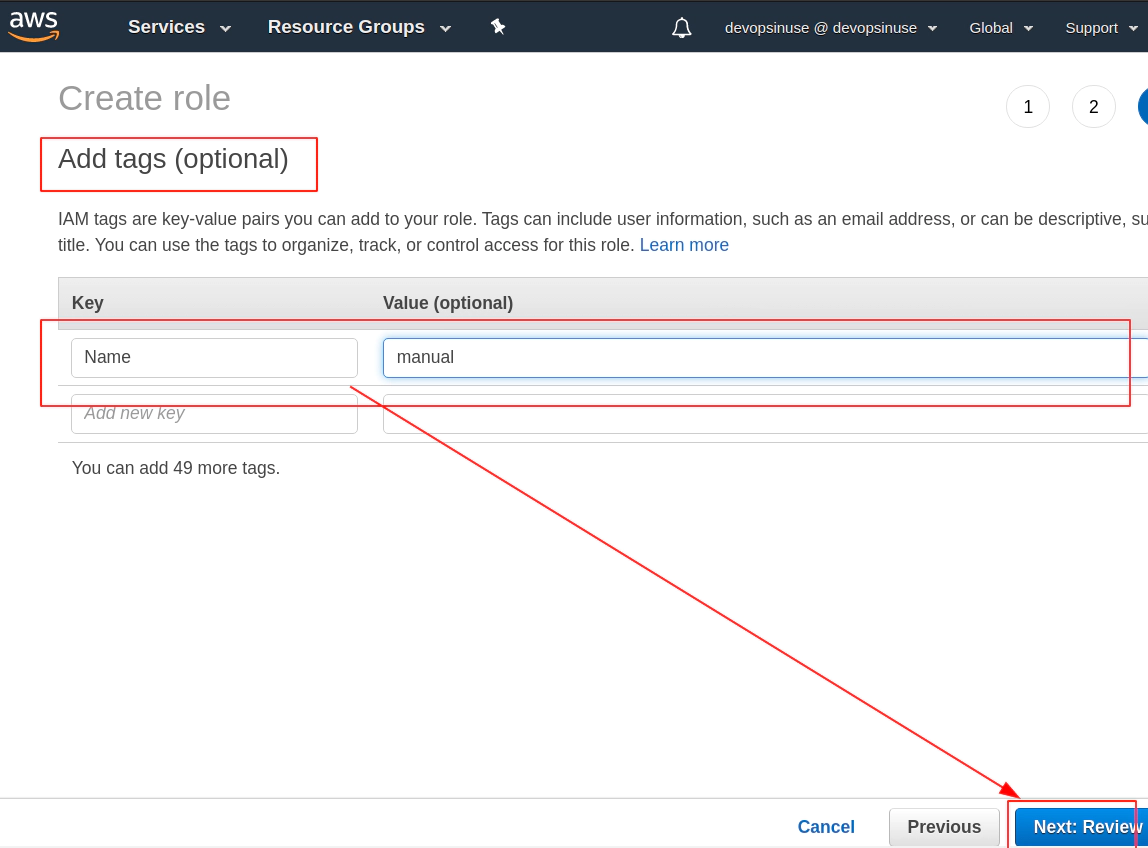
Review your AWS IAM role and assign some Role name to it e.g. DIU-EKSNodeGroupRole
Role DIU-EKSNodeGroupRole is finally created
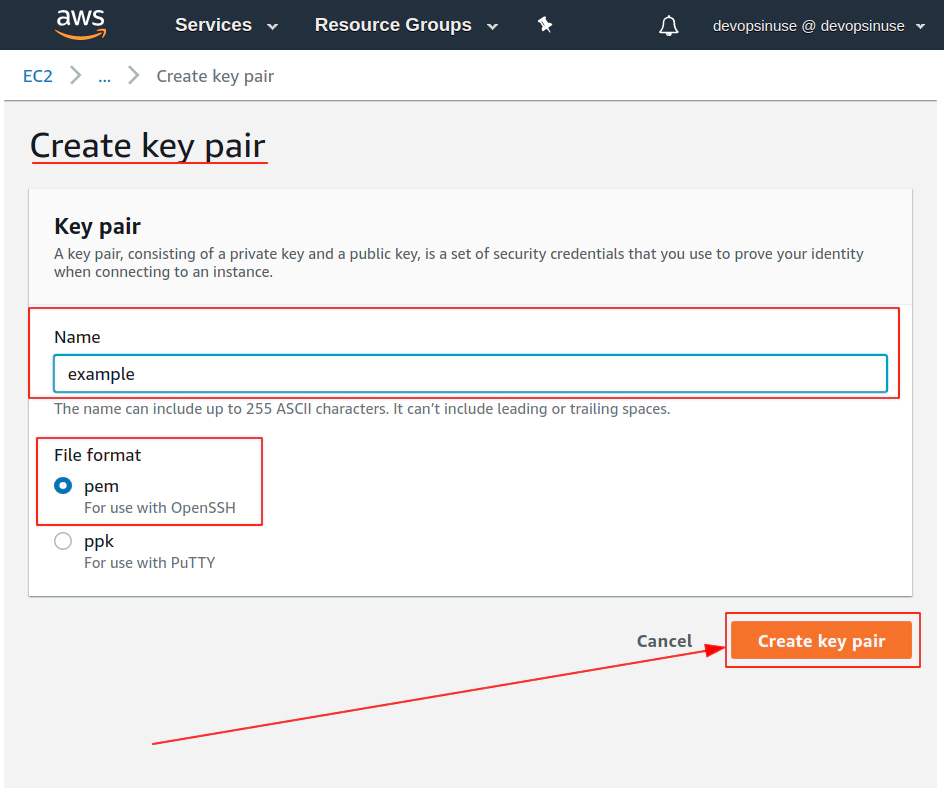
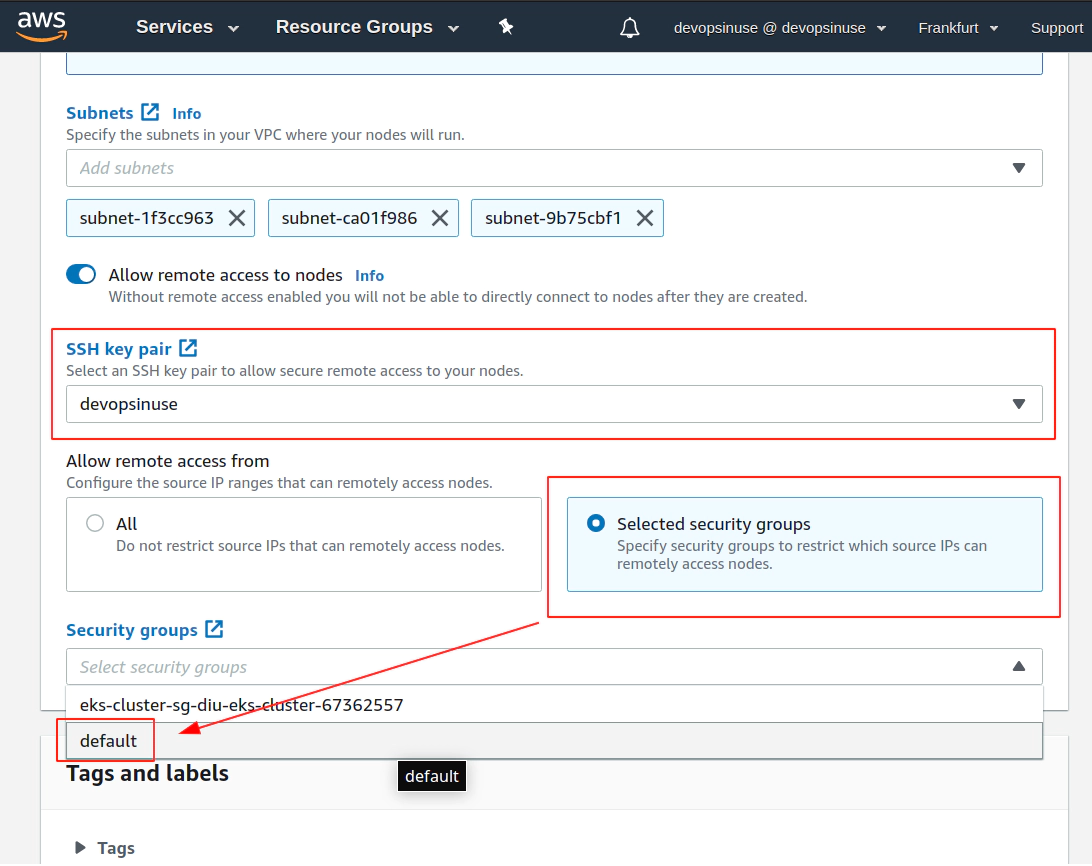
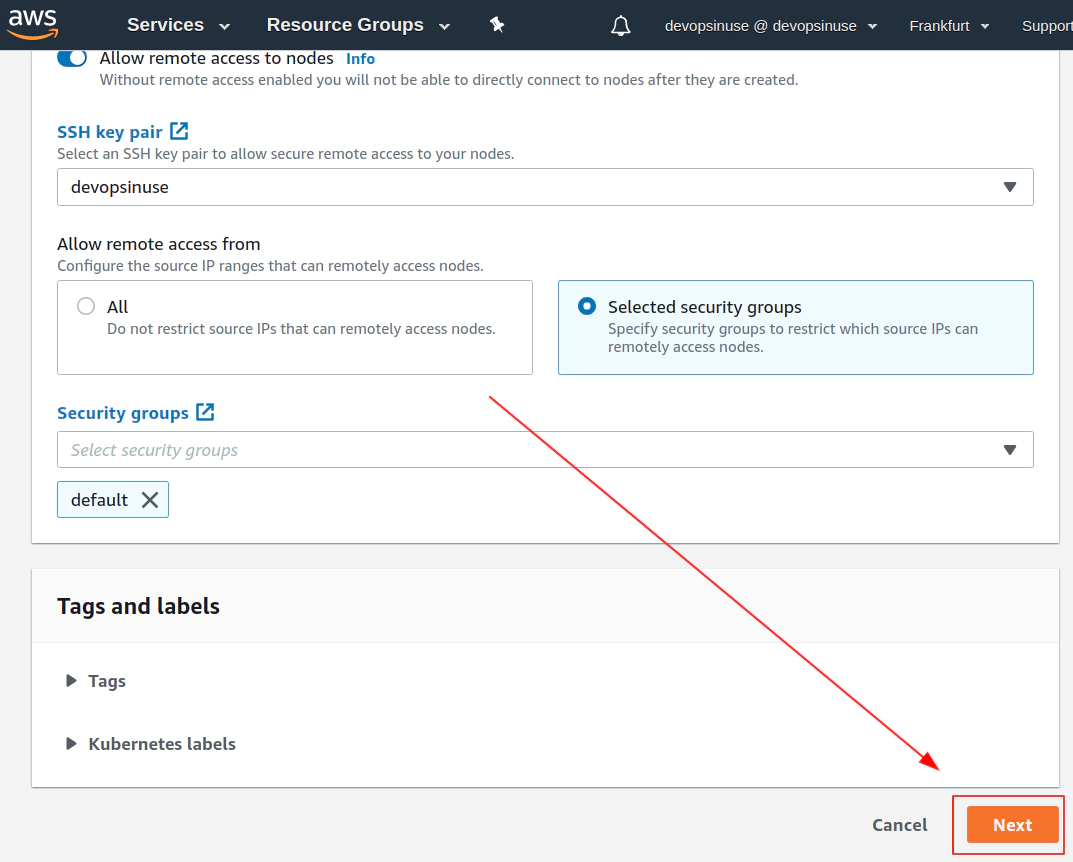
10. Create SSH key pair in AWS console

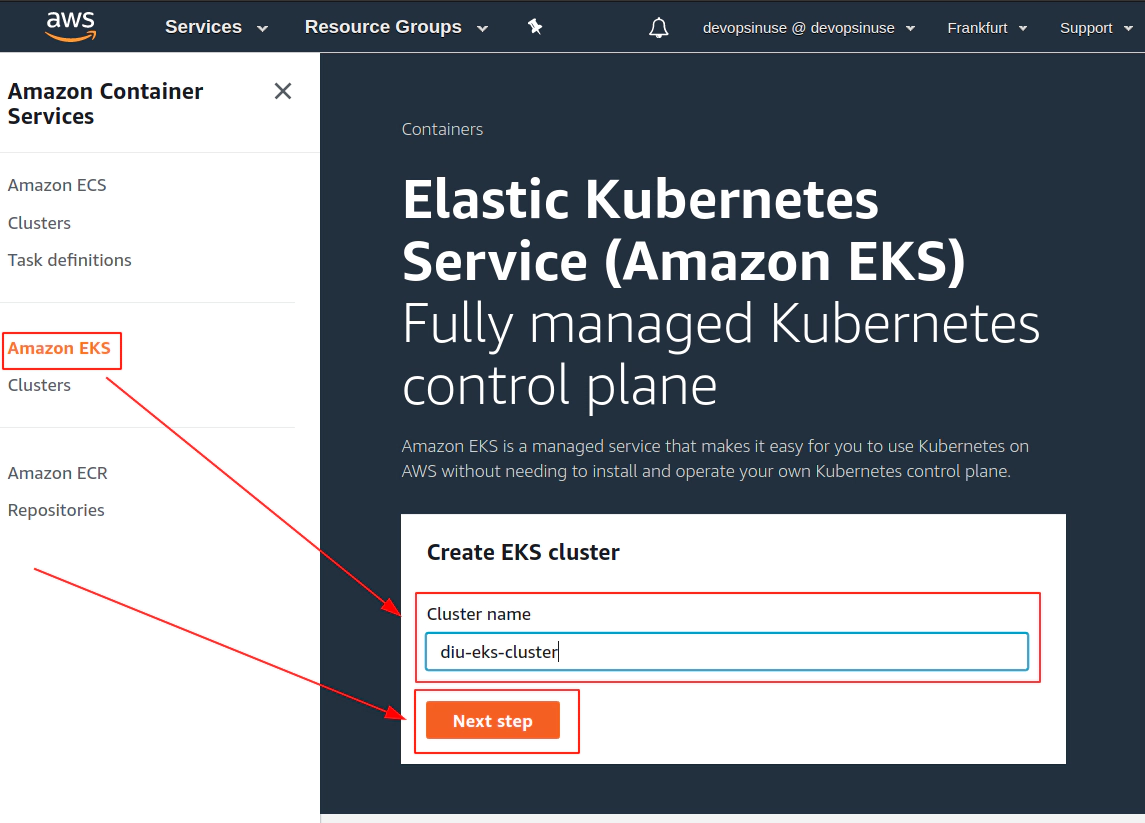
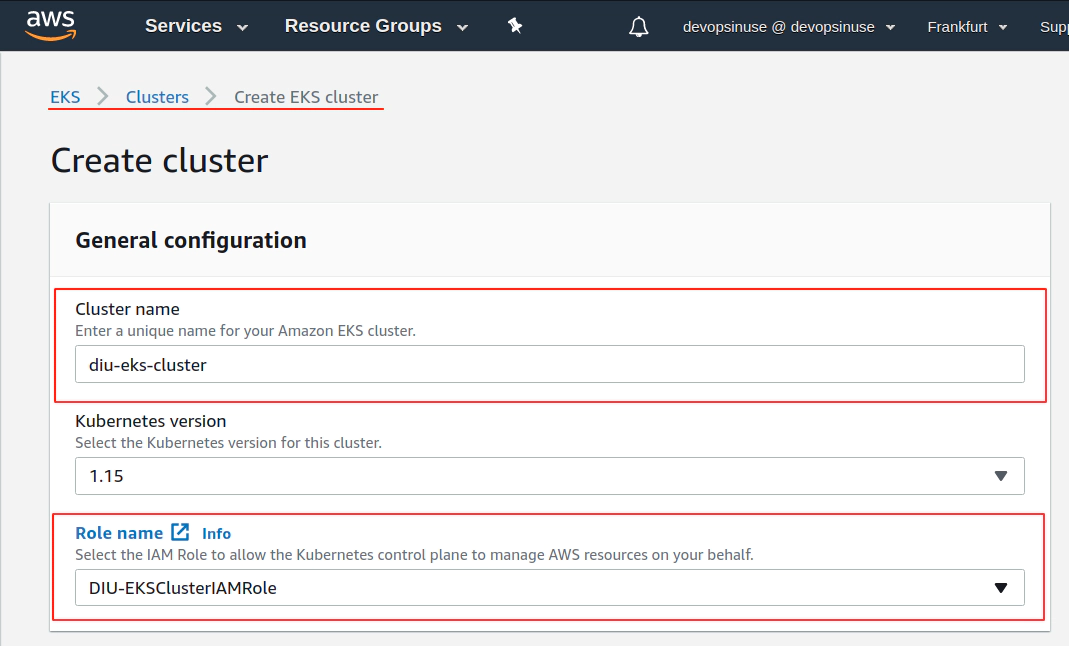
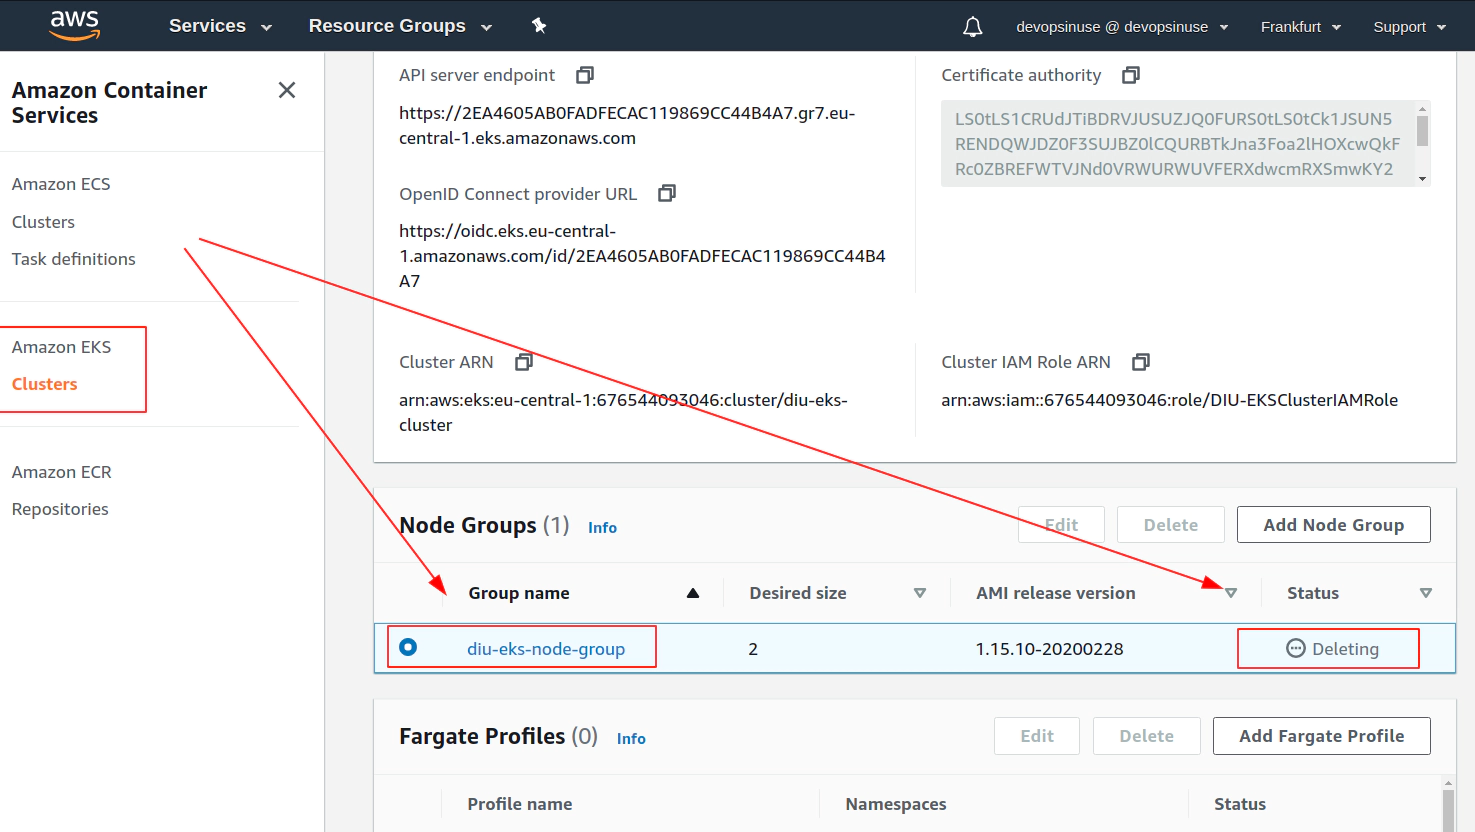
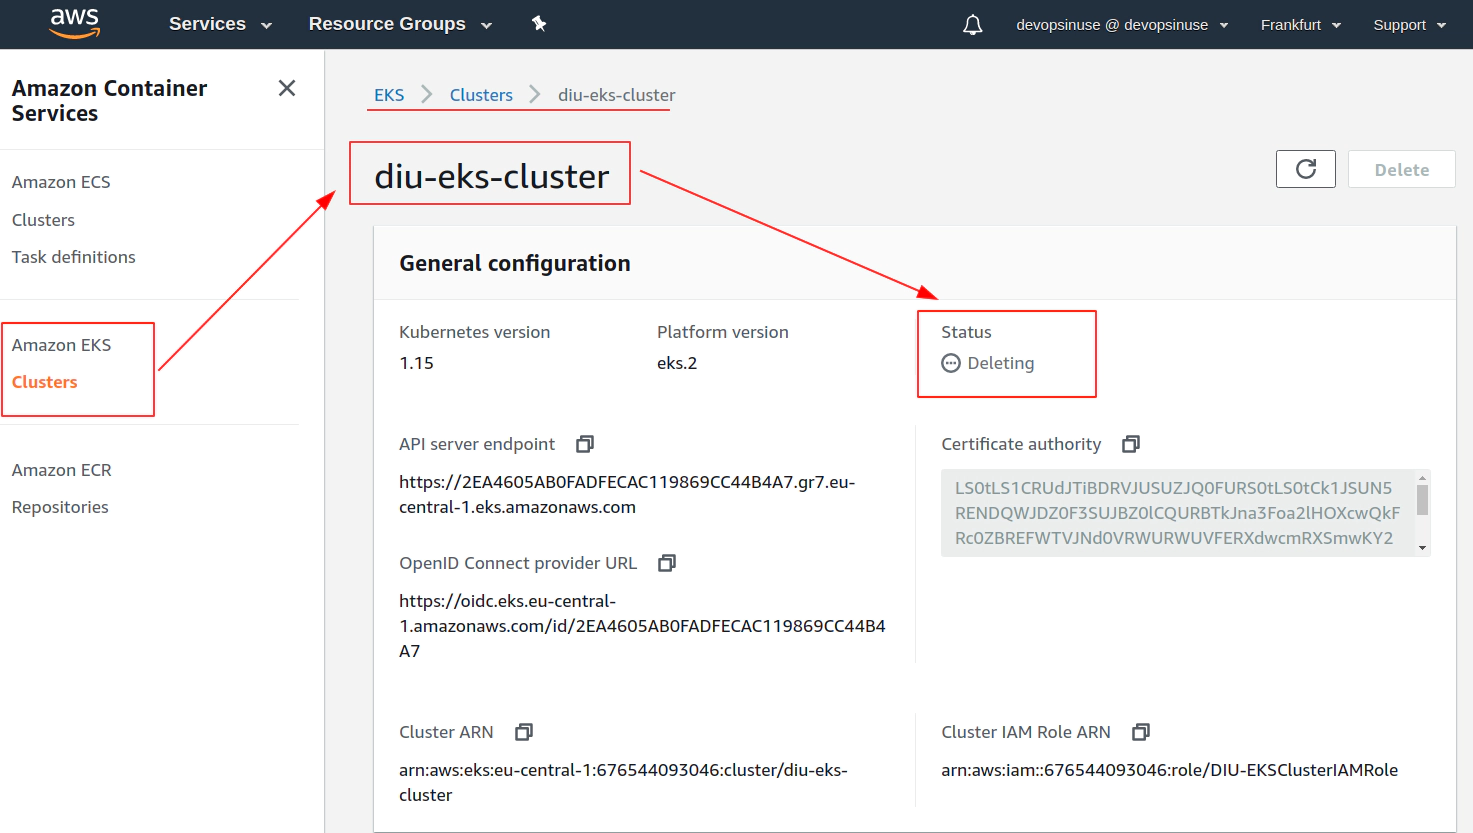
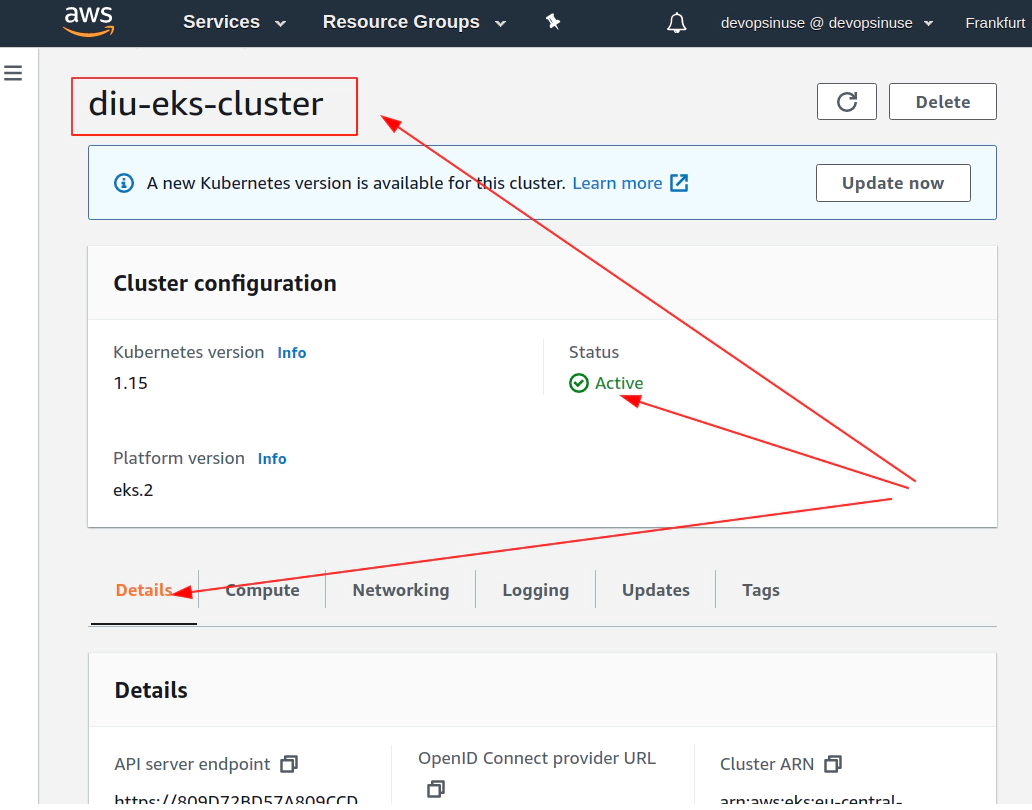
11. Create EKS cluster in AWS web console
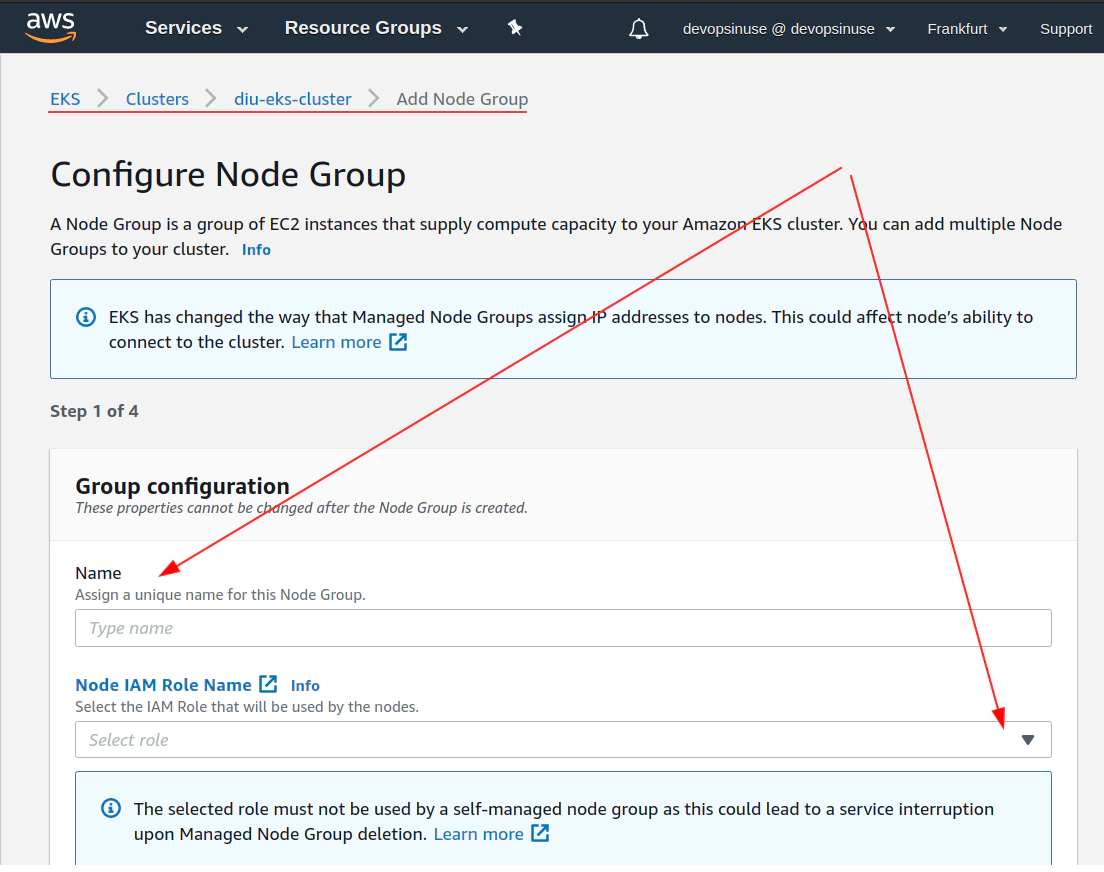
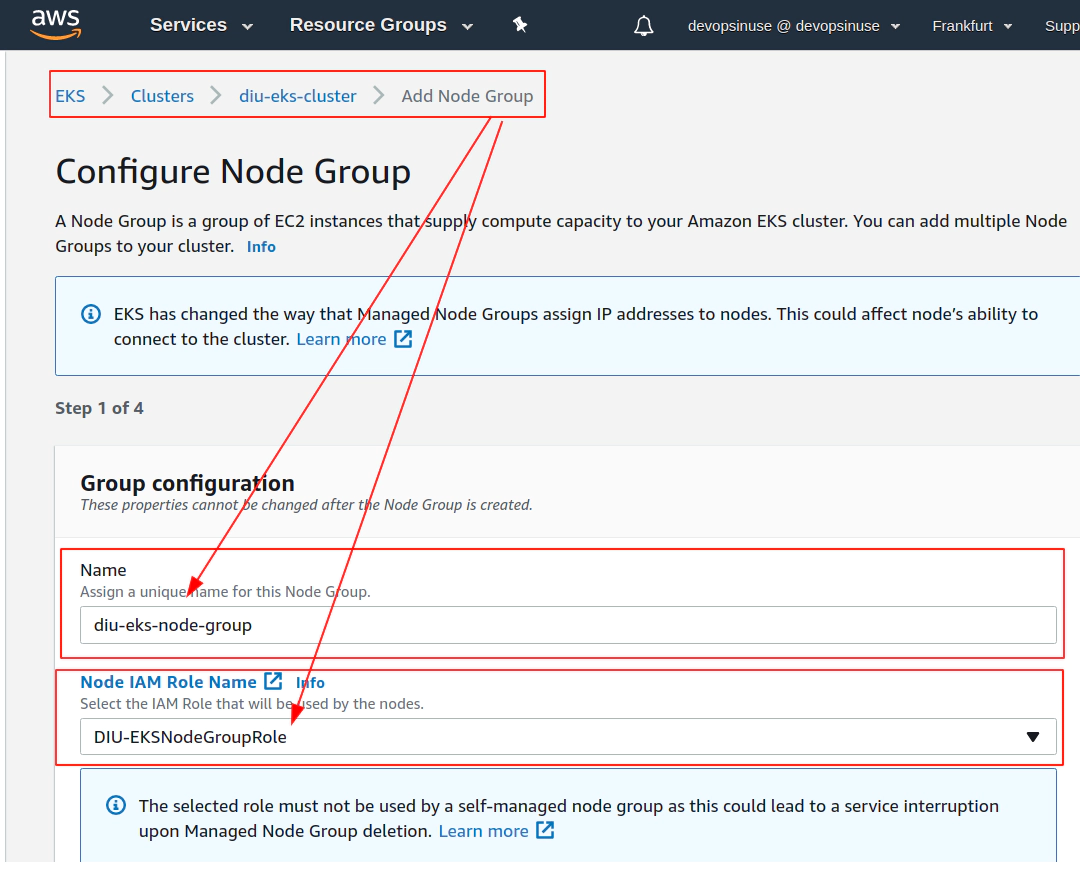
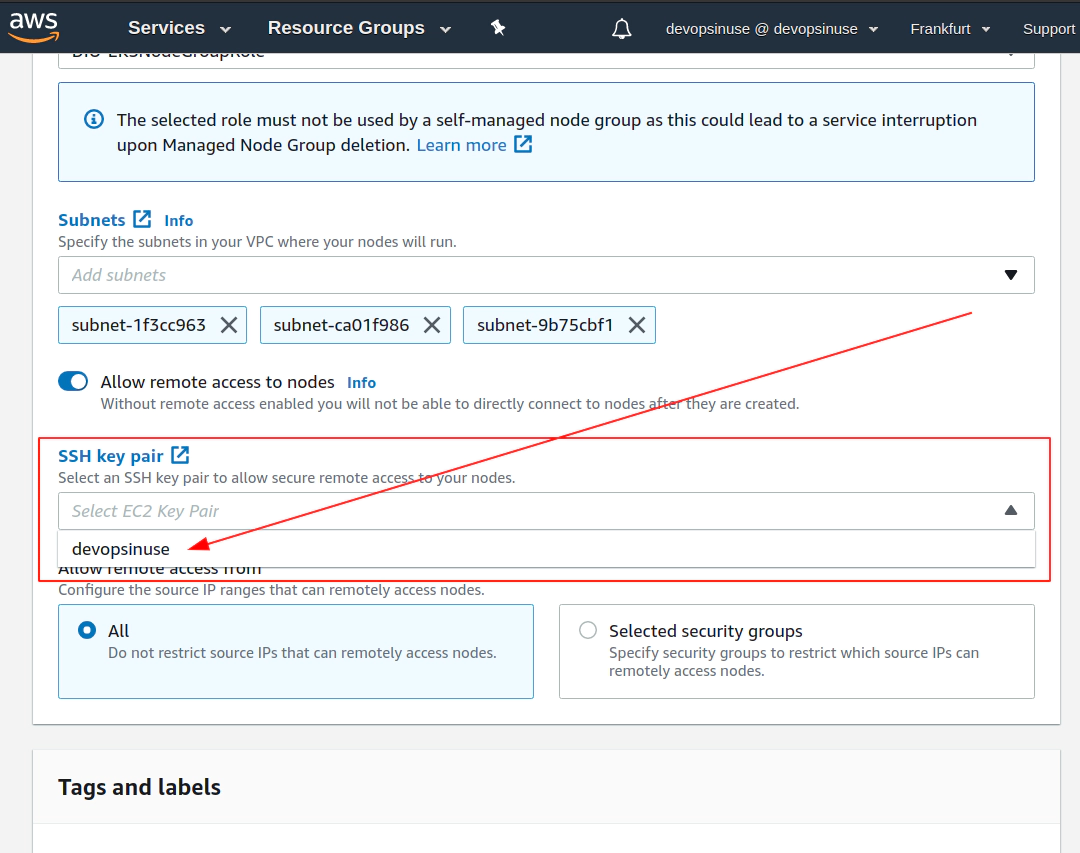
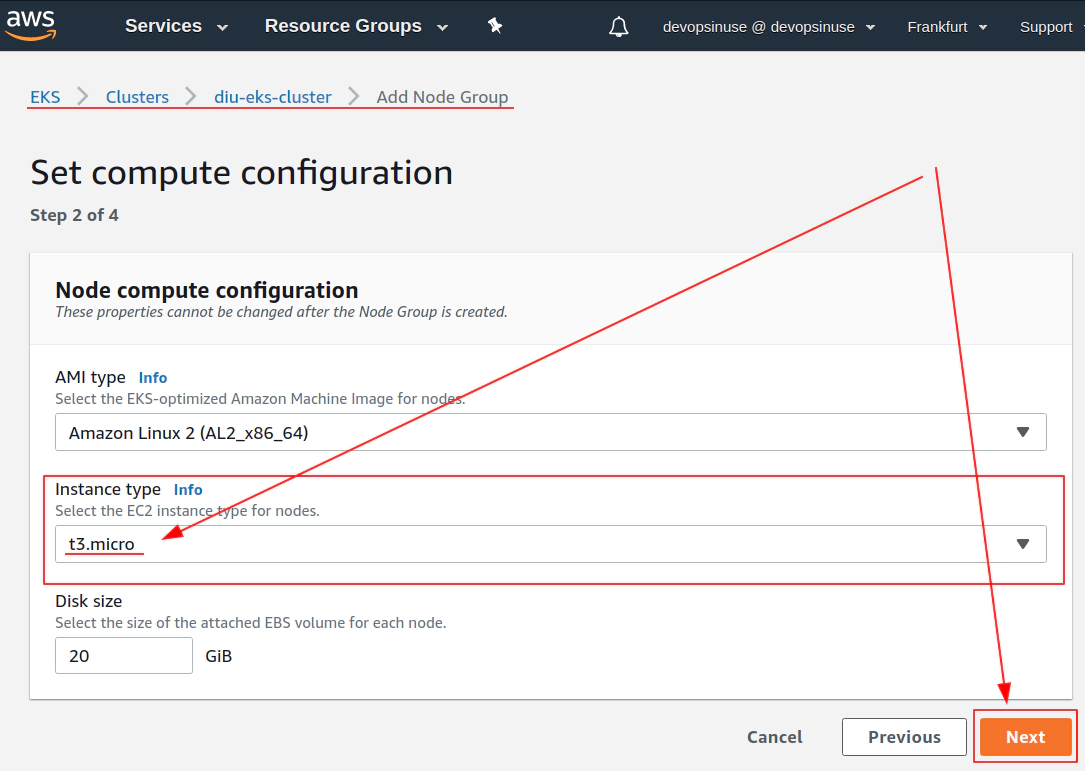
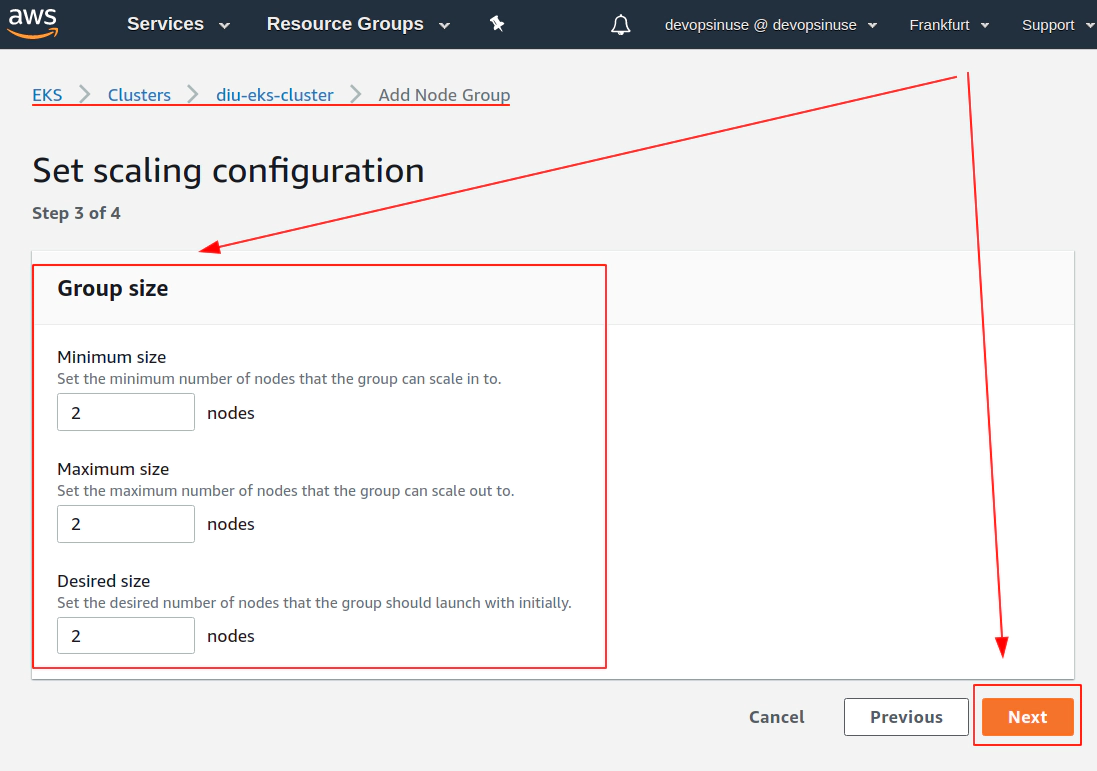
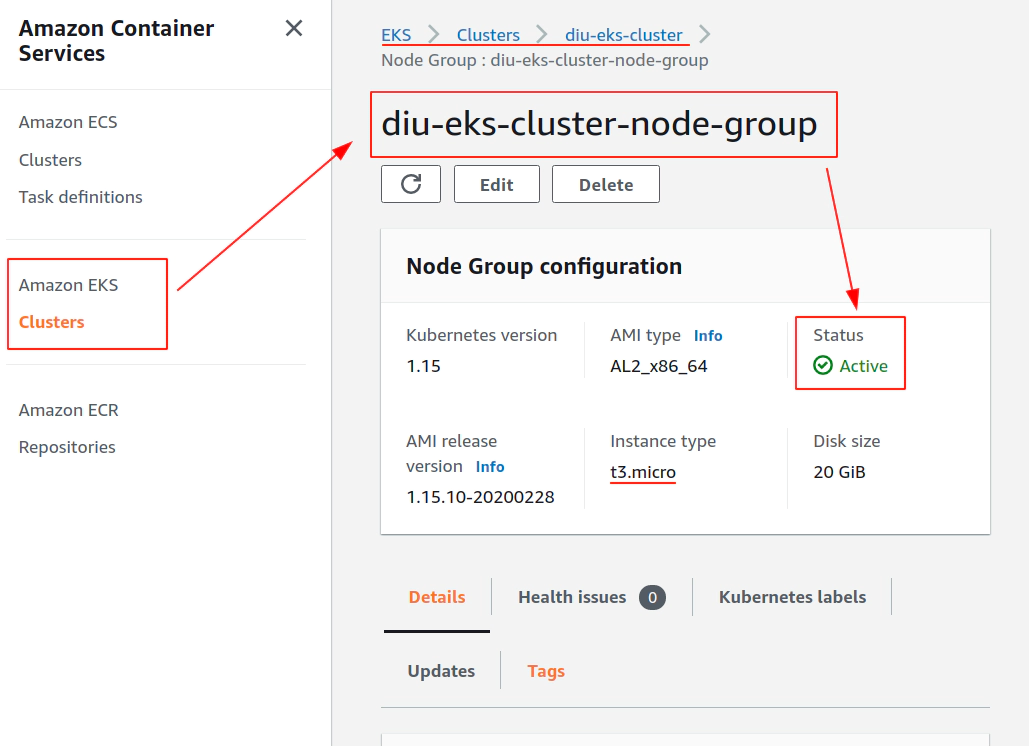
12. Create EKS node group in AWS web console

13. Create KUBECONFIG at your local
Run this command get the content of your ~/.kube/config file at your local
aws eks --region eu-central-1 update-kubeconfig --name diu-eks-cluster --profile devopsinuse

Added new context arn:aws:eks:eu-central-1:611111111116:cluster/diu-eks-cluster to /home/username/.kube/config
If you now go and take a look what is inside the file: ~/.kube/config, you will find a correct connection settings to be able to communicate with your AWS EKS Kubernetes cluster under your AWS Free Tier account
Run following commands to make sure that you can communicte with your AWS EKS Kubernetes cluster under your AWS Free Tier account
kubectl get nodes
NAME                                            STATUS   ROLES    AGE     VERSION
ip-172-31-20-97.eu-central-1.compute.internal   Ready    <none>   9m2s    v1.15.10-eks-bac369
ip-172-31-3-232.eu-central-1.compute.internal   Ready    <none>   8m55s   v1.15.10-eks-bac369

kubectl get pods -A
NAMESPACE     NAME                       READY   STATUS    RESTARTS   AGE
kube-system   aws-node-ldt44             1/1     Running   0          9m14s
kube-system   aws-node-s6nb9             1/1     Running   0          9m7s
kube-system   coredns-5b6dbb4b59-4rjkm   1/1     Running   0          23m
kube-system   coredns-5b6dbb4b59-bnxs4   1/1     Running   0          23m
kube-system   kube-proxy-ncm6q           1/1     Running   0          9m14s
kube-system   kube-proxy-zffwq           1/1     Running   0          9m7s
14. Create configmap for NGINX deployment to AWS EKS cluster
tree deployment-eks-nginx-manual
deployment-eks-nginx-manual
├── deployment-eks-nginx-manual.yaml
├── index-eks-nginx-manual_files
│   ├── bootstrap.min.css
│   ├── bootstrap.min.js
│   ├── Chart.min.js
│   ├── dashboard.css
│   ├── feather.min.js
│   ├── jquery-3.2.1.slim.min.js
│   └── popper.min.js
└── index-eks-nginx-manual.html
Create configmap kubernetes object nginx-cm
cd deployment-eks-nginx-manual/

kubectl create configmap nginx-cm \
--from-file="index-eks-nginx-manual.html" \
--from-file="index-eks-nginx-manual_files/bootstrap.min.css" \
--from-file="index-eks-nginx-manual_files/bootstrap.min.js" \
--from-file="index-eks-nginx-manual_files/Chart.min.js" \
--from-file="index-eks-nginx-manual_files/dashboard.css" \
--from-file="index-eks-nginx-manual_files/feather.min.js" \
--from-file="index-eks-nginx-manual_files/jquery-3.2.1.slim.min.js" \
--from-file="index-eks-nginx-manual_files/popper.min.js"
Explore file: deployment-eks-nginx-manual.yaml for creating deployment and service Kubernetes objects
---
apiVersion: apps/v1
kind: Deployment
metadata:
  name: nginx
  labels:
    app: nginx
spec:
  replicas: 1
  selector:
    matchLabels:
      app: nginx
  template:
    metadata:
      labels:
        app: nginx
    spec:
      containers:
      - name: nginx
        image: nginx
        ports:
        - containerPort: 80
        volumeMounts:
        - mountPath: /usr/share/nginx/html/index.html
          readOnly: true
          name: nginx-cm
          subPath: index.html
        - mountPath: /usr/share/nginx/html/index-eks-nginx-manual_files/bootstrap.min.css
          readOnly: true
          name: nginx-cm
          subPath: bootstrap.min.css
        - mountPath: /usr/share/nginx/html/index-eks-nginx-manual_files/bootstrap.min.js
          readOnly: true
          name: nginx-cm
          subPath: bootstrap.min.js
        - mountPath: /usr/share/nginx/html/index-eks-nginx-manual_files/Chart.min.js
          readOnly: true
          name: nginx-cm
          subPath: Chart.min.js
        - mountPath: /usr/share/nginx/html/index-eks-nginx-manual_files/dashboard.css
          readOnly: true
          name: nginx-cm
          subPath: dashboard.css
        - mountPath: /usr/share/nginx/html/index-eks-nginx-manual_files/feather.min.js
          readOnly: true
          name: nginx-cm
          subPath: feather.min.js
        - mountPath: /usr/share/nginx/html/index-eks-nginx-manual_files/jquery-3.2.1.slim.min.js
          readOnly: true
          name: nginx-cm
          subPath: jquery-3.2.1.slim.min.js
        - mountPath: /usr/share/nginx/html/index-eks-nginx-manual_files/popper.min.js
          readOnly: true
          name: nginx-cm
          subPath: popper.min.js

      volumes:
      # Do not forget to run this command up front
      # kubectl create configmap nginx-cm --from-file=index-eks-nginx-manual.html
      - name: nginx-cm
        configMap:
          name: nginx-cm
          items:
            - key: index-eks-nginx-manual.html
              path: index.html
            - key: bootstrap.min.css
              path: bootstrap.min.css
            - key: bootstrap.min.js
              path: bootstrap.min.js
            - key: Chart.min.js
              path: Chart.min.js
            - key: dashboard.css
              path: dashboard.css
            - key: feather.min.js
              path: feather.min.js
            - key: jquery-3.2.1.slim.min.js
              path: jquery-3.2.1.slim.min.js
            - key: popper.min.js
              path: popper.min.js


---
apiVersion: v1
kind: Service
metadata:
  name: nginx
spec:
  type: NodePort
  ports:
  - port: 80
    targetPort: 80
    nodePort: 30111
  selector:
    app: nginx
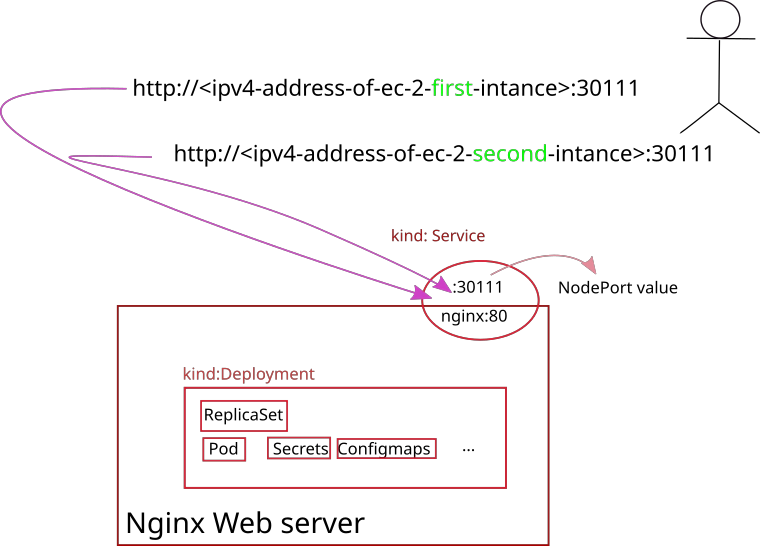
15. Execute Nginx deployment against AWS EKS Kubernetes cluster
Execute deployment of your Nginx web server with custom content
kubectl apply -f deployment-eks-nginx-manual.yaml
Retrive IP Addresses of your physical nodes in AWS
kubectl get nodes -o wide | awk -F" " '{print $1"\t"$7}'
NAME EXTERNAL-IP
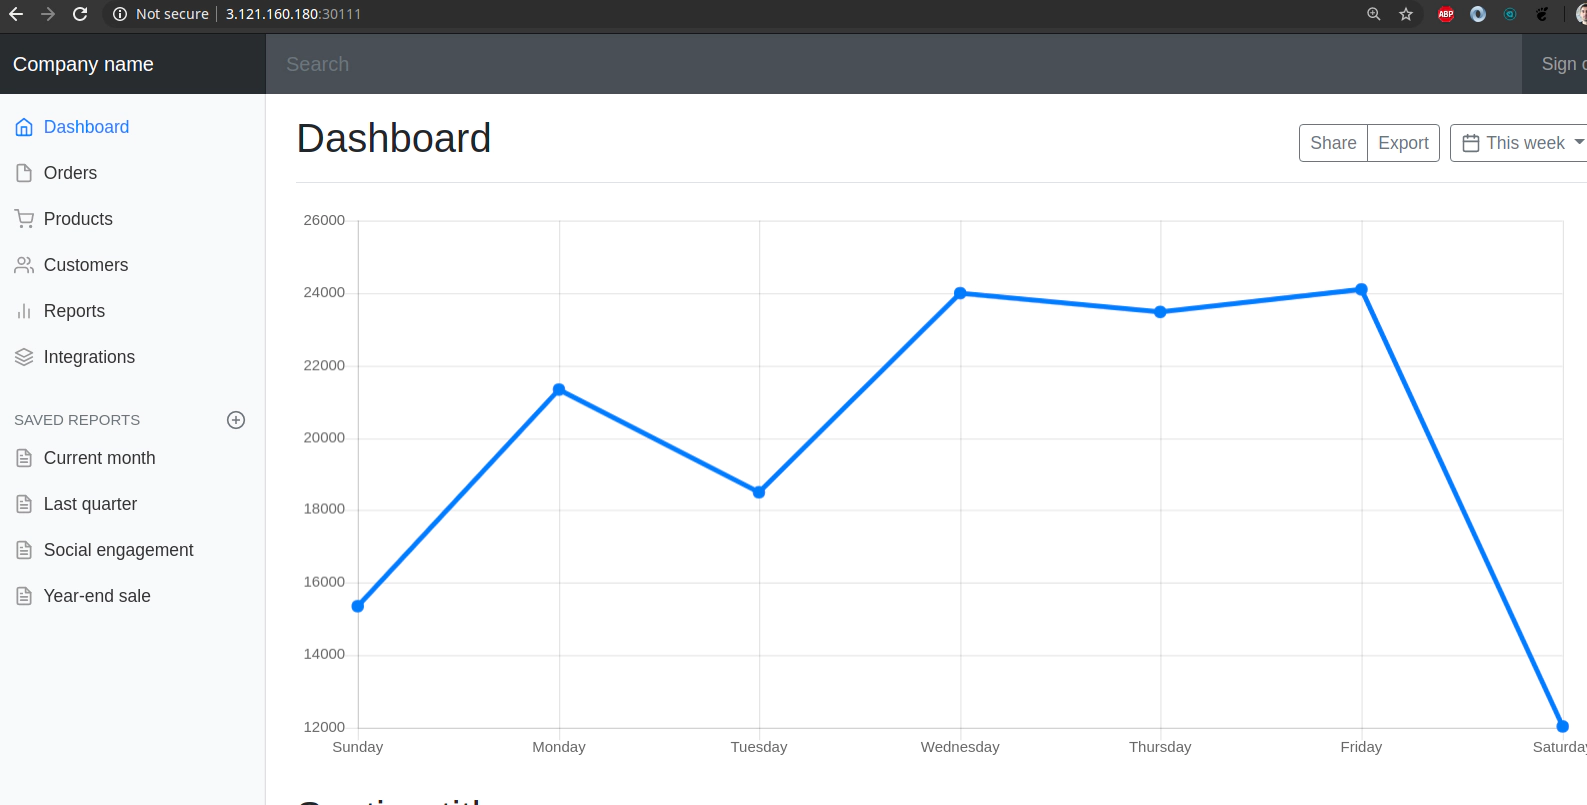
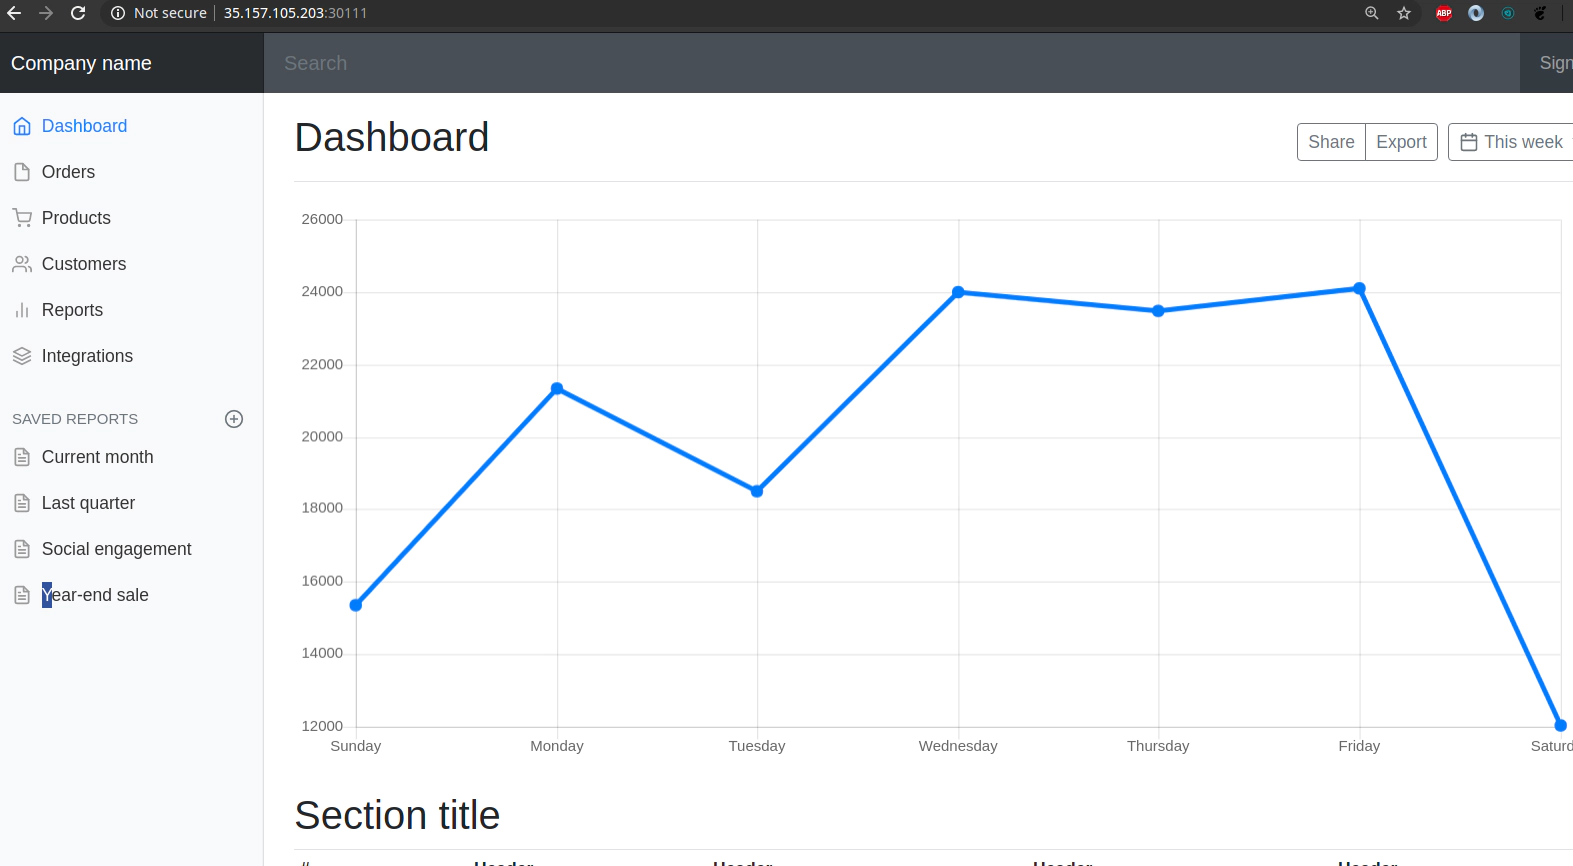
ip-172-31-20-97.eu-central-1.compute.internal 35.157.105.203
ip-172-31-3-232.eu-central-1.compute.internal 3.121.160.180
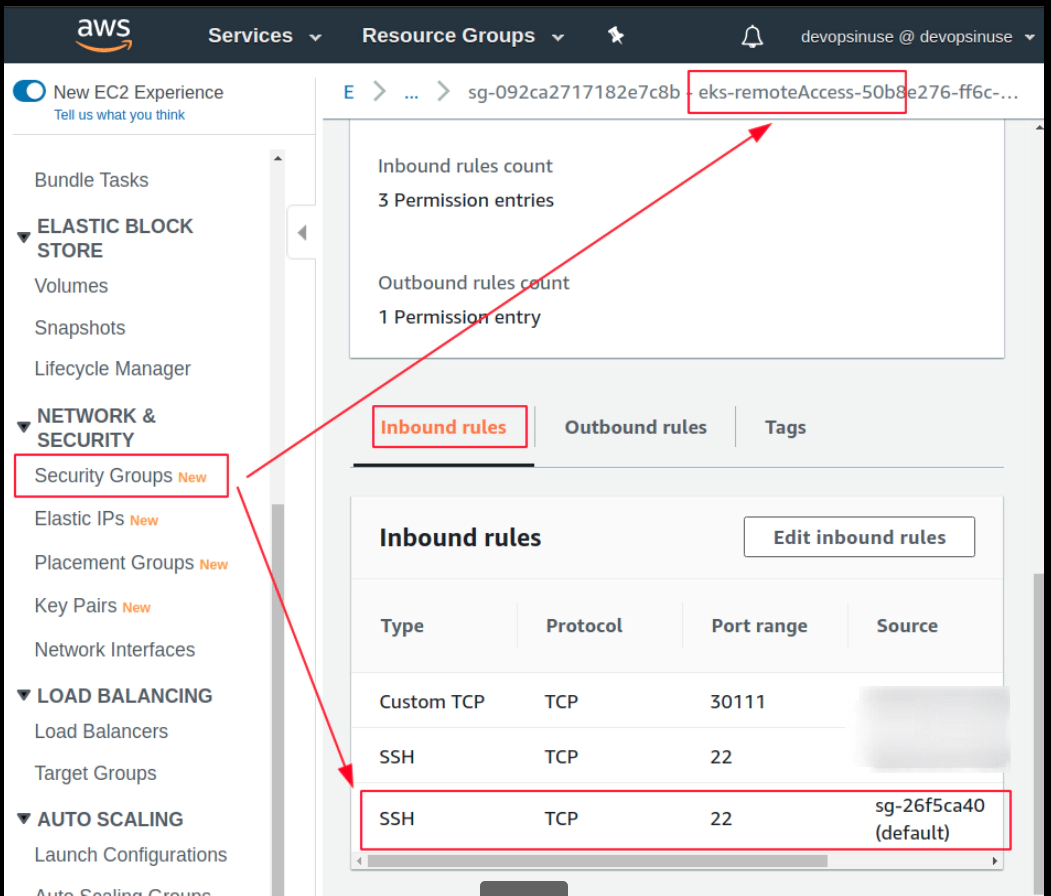
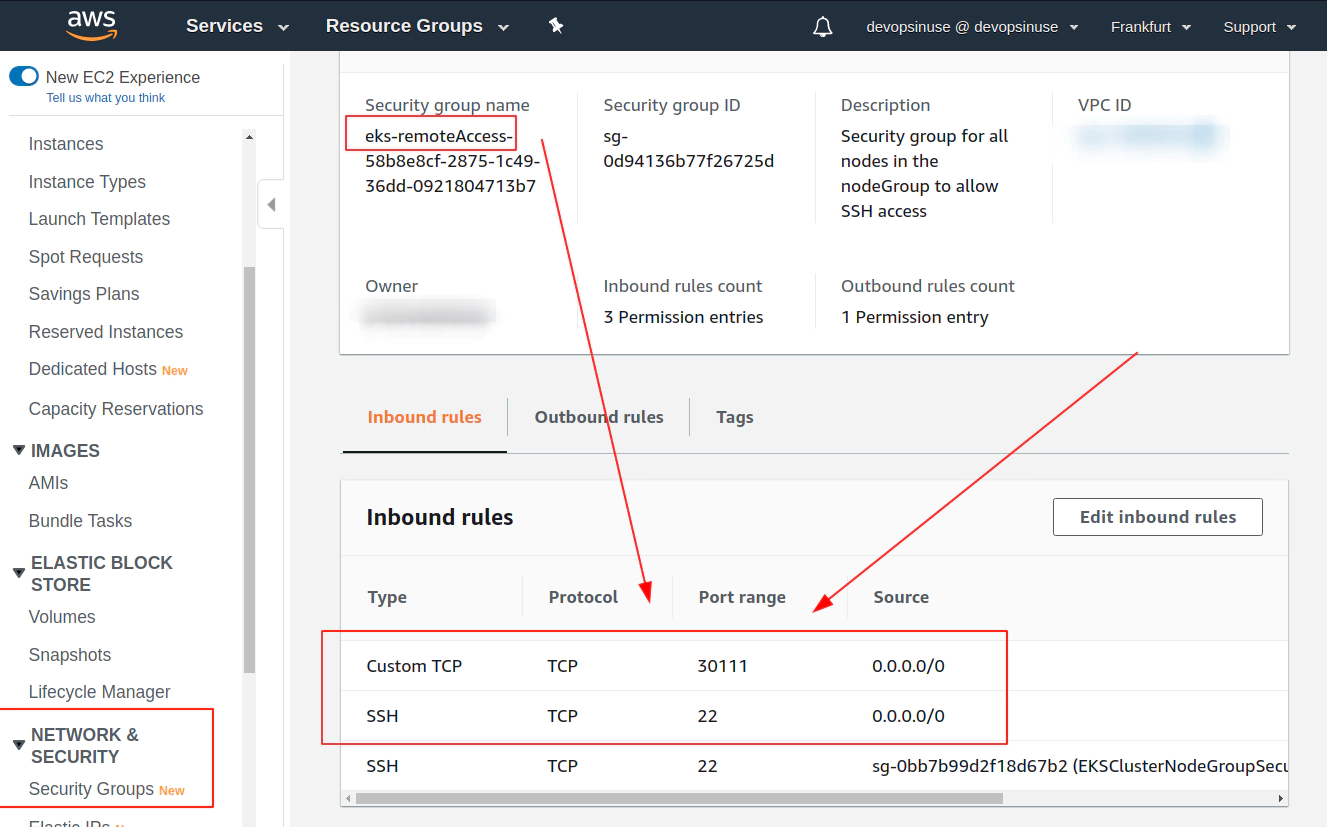
Allow port 30111 in Security Group section in AWS console
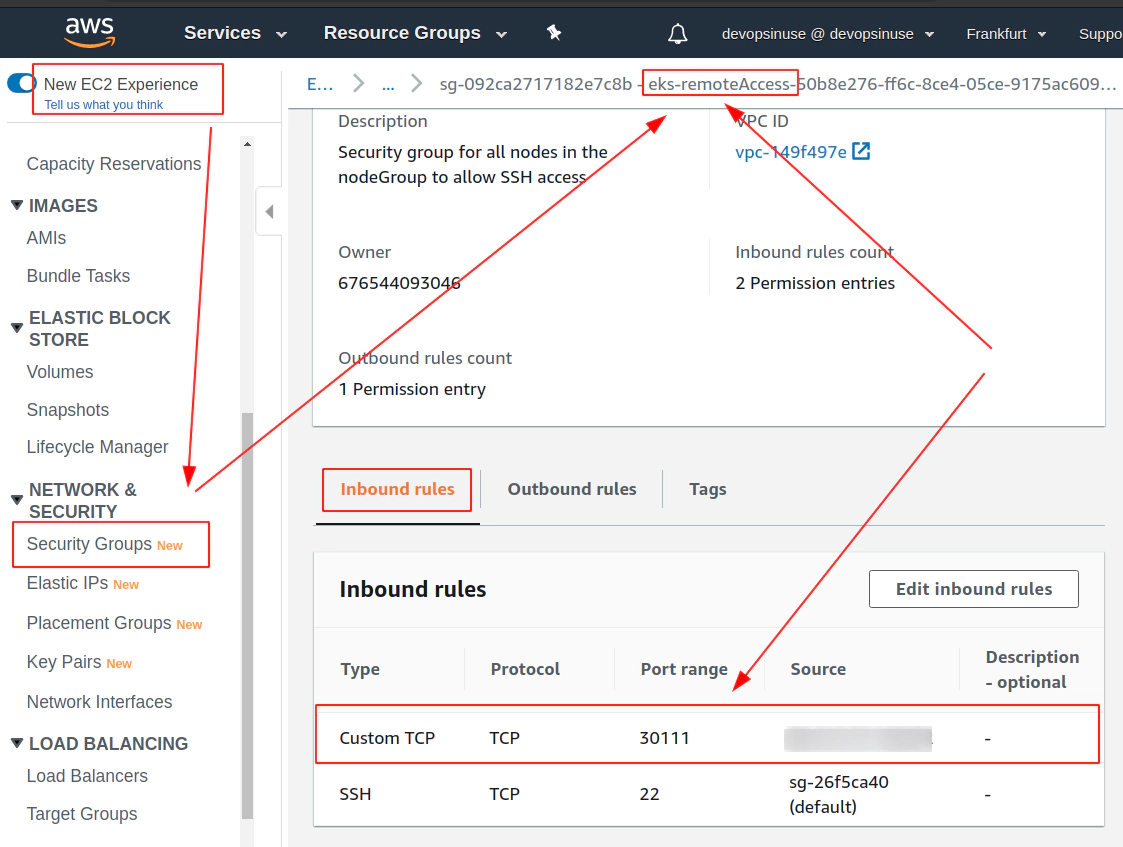
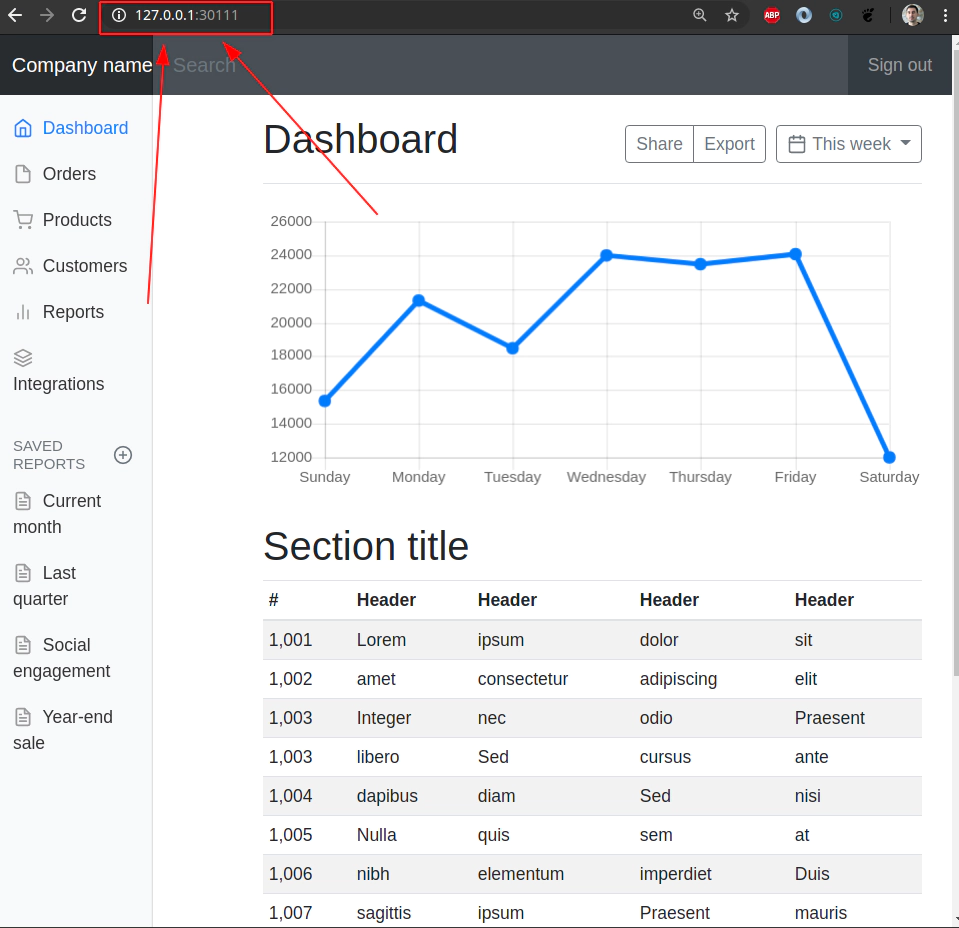
SSH tunnel approach without the need to seup Security group in AWS
ssh -o "IdentitiesOnly yes" \
-i  ~/.ssh/devopsinuse.pem \
ec2-user@35.157.105.203 \
-L30111:127.0.0.1:30111
16. Explore Nginx pod by attaching to a running container
Explore Nginx pod by attaching to a running container
Get the list of all available pods within default namespace
kubectl get pods
NAME                     READY   STATUS    RESTARTS   AGE
nginx-6d786774cd-fmtgh   1/1     Running   0          31m

kubectl exec -it  nginx-6d786774cd-fmtgh -- bash
root@nginx-6d786774cd-fmtgh:/#


root@nginx-6d786774cd-fmtgh:/# ls usr/share/nginx/html/index* -l
-rw-r--r-- 1 root root 10:17 usr/share/nginx/html/index.html

usr/share/nginx/html/index-eks-nginx-manual_files:
total 516
-rw-r--r-- 1 root root  10:17 Chart.min.js
-rw-r--r-- 1 root root  10:17 bootstrap.min.css
-rw-r--r-- 1 root root  10:17 bootstrap.min.js
-rw-r--r-- 1 root root  10:17 dashboard.css
-rw-r--r-- 1 root root  10:17 feather.min.js
-rw-r--r-- 1 root root  10:17 jquery-3.2.1.slim.min.js
-rw-r--r-- 1 root root  10:17 popper.min.js
Ask Kubernetes to provide a list of available deployments
# get all deployments in default namespace
kubectl get deployment nginx -o yaml

apiVersion: extensions/v1beta1
kind: Deployment
metadata:
  annotations:
    deployment.kubernetes.io/revision: "1"
    kubectl.kubernetes.io/last-applied-configuration: |
      {...}
  creationTimestamp: "..."
  generation: 1
  labels:
    app: nginx
  name: nginx
  namespace: default
  resourceVersion: "15772"
  selfLink: /apis/extensions/v1beta1/namespaces/default/deployments/nginx
  uid: 83a88f7c-19f9-40b6-a3e6-76b6afc3f445
spec:
  progressDeadlineSeconds: 600
  replicas: 1
  revisionHistoryLimit: 2
  selector:
    matchLabels:
      app: nginx
  strategy:
    rollingUpdate:
      maxSurge: 25%
      maxUnavailable: 25%
    type: RollingUpdate
  template:
    metadata:
      creationTimestamp: null
      labels:
        app: nginx
    spec:
      containers:
      - image: nginx
        imagePullPolicy: Always
        name: nginx
        ports:
        - containerPort: 80
          protocol: TCP
        resources: {}
        terminationMessagePath: /dev/termination-log
        terminationMessagePolicy: File
        volumeMounts:
        - mountPath: /usr/share/nginx/html/index.html
          name: nginx-cm
          readOnly: true
          subPath: index.html
        - mountPath: /usr/share/nginx/html/index-eks-nginx-manual_files/bootstrap.min.css
          name: nginx-cm
          readOnly: true
          subPath: bootstrap.min.css
        - mountPath: /usr/share/nginx/html/index-eks-nginx-manual_files/bootstrap.min.js
          name: nginx-cm
          readOnly: true
          subPath: bootstrap.min.js
        - mountPath: /usr/share/nginx/html/index-eks-nginx-manual_files/Chart.min.js
          name: nginx-cm
          readOnly: true
          subPath: Chart.min.js
        - mountPath: /usr/share/nginx/html/index-eks-nginx-manual_files/dashboard.css
          name: nginx-cm
          readOnly: true
          subPath: dashboard.css
        - mountPath: /usr/share/nginx/html/index-eks-nginx-manual_files/feather.min.js
          name: nginx-cm
          readOnly: true
          subPath: feather.min.js
        - mountPath: /usr/share/nginx/html/index-eks-nginx-manual_files/jquery-3.2.1.slim.min.js
          name: nginx-cm
          readOnly: true
          subPath: jquery-3.2.1.slim.min.js
        - mountPath: /usr/share/nginx/html/index-eks-nginx-manual_files/popper.min.js
          name: nginx-cm
          readOnly: true
          subPath: popper.min.js
      dnsPolicy: ClusterFirst
      restartPolicy: Always
      schedulerName: default-scheduler
      securityContext: {}
      terminationGracePeriodSeconds: 30
      volumes:
      - configMap:
          defaultMode: 420
          items:
          - key: index-eks-nginx-manual.html
            path: index.html
          - key: bootstrap.min.css
            path: bootstrap.min.css
          - key: bootstrap.min.js
            path: bootstrap.min.js
          - key: Chart.min.js
            path: Chart.min.js
          - key: dashboard.css
            path: dashboard.css
          - key: feather.min.js
            path: feather.min.js
          - key: jquery-3.2.1.slim.min.js
            path: jquery-3.2.1.slim.min.js
          - key: popper.min.js
            path: popper.min.js
          name: nginx-cm
        name: nginx-cm
status:
  availableReplicas: 1
  conditions:
   ...
    type: Progressing
  observedGeneration: 1
  readyReplicas: 1
  replicas: 1
  updatedReplicas: 1
Ask Kubernetes for all available services within default namespace
kubectl get service  nginx -o yaml
apiVersion: v1
kind: Service
metadata:
  annotations:
    kubectl.kubernetes.io/last-applied-configuration: |
      {}
  creationTimestamp: "..."
  name: nginx
  namespace: default
  resourceVersion: "15759"
  selfLink: /api/v1/namespaces/default/services/nginx
  uid: 67ad2770-154a-4dc4-aa32-a4c2d53af8d2
spec:
  clusterIP: 10.100.210.78
  externalTrafficPolicy: Cluster
  ports:
  - nodePort: 30111
    port: 80
    protocol: TCP
    targetPort: 80
  selector:
    app: nginx
  sessionAffinity: None
  type: NodePort
status:
  loadBalancer: {}
17. SSH to physical EC2 instances within your Kubernetes cluster in AWS
In order to SSH you your Kubenretes cluster EC2 instances, it is important to allow (enable) port 22 in Security Group in AWS web console
Retrive IP Addresses of your physical nodes (EC2 instances) in AWS
kubectl get nodes -o wide | awk -F" " '{print $1"\t"$7}'
NAME    EXTERNAL-IP
ip-172-31-20-97.eu-central-1.compute.internal   35.157.105.203
ip-172-31-3-232.eu-central-1.compute.internal   3.121.160.180
SSH to a node (EC2 instance) with the first IP Address
ssh -o "IdentitiesOnly yes" \
-i  ~/.ssh/devopsinuse.pem \
ec2-user@35.157.105.203
SSH to a node (EC2 instance) with the second IP Address
ssh -o "IdentitiesOnly yes" \
-i  ~/.ssh/devopsinuse.pem \
ec2-user@3.121.160.180
18. Clean up
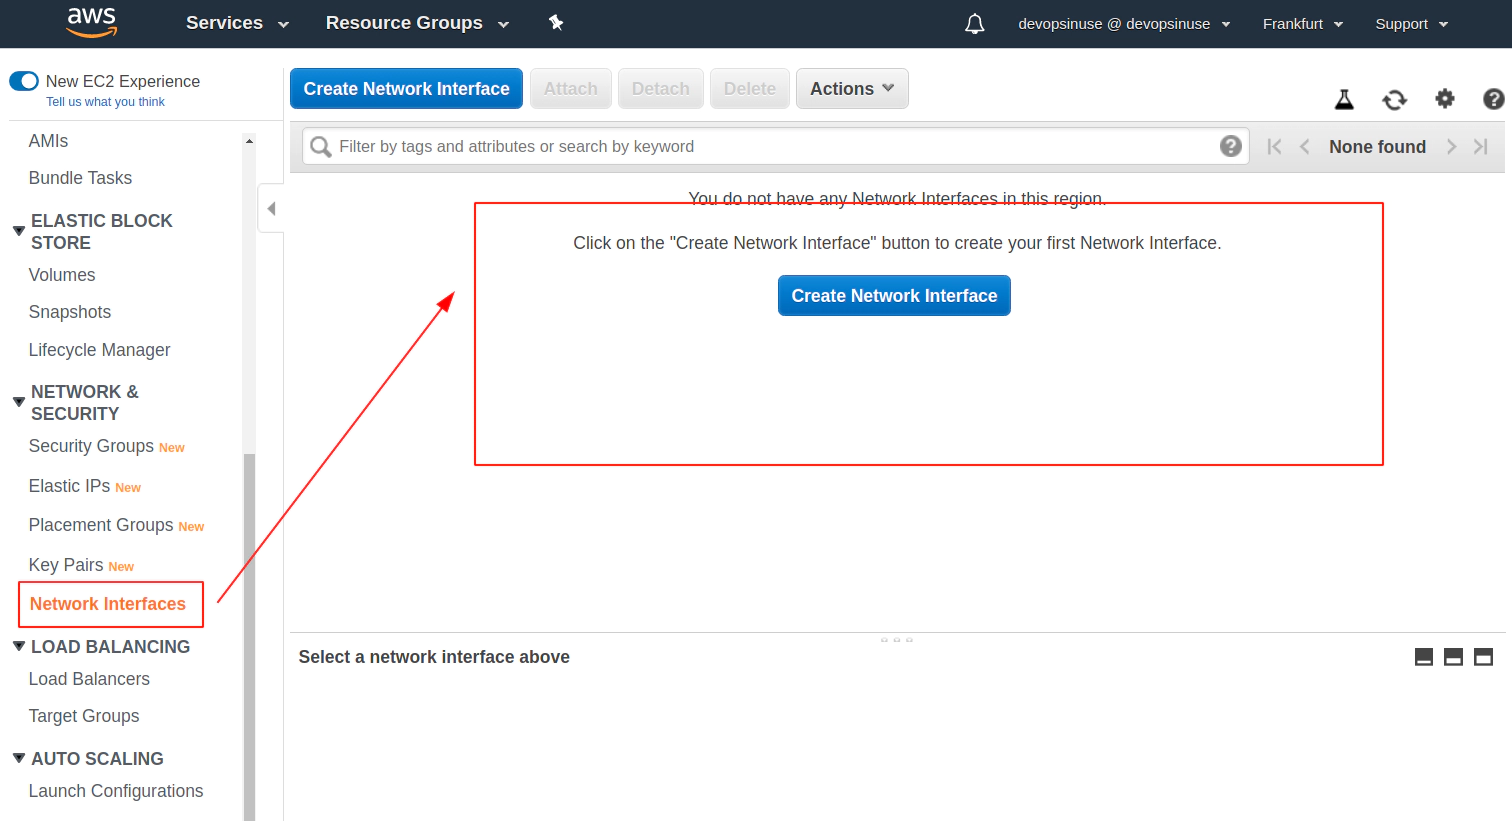
Clean up Network Interfaces
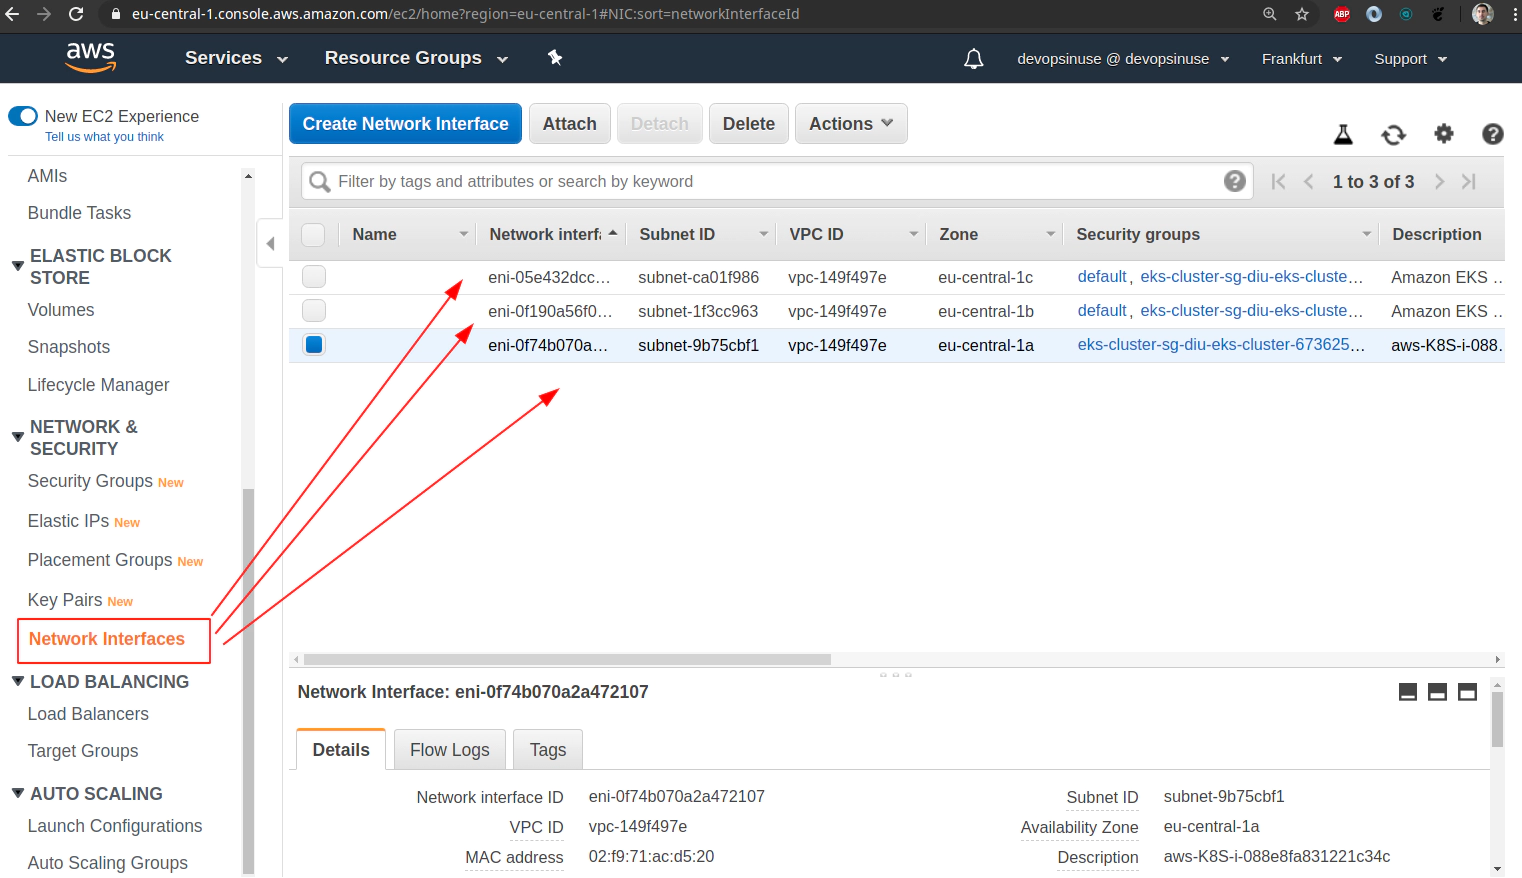
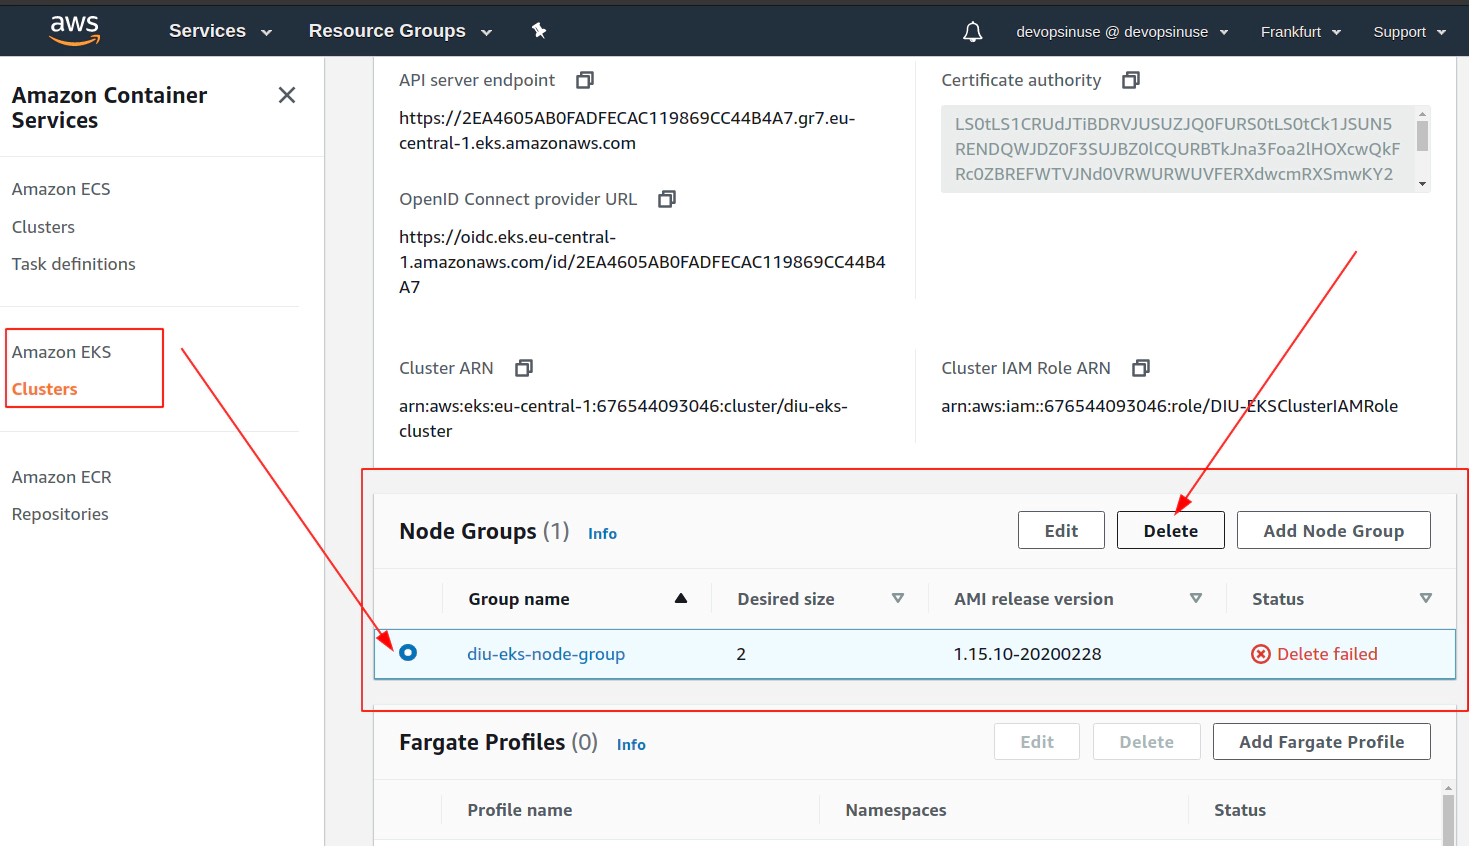
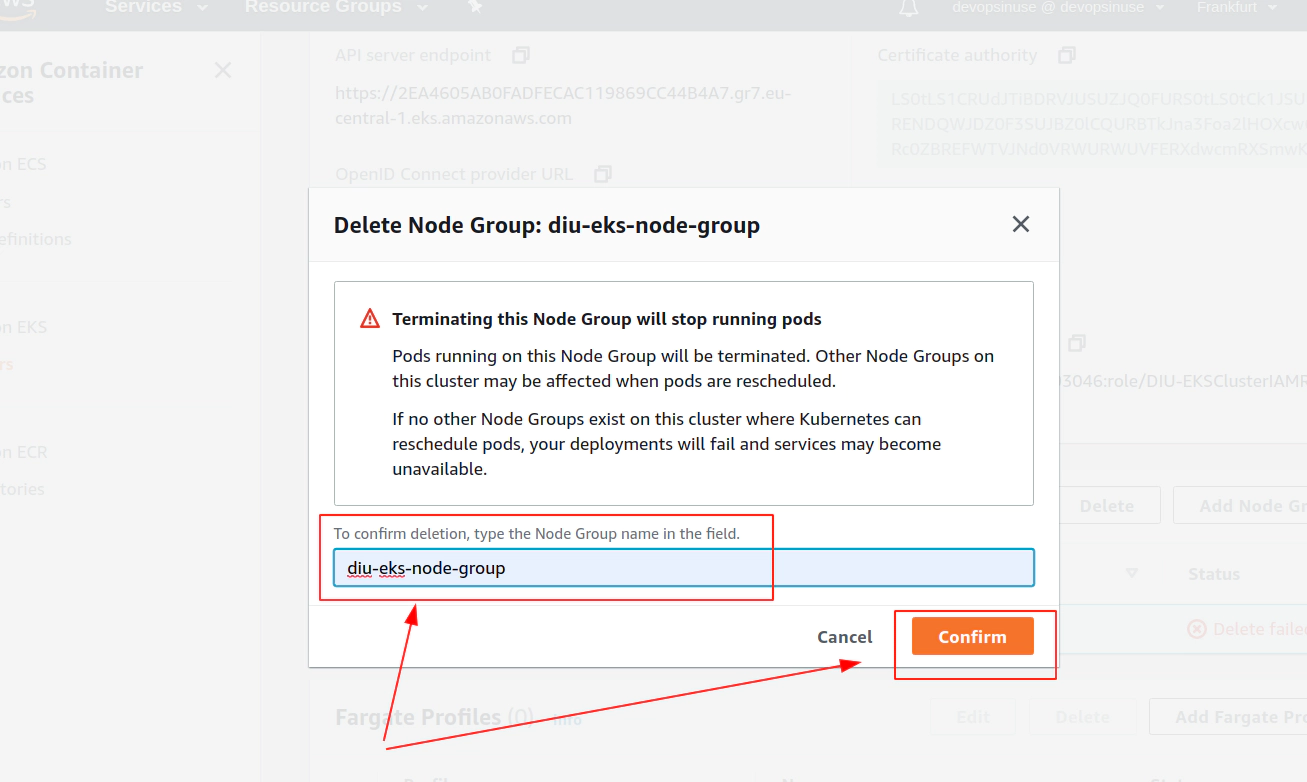
Clean up AWS EKS node group
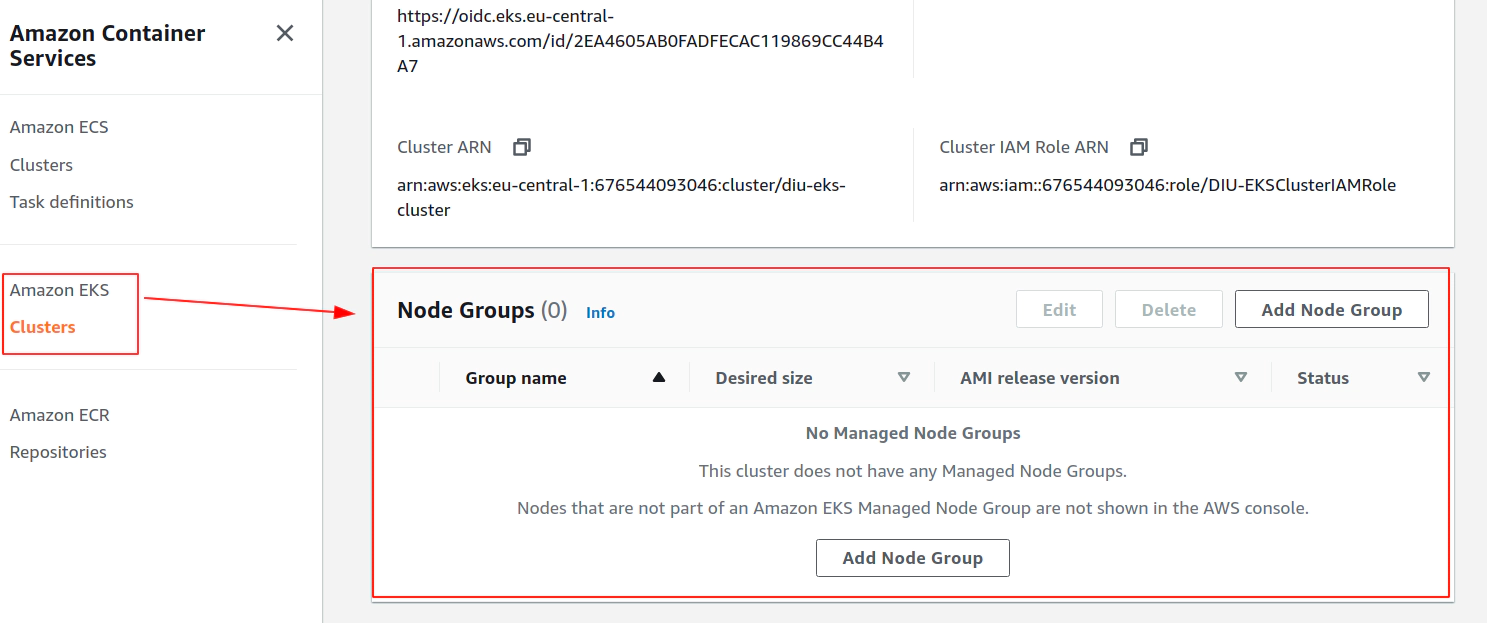
Clean up AWS EKS control plane
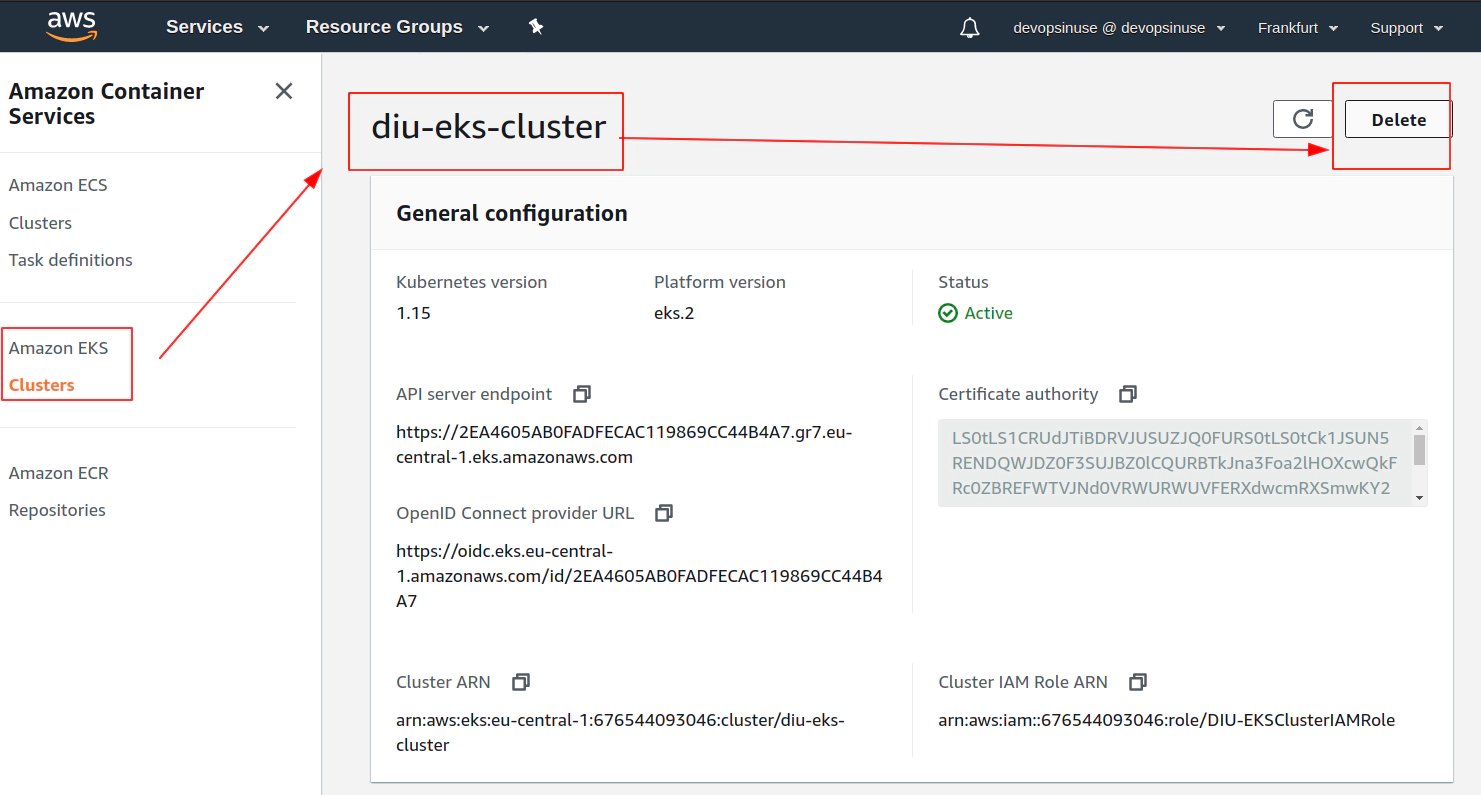
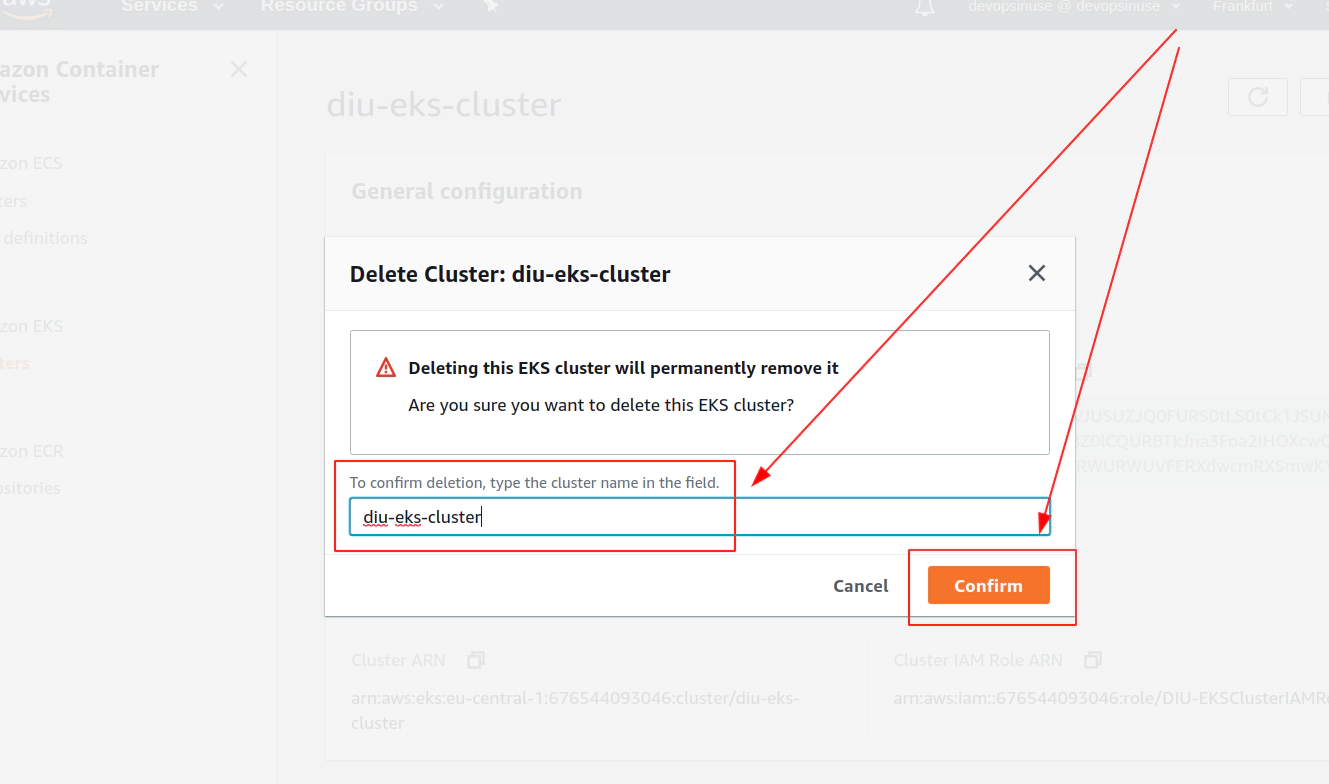
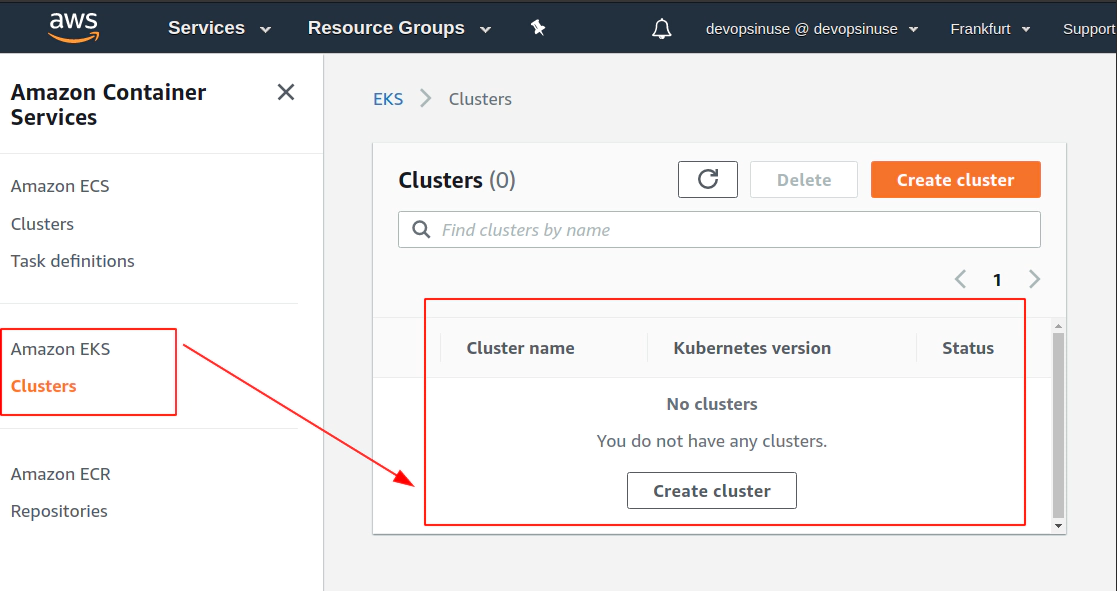
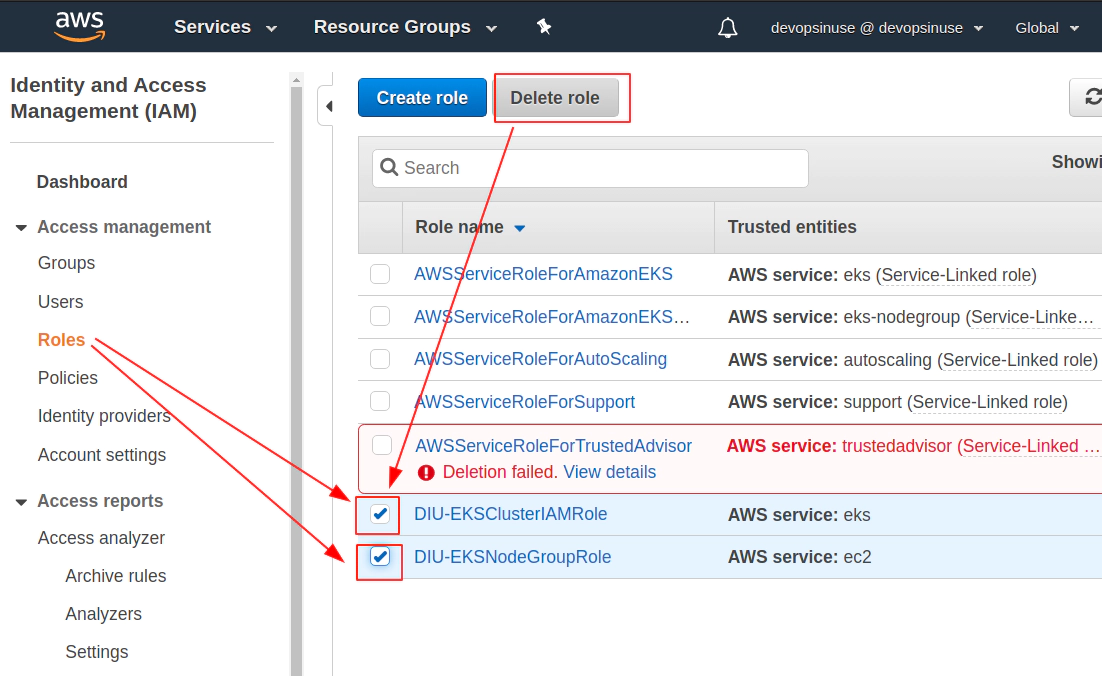
Delete AWS IAM roles
2. Using terrafrom to manage AWS EKS cluster
19. Install terrafrom binary at your local
Link: https://www.terraform.io/downloads.html
Download *.zip file from the lin below. Unzip files to a proper location at your local e.g. /usr/bin.
curl -L --output /tmp/terraform.zip  \
https://releases.hashicorp.com/terraform/0.12.24/terraform_0.12.24_linux_amd64.zip

sudo unzip -d /usr/bin/ /tmp/terraform.zip

terraform -version
Terraform v0.12.24
20. Run terrafrom init and validate to initialize required plugins
Navigate to eks-terraform folder and list it to see the terrafrom files
cd eks-terraform
tree
.
├── iam.tf
├── main.tf
├── outputs.tf
├── sg.tf
├── subnets.tf
├── terraform.eks.tfvars
├── terraform.eks.tfvars.git
├── terraform.tfstate
└── variables.tf
- Most of the files have completly commented lines for now.
- When touching this code for the first time, there should be no hidden
.terrafromfolder present. .terraformfolder stores all neceassary terrafrom plugins used within this code- plugins will be downloaded to
terraformfolder afterterraform initcommand run
… sbx aws-eks-devopsinuse eks-terraform master ✚ 1 … 1 terraform init
Initializing the backend...
Initializing provider plugins...
- Checking for available provider plugins...
- Downloading plugin for provider "aws" (hashicorp/aws) 2.60.0...
The following providers do not have any version constraints in configuration,
so the latest version was installed.
To prevent automatic upgrades to new major versions that may contain breaking
changes, it is recommended to add version = "..." constraints to the
corresponding provider blocks in configuration, with the constraint strings
suggested below.
* provider.aws: version = "~> 2.60"
Terraform has been successfully initialized!
You may now begin working with Terraform. Try running "terraform plan" to see
any changes that are required for your infrastructure. All Terraform commands
should now work.
If you ever set or change modules or backend configuration for Terraform,
rerun this command to reinitialize your working directory. If you forget, other
commands will detect it and remind you to do so if necessary.
Take a look what is now stored in .terraform folder
… sbx aws-eks-devopsinuse eks-terraform master ✚ 1 … 3 tree .terraform
.terraform
└── plugins
└── linux_amd64
├── lock.json
└── terraform-provider-aws_v2.60.0_x4
2 directories, 2 files
21. Fill up terraform.eks.tfvars file with your AWS security credentials
to start using terrafrom it only takes few commands to learn in the begining
most comonly used commands will be:
terraform initterraform planterraform applyterraform destroyterraform showterraform consoleterraform validateterraform fmt -recursive
Before running
terraform planandterraform applyto see what the code is about to create - it is neceassary to setup credentials to make terrafrom binary talk to AWS.there are several main ways how to setup this communication:
(1) export env. variables to console you are using:
export AWS_ACCESS_KEY_ID="..."export AWS_SECRET_ACCESS_KEY="..."export AWS_DEFAULT_REGION="eu-central-1"(2) configure two files (since we configured aws cli
--profile):~/.aws/credentials~/.aws/configexport AWS_PROFILE="devopsinuse"(3) use
-var-fileflag when runningterrafrom <command> -var-file terraform.eks.tfvarsterraform destroy -var-file terraform.eks.tfvars
Please fill up file: terraform.eks.tfvars
cat terraform.eks.tfvars

aws_region     = "eu-central-1"
aws_access_key = "..."
aws_secret_key = "..."
ssh_public_key = "/home/user/.ssh/eks-aws.pub"
custom_tags = {
  Name      = "diu-eks-cluster-tag"
  Terraform = "true"
  Delete    = "true"
}

eks-cluster-name = "diu-eks-cluster"
kubernetes-version = "1.16"

desired_number_nodes = 2
max_number_nodes = 3
min_number_nodes = 1

tcp_ports = ["22", "30111", "30222", "30333"]
Generate SSH key pair:
SSH_KEYS=~/.ssh/eks-aws

if [ ! -f "$SSH_KEYS" ]
then
   echo -e "\nCreating SSH keys ..."
   ssh-keygen -t rsa -C "eks-aws" -N '' -f $SSH_KEYS
else
   echo -e "\nSSH keys are already in place\!"
fi
22. Run terrafrom plan and terrafrom apply
Run terraform validate and terraform fmt -recursive first to validate the code and do a proper formatting of the terrafrom code
terraform validate
Success! The configuration is valid.

terraform fmt -recursive
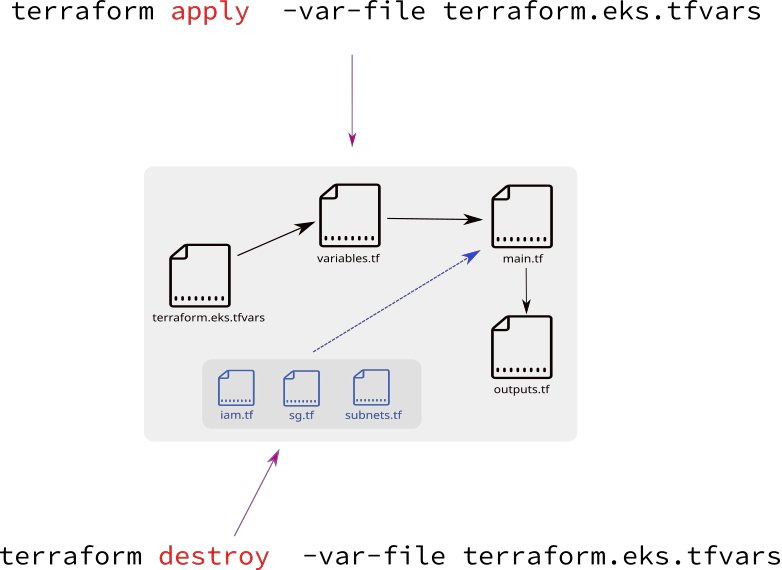
- it’s mostly refered that terraform has 3 main files with a correspondng naming convention:
main.tfvariables.tfoutputs.tf----------------terraform.eks.tfvars(extra var file)
terraform plan will throw an error:
terrafrom plan

var.aws_access_key
  AWS region
  Enter a value:
run: terraform plan -var-file terraform.eks.tfvars with an extra flag: -var-file
terraform plan -var-file terraform.eks.tfvars
Refreshing Terraform state in-memory prior to plan...
The refreshed state will be used to calculate this plan, but will not be
persisted to local or remote state storage.

data.aws_vpc.default: Refreshing state...
data.aws_availability_zones.default: Refreshing state...
data.aws_subnet_ids.default: Refreshing state...

------------------------------------------------------------------------

No changes. Infrastructure is up-to-date.

This means that Terraform did not detect any differences between your
configuration and real physical resources that exist. As a result, no
actions need to be performed.
The reason why terrafrom is not going to do anything special in paricular is that most of the files are commented. There are just few lines without comments in main.tffile.
However, the files variables.tf and outputs.tf keep few active (uncommented) lines and once terraform apply -var-file terraform.eks.tfvars is executed, there will be some output.
Run terraform apply -var-file terraform.eks.tfvars command:
terraform apply -var-file terraform.eks.tfvars

data.aws_availability_zones.default: Refreshing state...
data.aws_vpc.default: Refreshing state...
data.aws_subnet_ids.default: Refreshing state...

Apply complete! Resources: 0 added, 0 changed, 0 destroyed.

Outputs:

aws_availability_zones = {
  "group_names" = [
    "eu-central-1",
  ]
  "id" = "..."
  "names" = [
    "eu-central-1a",
    "eu-central-1b",
    "eu-central-1c",
  ]
  "state" = "available"
  "zone_ids" = [
    "euc1-az2",
    "euc1-az3",
    "euc1-az1",
  ]
}
vpc_id = vpc-111117e
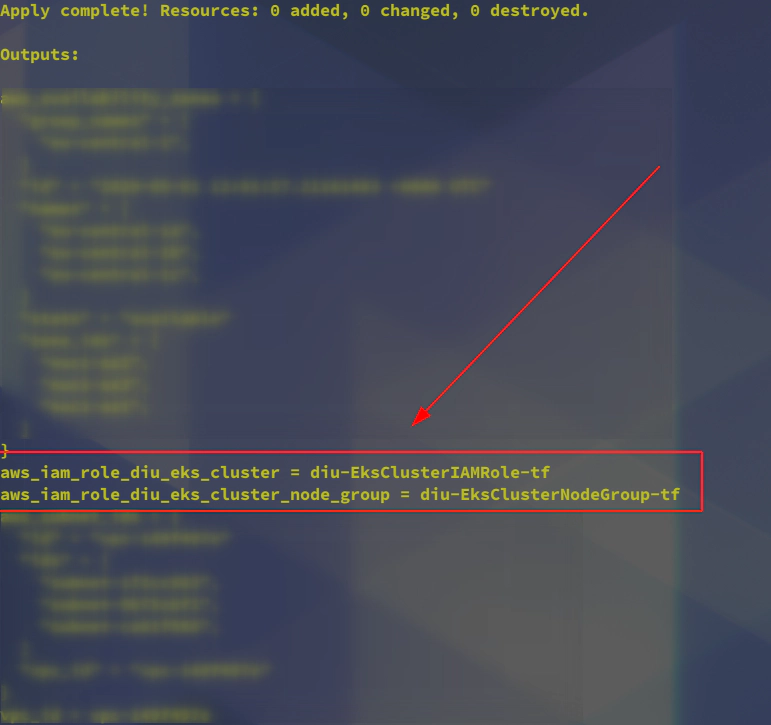
23. Uncomment iam.tf and run terrafrom apply to create mandatory AWS IAM roles
Remove comments from iam.tf file:
IAM AWS role for EKS control plane
# IAM AWS role for EKS control plane
resource "aws_iam_role" "diu-eks-cluster" {
  name = "diu-EksClusterIAMRole-tf"

  assume_role_policy = <<POLICY
{
  "Version": "2012-10-17",
  "Statement": [
    {
      "Effect": "Allow",
      "Principal": {
        "Service": "eks.amazonaws.com"
      },
      "Action": "sts:AssumeRole"
    }
  ]
}
POLICY
}

resource "aws_iam_role_policy_attachment" "diu-eks-cluster-AmazonEKSClusterPolicy" {
  policy_arn = "arn:aws:iam::aws:policy/AmazonEKSClusterPolicy"
  role       = aws_iam_role.diu-eks-cluster.name
}

resource "aws_iam_role_policy_attachment" "diu-eks-cluster-AmazonEKSServicePolicy" {
  policy_arn = "arn:aws:iam::aws:policy/AmazonEKSServicePolicy"
  role       = aws_iam_role.diu-eks-cluster.name
}
IAM AWS role for AWS EKS Node Group
# IAM AWS role for Node Group
resource "aws_iam_role" "diu-eks-cluster-node-group" {
  name = "diu-EksClusterNodeGroup-tf"

  assume_role_policy = jsonencode({
    Statement = [{
      Action = "sts:AssumeRole"
      Effect = "Allow"
      Principal = {
        Service = "ec2.amazonaws.com"
      }
    }]
    Version = "2012-10-17"
  })
}

resource "aws_iam_role_policy_attachment" "diu-eks-cluster-node-group-AmazonEKSWorkerNodePolicy" {
  policy_arn = "arn:aws:iam::aws:policy/AmazonEKSWorkerNodePolicy"
  role       = aws_iam_role.diu-eks-cluster-node-group.name
}

resource "aws_iam_role_policy_attachment" "diu-eks-cluster-node-group-AmazonEKS_CNI_Policy" {
  policy_arn = "arn:aws:iam::aws:policy/AmazonEKS_CNI_Policy"
  role       = aws_iam_role.diu-eks-cluster-node-group.name
}

resource "aws_iam_role_policy_attachment" "diu-eks-cluster-node-group-AmazonEC2ContainerRegistryReadOnly" {
  policy_arn = "arn:aws:iam::aws:policy/AmazonEC2ContainerRegistryReadOnly"
  role       = aws_iam_role.diu-eks-cluster-node-group.name
}
Please run terraform apply -var-file terraform.eks.tfvars
terraform apply -var-file terraform.eks.tfvars


data.aws_availability_zones.default: Refreshing state...
data.aws_vpc.default: Refreshing state...
data.aws_subnet_ids.default: Refreshing state...

An execution plan has been generated and is shown below.
Resource actions are indicated with the following symbols:
  + create

Terraform will perform the following actions:

  # aws_iam_role.diu-eks-cluster will be created
  + resource "aws_iam_role" "diu-eks-cluster" {
      + arn                   = (known after apply)
      + assume_role_policy    = jsonencode(
            {
              + Statement = [
                  + {

  ...
  ...
  ...

  Terraform will perform the actions described above.
  Only 'yes' will be accepted to approve.

  Enter a value: yes
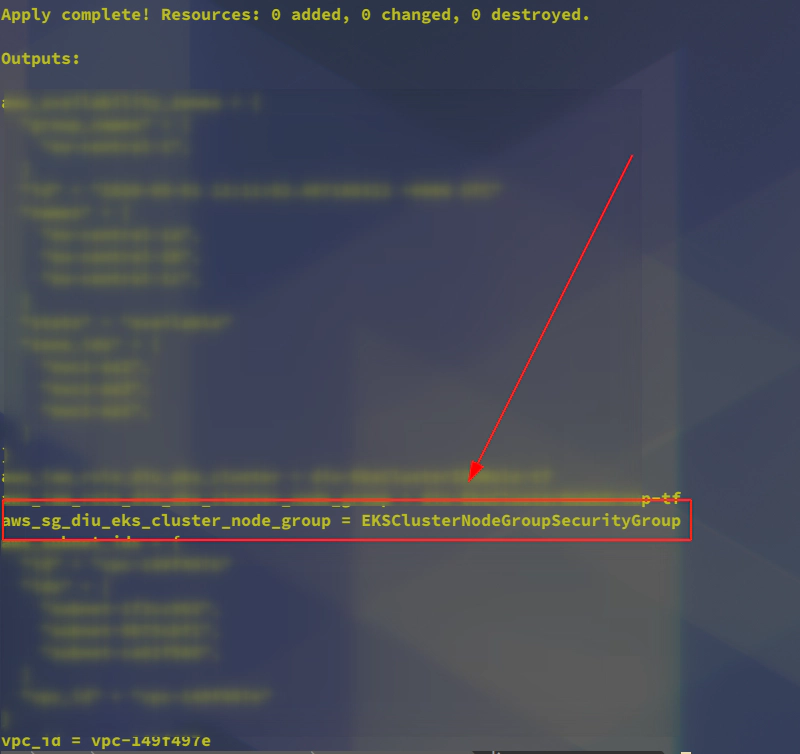
24. Run terraform apply uncomment sg.tf to create extra Security Group
https://docs.aws.amazon.com/eks/latest/userguide/sec-group-reqs.html
kubernetes.io/cluster/<cluster-name> owned
Please uncomment all lines from sg.tf file and run terraform apply -var-file terraform.eks.tfvars command:
terraform apply -var-file terraform.eks.tfvars
aws_iam_role.diu-eks-cluster-node-group: Refreshing state... [id=diu-EksClusterNodeGroup-tf]
  + create
  ...
  ...
  ...

Terraform will perform the following actions:

  # aws_security_group.eks_cluster_node_group will be created
  + resource "aws_security_group" "eks_cluster_node_group" {
      + arn                    = (known after apply)
      + description            = "Allow TLS inbound traffic"
      + egress                 = [
              + self             = false
              + to_port          = 0
              ...
              ...
              ...
            },
        ]
      + id                     = (known after apply)
      + ingress                = [
          + {
              + cidr_blocks      = [
                  + "0.0.0.0/0",
                ]
              + description      = "Allow incoming SSH traffic"
              ...
              ...
              ...
              + to_port          = 22
            },
        ]
      + name                   = "EKSClusterNodeGroupSecurityGroup"
      + owner_id               = (known after apply)
      + revoke_rules_on_delete = false
      + tags                   = {
          + "Delete"    = "true"
          + "Name"      = "diu-eks-cluster-tag"
          + "Terraform" = "true"
        }
      + vpc_id                 = "vpc-149f497e"
    }

Plan: 1 to add, 0 to change, 0 to destroy.

Do you want to perform these actions?
  Terraform will perform the actions described above.
  Only 'yes' will be accepted to approve.

  Enter a value: yes
aws ec2 describe-security-groups --group-names EKSClusterNodeGroupSecurityGroup --profile devopsinuse
{
    "SecurityGroups": [
        {
            "Description": "Allow TLS inbound traffic",
            "GroupName": "EKSClusterNodeGroupSecurityGroup",
            "IpPermissions": [
                {
                    "FromPort": 22,
                    "IpProtocol": "tcp",
                    "IpRanges": [
                        {
                            "CidrIp": "0.0.0.0/0",
                            "Description": "Allow incoming SSH traffic"
                        }
                    ],
                    "Ipv6Ranges": [],
                    "PrefixListIds": [],
                    "ToPort": 22,
                    "UserIdGroupPairs": []
                }
            ],
            "OwnerId": "...",
            "GroupId": "sg-0bb7b99d2f18d67b2",
            "IpPermissionsEgress": [
                {
                    "IpProtocol": "-1",
                    "IpRanges": [
                        {
                            "CidrIp": "0.0.0.0/0",
                            "Description": "Allow all outbound traffic"
                        }
                    ],
                    "Ipv6Ranges": [],
                    "PrefixListIds": [],
                    "UserIdGroupPairs": []
                }
            ],
            "Tags": [
                {
                    "Key": "Name",
                    "Value": "diu-eks-cluster-tag"
                },
                {
                    "Key": "Delete",
                    "Value": "true"
                },
                {
                    "Key": "Terraform",
                    "Value": "true"
                }
            ],
        }
    ]
}
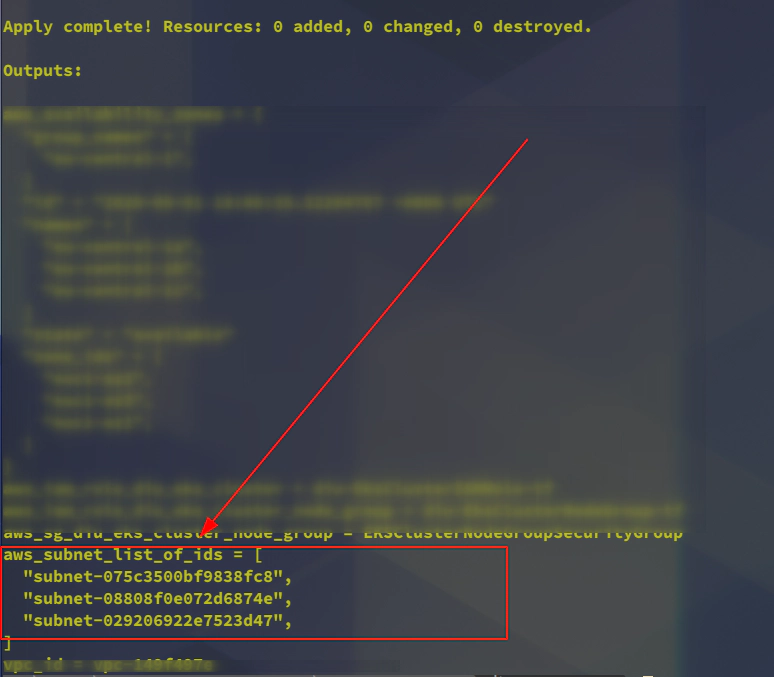
25. Uncomment file subnets.tf and run terraform apply to create Subnets in AWS
Uncomment subnets.tf file:
cat  subnets.tf
resource "aws_subnet" "this" {
  count = 3

  availability_zone       = data.aws_availability_zones.default.names[count.index]
  cidr_block              = cidrsubnet(data.aws_vpc.default.cidr_block, 8, 100 + count.index)
  vpc_id                  = data.aws_vpc.default.id
  map_public_ip_on_launch = true

  tags = merge({
    "kubernetes.io/cluster/${var.eks-cluster-name}" = "shared"
    },
    var.custom_tags
  )
}
Run terraform apply -var-file terraform.eks.tfvars to create subnets within a default VPC in AWS Free tier account
terraform apply -var-file terraform.eks.tfvars

aws_iam_role.diu-eks-cluster-node-group: Refreshing state... [id=diu-EksClusterNodeGroup-tf]
...
...
An execution plan has been generated and is shown below.
Resource actions are indicated with the following symbols:
  + create

Terraform will perform the following actions:

  # aws_subnet.this[0] will be created
  + resource "aws_subnet" "this" {
      + arn                             = (known after apply)
      + assign_ipv6_address_on_creation = false
      + availability_zone               = "eu-central-1a"
      + availability_zone_id            = (known after apply)
      + cidr_block                      = "172.31.100.0/24"
      + id                              = (known after apply)
      + ipv6_cidr_block                 = (known after apply)
      + ipv6_cidr_block_association_id  = (known after apply)
      + map_public_ip_on_launch         = true
      + owner_id                        = (known after apply)
      + tags                            = {
          + "Delete"                                = "true"
          + "Name"                                  = "diu-eks-cluster-tag"
          + "Terraform"                             = "true"
          + "kubernetes.io/cluster/diu-eks-cluster" = "shared"
        }
      + vpc_id                          = "vpc-149f497e"
    }

  # aws_subnet.this[1] will be created
  + resource "aws_subnet" "this" {
      + arn                             = (known after apply)
      + assign_ipv6_address_on_creation = false
      + availability_zone               = "eu-central-1b"
      + availability_zone_id            = (known after apply)
      + cidr_block                      = "172.31.101.0/24"
      + id                              = (known after apply)
      + ipv6_cidr_block                 = (known after apply)
      + ipv6_cidr_block_association_id  = (known after apply)
      + map_public_ip_on_launch         = true
      + owner_id                        = (known after apply)
      + tags                            = {
          + "Delete"                                = "true"
          + "Name"                                  = "diu-eks-cluster-tag"
          + "Terraform"                             = "true"
          + "kubernetes.io/cluster/diu-eks-cluster" = "shared"
        }
      + vpc_id                          = "vpc-149f497e"
    }

  # aws_subnet.this[2] will be created
  + resource "aws_subnet" "this" {
      + arn                             = (known after apply)
      + assign_ipv6_address_on_creation = false
      + availability_zone               = "eu-central-1c"
      + availability_zone_id            = (known after apply)
      + cidr_block                      = "172.31.102.0/24"
      + id                              = (known after apply)
      + ipv6_cidr_block                 = (known after apply)
      + ipv6_cidr_block_association_id  = (known after apply)
      + map_public_ip_on_launch         = true
      + owner_id                        = (known after apply)
      + tags                            = {
          + "Delete"                                = "true"
          + "Name"                                  = "diu-eks-cluster-tag"
          + "Terraform"                             = "true"
          + "kubernetes.io/cluster/diu-eks-cluster" = "shared"
        }
      + vpc_id                          = "vpc-149f497e"
    }

Plan: 3 to add, 0 to change, 0 to destroy.

Do you want to perform these actions?
  Terraform will perform the actions described above.
  Only 'yes' will be accepted to approve.

  Enter a value: yes
26. Uncomment aws eks cluster section in main.tf to create AWS EKS cluster control plane
This time it will be important to navigate to main.tf file and uncomment the section for the resource: aws_eks_cluster to provision AWS EKS cluster (Kubernetes control plane)
vim main.tf

...
# Uncomment to create AWS EKS cluster (Kubernetes control plane) - start
resource "aws_eks_cluster" "this" {
  name     = var.eks-cluster-name
  role_arn = aws_iam_role.diu-eks-cluster.arn
  version  = "1.16"

  vpc_config {
    # subnet_ids = ["${aws_subnet.example1.id}", "${aws_subnet.example2.id}"]
    # security_group_ids = list(aws_security_group.eks_cluster.id)
    subnet_ids = [for subnet in [for value in aws_subnet.this : value] : subnet.id]
  }

  # Ensure that IAM Role permissions are created before and deleted after EKS Cluster handling.
  # Otherwise, EKS will not be able to properly delete EKS managed EC2 infrastructure such as Security Groups.
  depends_on = [
    aws_iam_role_policy_attachment.diu-eks-cluster-AmazonEKSClusterPolicy,
    aws_iam_role_policy_attachment.diu-eks-cluster-AmazonEKSServicePolicy,
  ]
}
# Uncomment to create AWS EKS cluster (Kubernetes control plane) - start

...
:wq!
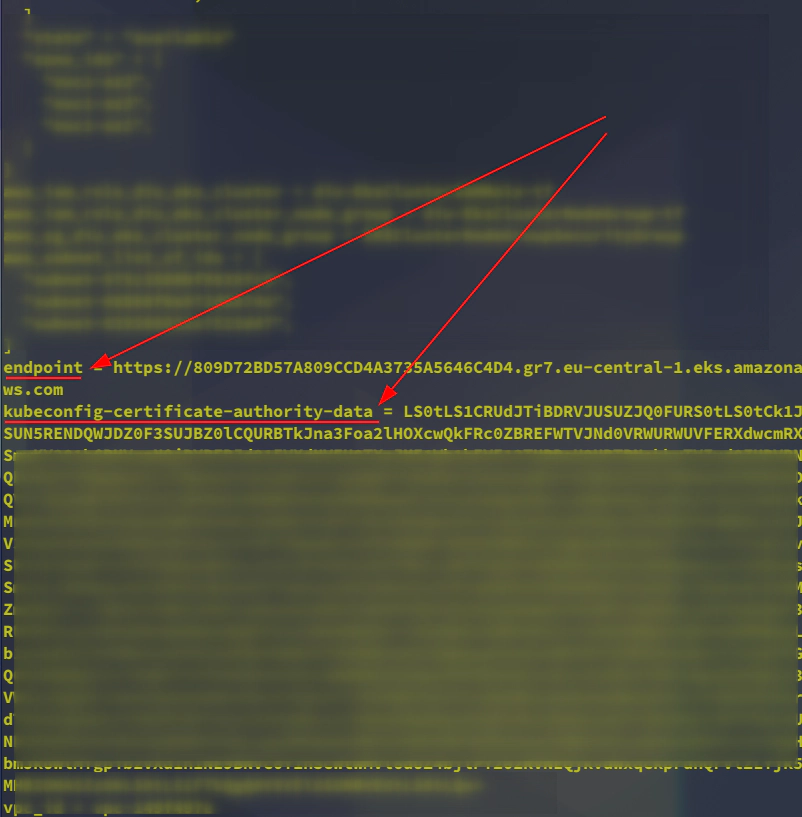
Please run terraform apply -var-file terraform.eks.tfvars to create aws_eks_cluster terraform resource and provision AWS EKS cluster (Kubernetes control plane) in AWS.
 terraform apply -var-file terraform.eks.tfvars

data.aws_vpc.default: Refreshing state...
...
...
aws_security_group.eks_cluster_node_group: Refreshing state... [id=sg-0bb7b99d2f18d67b2]

An execution plan has been generated and is shown below.
Resource actions are indicated with the following symbols:
  + create

Terraform will perform the following actions:

  # aws_eks_cluster.this will be created
  + resource "aws_eks_cluster" "this" {
      + arn                   = (known after apply)
      + certificate_authority = (known after apply)
      + created_at            = (known after apply)
      + endpoint              = (known after apply)
      + id                    = (known after apply)
      + identity              = (known after apply)
      + name                  = "diu-eks-cluster"
      + platform_version      = (known after apply)
      + role_arn              = "arn:aws:iam::61111116:role/diu-EksClusterIAMRole-tf"
      + status                = (known after apply)
      + version               = (known after apply)

      + vpc_config {
          + cluster_security_group_id = (known after apply)
          + endpoint_private_access   = false
          + endpoint_public_access    = true
          + public_access_cidrs       = (known after apply)
          + subnet_ids                = [
              + "subnet-029206922e7523d47",
              + "subnet-075c3500bf9838fc8",
              + "subnet-08808f0e072d6874e",
            ]
          + vpc_id                    = (known after apply)
        }
    }

Plan: 1 to add, 0 to change, 0 to destroy.

Do you want to perform these actions?
  Terraform will perform the actions described above.
  Only 'yes' will be accepted to approve.

  Enter a value: yes
27. Uncomment aws eks node group resource section in main.tf to create AWS EKS node group
terraform apply -var-file terraform.eks.tfvars
data.aws_vpc.default: Refreshing state...
...
...
An execution plan has been generated and is shown below.
Resource actions are indicated with the following symbols:
+ create
Terraform will perform the following actions:
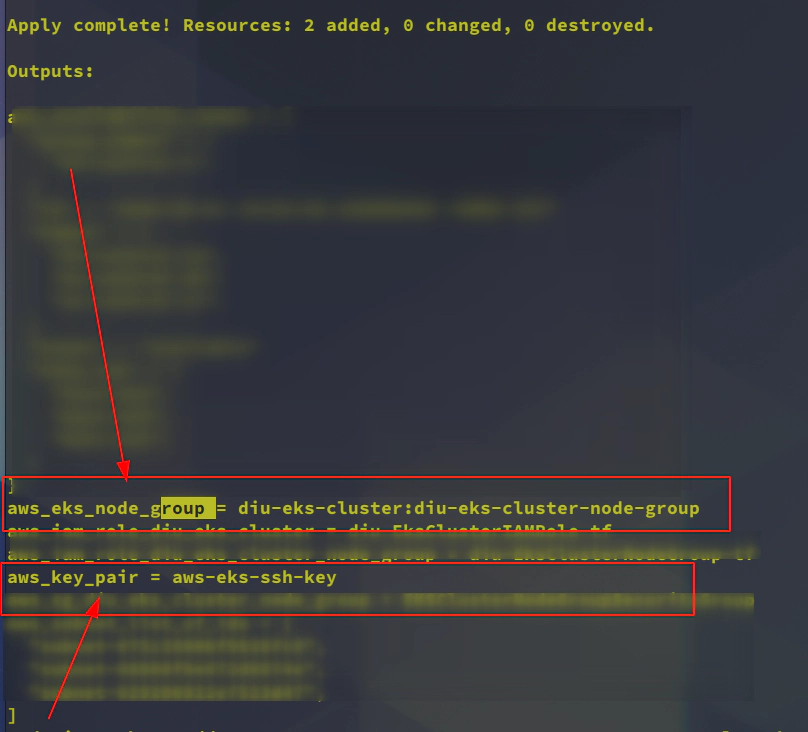
# aws_eks_node_group.this will be created
+ resource "aws_eks_node_group" "this" {
+ ami_type = (known after apply)
+ arn = (known after apply)
+ cluster_name = "diu-eks-cluster"
+ disk_size = (known after apply)
+ id = (known after apply)
+ instance_types = [
+ "t3.micro",
]
+ node_group_name = "diu-eks-cluster-node-group"
+ node_role_arn = "arn:aws:iam::61111111116:role/diu-EksClusterNodeGroup-tf"
+ release_version = (known after apply)
+ resources = (known after apply)
+ status = (known after apply)
+ subnet_ids = [
+ "subnet-029206922e7523d47",
+ "subnet-075c3500bf9838fc8",
+ "subnet-08808f0e072d6874e",
]
+ tags = {
+ "Delete" = "true"
+ "Name" = "diu-eks-cluster-tag"
+ "Terraform" = "true"
}
+ version = (known after apply)
+ remote_access {
+ ec2_ssh_key = "aws-eks-ssh-key"
+ source_security_group_ids = [
+ "sg-0bb7b99d2f18d67b2",
]
}
+ scaling_config {
+ desired_size = 2
+ max_size = 3
+ min_size = 1
}
}
# aws_key_pair.this will be created
+ resource "aws_key_pair" "this" {
+ fingerprint = (known after apply)
+ id = (known after apply)
+ key_name = "aws-eks-ssh-key"
+ key_pair_id = (known after apply)
+ public_key = "ssh-rsa AAA.....xyz
}
Plan: 2 to add, 0 to change, 0 to destroy.
Do you want to perform these actions?
Terraform will perform the actions described above.
Only 'yes' will be accepted to approve.
Enter a value: yes
28. Setup communication between your PC and AWS EKS cluster
echo "" > ~/.kube/config && cat ~/.kube/config

aws eks --region eu-central-1 \
update-kubeconfig \
--name diu-eks-cluster \
--profile devopsinuse &> /dev/null

Added new context arn:aws:eks:eu-central-1:611111116:cluster/diu-eks-cluster to /home/<username>/.kube/config
If you now go and take a look what is inside the file: ~/.kube/config, you will find a correct connection settings to be able to communicate with your AWS EKS Kubernetes cluster under your AWS Free Tier account
Run following commands to make sure that you can communicte with your AWS EKS Kubernetes cluster under your AWS Free Tier account
kubectl get nodes
NAME                                              STATUS   ROLES    AGE   VERSION
ip-172-31-101-85.eu-central-1.compute.internal    Ready    <none>   11m   v1.15.10-eks-bac369
ip-172-31-102-164.eu-central-1.compute.internal   Ready    <none>   11m   v1.15.10-eks-bac369

kubectl get pods -A
NAMESPACE     NAME                       READY   STATUS    RESTARTS   AGE
kube-system   aws-node-tpnfj             1/1     Running   0          11m
kube-system   aws-node-w5bh5             1/1     Running   0          11m
kube-system   coredns-5b6dbb4b59-8h9wd   1/1     Running   0          41m
kube-system   coredns-5b6dbb4b59-r5bz6   1/1     Running   0          41m
kube-system   kube-proxy-lnjwr           1/1     Running   0          11m
kube-system   kube-proxy-z945r           1/1     Running   0          11m
29. Explore terrafrom console command
Run terrafrom console -var-file terraform.eks.tfvars command to start terraform console and print whatever variable present within terraform.eks.tfvars file.
terraform console -var-file terraform.eks.tfvars
>

> var.custom_tags
{
  "Delete" = "true"
  "Name" = "diu-eks-cluster-tag"
  "Terraform" = "true"
}

> var.eks-cluster-name
diu-eks-cluster
>

> var.aws_region
eu-central-1
Let’s say there is the requirement to modify tag name: Name and append some string to already existing one.
> {for a, b in var.custom_tags : a => (a == "Name" ? format("%s-%s", b, "terraform") : b)}

{
  "Delete" = "true"
  "Name" = "diu-eks-cluster-tag-terraform"
  "Terraform" = "true"
}
If you for example need to do a megre of two maps - to add extra tag to custom_tags variable:
> merge({for a, b in var.custom_tags : a => (a == "Name" ? format("%s-%s", b, "terraform") : b)}, {extra-key = "extra-value"})
{
  "Delete" = "true"
  "Name" = "diu-eks-cluster-tag-terraform"
  "Terraform" = "true"
  "extra-key" = "extra-value"
}
30. First NGINX deployment by kubectl to AWS EKS cluster created by terraform
deployment-eks-nginx-terraform
├── deployment-eks-nginx-terraform.yaml
├── index-eks-nginx-terraform_files
│   ├── bootstrap.min.css
│   ├── bootstrap.min.js
│   ├── Chart.min.js
│   ├── dashboard.css
│   ├── feather.min.js
│   ├── jquery-3.2.1.slim.min.js
│   └── popper.min.js
└── index-eks-nginx-terraform.html

1 directory, 9 files
Create configmap kubernetes object nginx-cm
cd deployment-eks-nginx-terraform/

kubectl create configmap nginx-cm \
--from-file=index-eks-nginx-terraform.html \
--from-file=index-eks-nginx-terraform_files/bootstrap.min.css \
--from-file=index-eks-nginx-terraform_files/bootstrap.min.js \
--from-file=index-eks-nginx-terraform_files/Chart.min.js \
--from-file=index-eks-nginx-terraform_files/dashboard.css \
--from-file=index-eks-nginx-terraform_files/feather.min.js \
--from-file=index-eks-nginx-terraform_files/jquery-3.2.1.slim.min.js \
--from-file=index-eks-nginx-terraform_files/popper.min.js
Execute deployment of your Nginx web server with custom content
kubectl apply -f deployment-eks-nginx-terraform.yaml
Check whether desired kubernetes objects have been created
kubectl get deployment,svc
NAME                          READY   UP-TO-DATE   AVAILABLE   AGE
deployment.extensions/nginx   0/1     1            0           9s

NAME                 TYPE        CLUSTER-IP       EXTERNAL-IP   PORT(S)        AGE
service/kubernetes   ClusterIP   10.100.0.1       <none>        443/TCP        101m
service/nginx        NodePort    10.100.176.217   <none>        80:30111/TCP   9s


# Check for pods
kubectl get pods
NAME                     READY   STATUS    RESTARTS   AGE
nginx-656bf99f5d-4pjgt   1/1     Running   0          8s
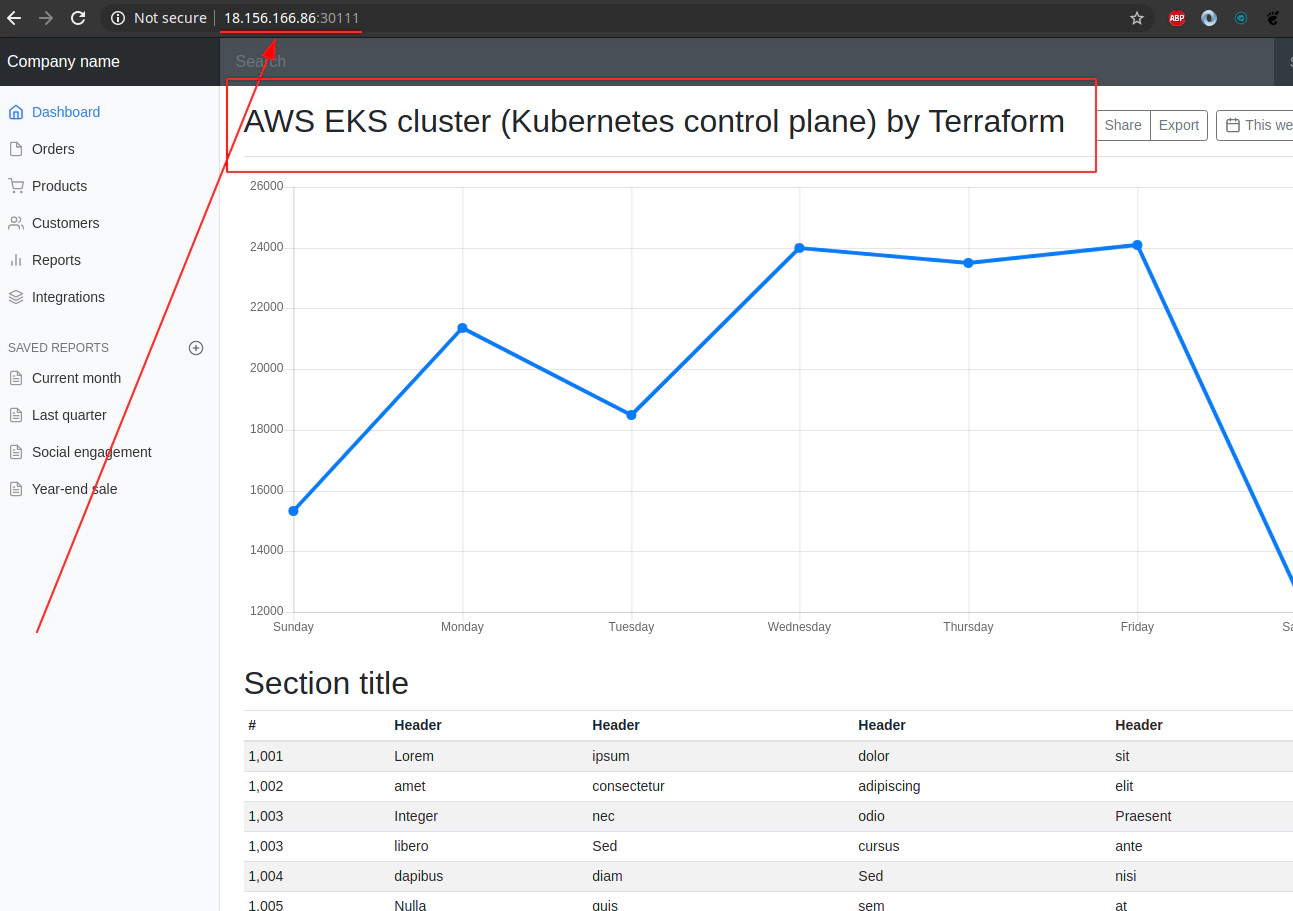
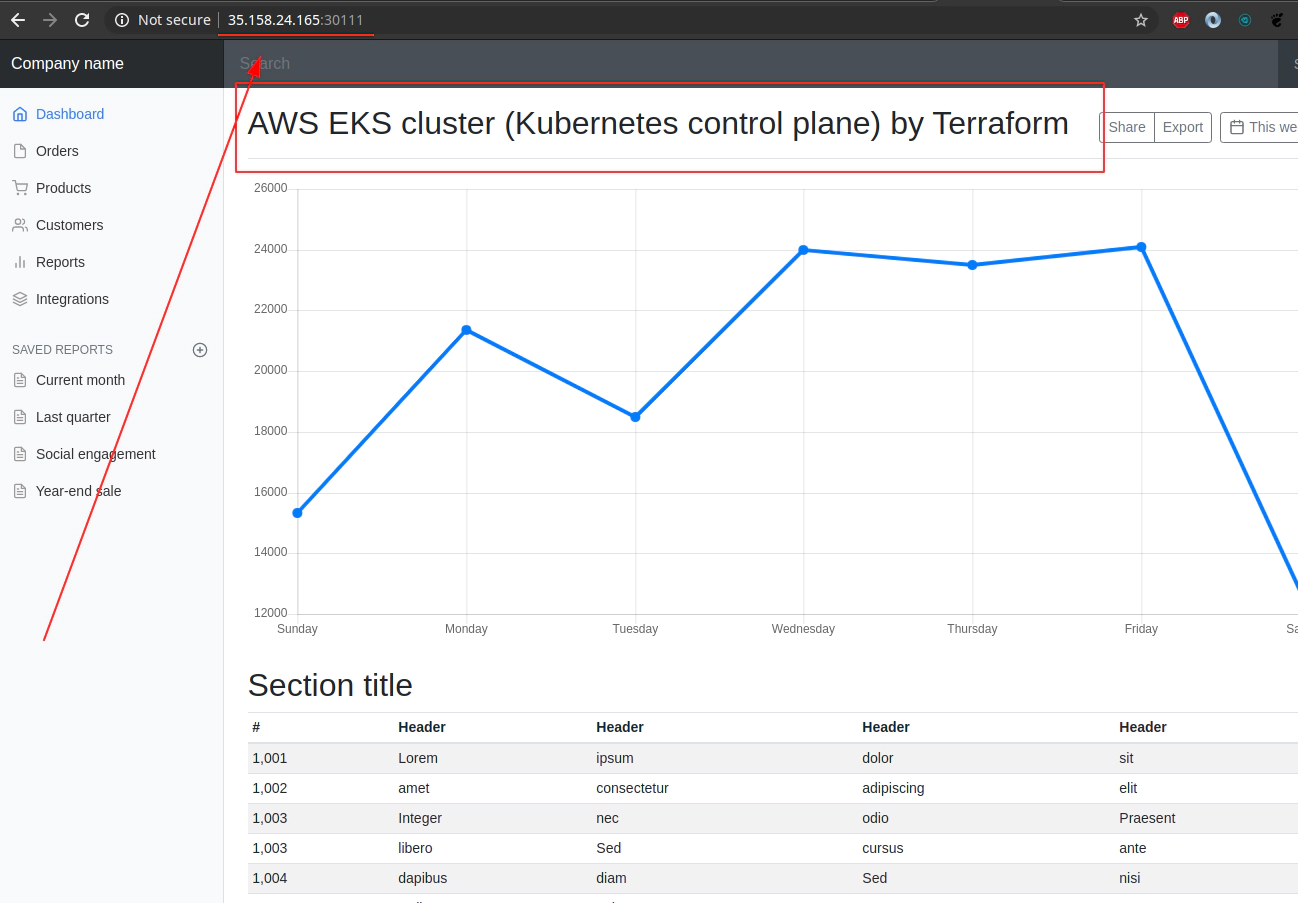
Retrive IP Addresses of your physical nodes in AWS
NAME	EXTERNAL-IP
ip-172-31-101-85.eu-central-1.compute.internal	18.156.166.86
ip-172-31-102-164.eu-central-1.compute.internal	35.158.24.165
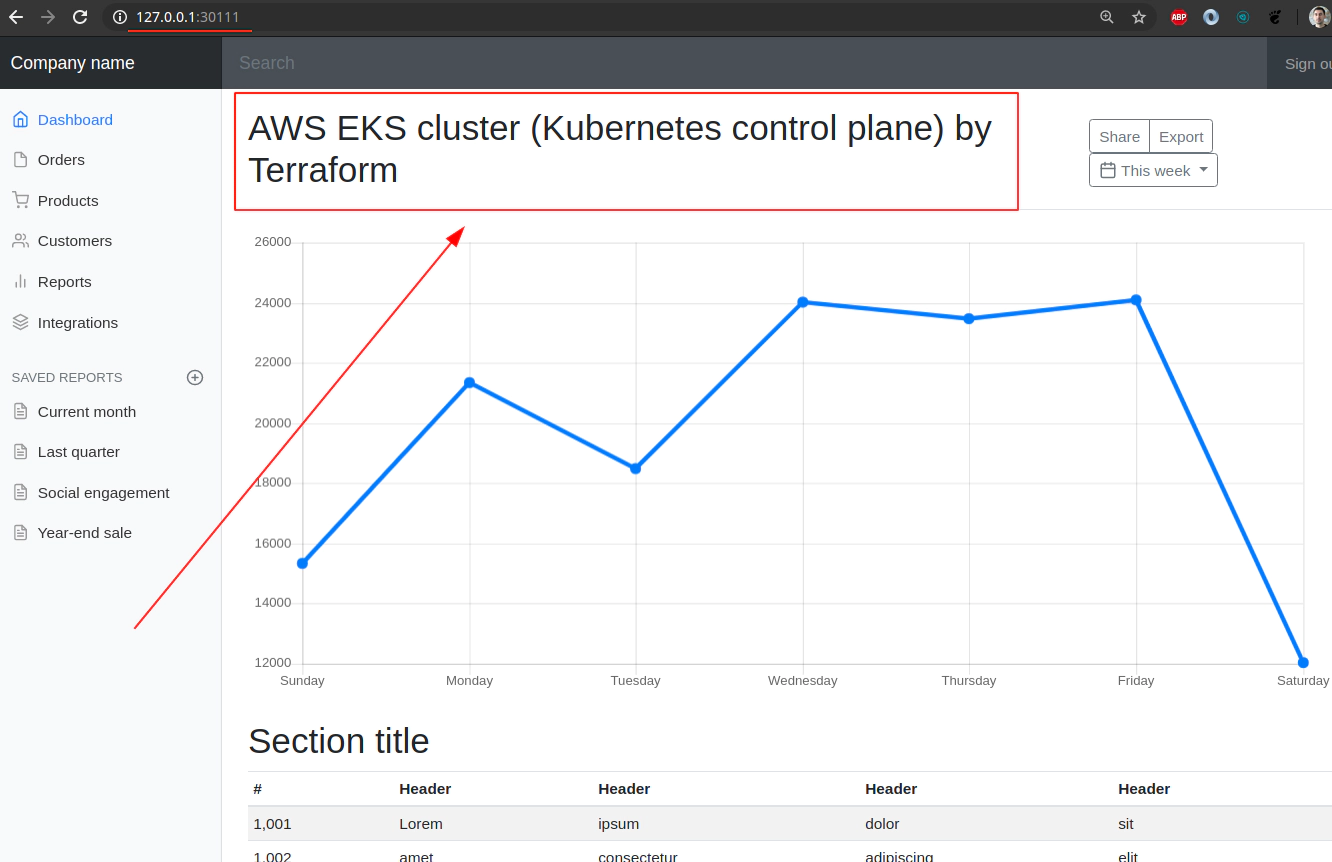
SSH tunnel approach without the need to seup Security group in AWS
ssh -o "IdentitiesOnly yes" \
-i  ~/.ssh/eks-aws \
ec2-user@35.158.24.165 \
-L30111:127.0.0.1:30111

ssh -o "IdentitiesOnly yes" \
-i  ~/.ssh/eks-aws \
ec2-user@18.156.166.86 \
-L30111:127.0.0.1:30111
Explore Nginx deployment in AWS EKS provisioned by terrafrom
 kubectl get pods
NAME                     READY   STATUS    RESTARTS   AGE
nginx-656bf99f5d-4pjgt   1/1     Running   0          26m
kubectl exec -it  nginx-656bf99f5d-4pjgt -- bash
root@nginx-656bf99f5d-4pjgt:/# ls usr/share/nginx/html/index* -l
-rw-r--r-- 1 root root 16062 usr/share/nginx/html/index.html

usr/share/nginx/html/index-eks-nginx-terraform_files:
total 516
-rw-r--r-- 1 root root 157843 Chart.min.js
-rw-r--r-- 1 root root 144877 bootstrap.min.css
-rw-r--r-- 1 root root  48944 bootstrap.min.js
-rw-r--r-- 1 root root   1539 dashboard.css
-rw-r--r-- 1 root root  75779 feather.min.js
-rw-r--r-- 1 root root  69597 jquery-3.2.1.slim.min.js
-rw-r--r-- 1 root root  19188 popper.min.js
root@nginx-656bf99f5d-4pjgt:/#
31. Executing terrafrom destroy will not work when terrafrom run incrementaly
 Run
Run terraform destroy -var-file terraform.eks.tfvars command to delete all prevoiusly created AWS resources
Quick recap on how the cluster was brought to life.
prerequisites:
- Clear some left overs from: ~/.kube/config file
echo "" > ~/.kube/config && cat ~/.kube/config
- Navigate to terraform code folder
cd eks-terraform
rm terraform.tfstate.backup terraform.tfstate .terraform -rf
ls  ~/.ssh/eks-aws.pub
/home/<username>/.ssh/eks-aws.pub: OpenSSH RSA public key
- Make sure that terraform.eks.tfvars file is configured correctlly
and remeber that at this point most of the terrafrom code has comments - effectively it will not be take into an account
# sed -i 's/^/#/' iam.tf outputs.tf sg.tf subnets.tfandsed -i '/^.*EKS_CLUSTER_START.*/,/^.*EKS_NODE_GROUP_END.*/s/^/#/' main.tf
terraform init
terraform validate
terraform fmt -recursive
terraform apply -var-file terraform.eks.tfvars
- Remove the comments from
iam.tffile
# Check AWS IAM Roles before running terraform apply ...
aws iam list-roles --profile devopsinuse --region eu-central-1 | jq '.Roles [].RoleName'
"AWSServiceRoleForAmazonEKS"
"AWSServiceRoleForAmazonEKSNodegroup"
"AWSServiceRoleForAutoScaling"
"AWSServiceRoleForSupport"
"AWSServiceRoleForTrustedAdvisor"

# Create 2 IAM AWS Roles and make sure htat you uncommented iam.tf file
sed -i 's/^#//' iam.tf # removes comments from file
terraform validate
terraform apply -var-file terraform.eks.tfvars

# if there is no any issue 2 IAM AWS Roles will be created
aws iam list-roles --profile devopsinuse --region eu-central-1 | jq '.Roles [].RoleName'
"AWSServiceRoleForAmazonEKS"
"AWSServiceRoleForAmazonEKSNodegroup"
"AWSServiceRoleForAutoScaling"
"AWSServiceRoleForSupport"
"AWSServiceRoleForTrustedAdvisor"
"diu-EksClusterIAMRole-tf"
"diu-EksClusterNodeGroup-tf"
- Remove all comments from
sg.tffile and run terrafrom apply
# Check for the Security group before terraform apply -var-file terraform.eks.tfvars
aws ec2 describe-security-groups --profile devopsinuse --region eu-central-1 | jq '.SecurityGroups [].GroupName'
"default"

# apply sg.tf terrrafrom code
sed  's/^#//' -i sg.tf
terraform validate
terraform apply -var-file terraform.eks.tfvars

# Check for the Security group after terraform apply -var-file terraform.eks.tfvars
aws ec2 describe-security-groups --profile devopsinuse --region eu-central-1 | jq '.SecurityGroups [].GroupName'
"EKSClusterNodeGroupSecurityGroup"
"default"
- Remove comments from subnets.tf file and run terrafrom apply …
# Check for the extra Subnets before terraform apply -var-file terraform.eks.tfvars
aws ec2 describe-subnets --profile devopsinuse --region eu-central-1 | jq '.Subnets [].SubnetId'
"subnet-1f3cc963"
"subnet-ca01f986"
"subnet-9b75cbf1"

# apply subnets.tf terrrafrom code
sed  's/^#//' -i subnets.tf
terraform validate
terraform apply -var-file terraform.eks.tfvars

# Check for the extra Subnets before terraform apply -var-file terraform.eks.tfvars
aws ec2 describe-subnets --profile devopsinuse --region eu-central-1 | jq '.Subnets [].SubnetId'
"subnet-064d6205839537b7b"
"subnet-06aab122584ff2903"
"subnet-1f3cc963"
"subnet-092c8c9af4f4501e6"
"subnet-ca01f986"
"subnet-9b75cbf1"
- Remove comments from main.tf file and correcponding section for AWS EKS cluster
# Check whether you got any AWS EKS cluster before you gonna run terrafrom apply ...
aws eks list-clusters --profile devopsinuse --region eu-central-1
{
    "clusters": []
}

# apply main.tf terrrafrom code for AWS EKS cluster
sed -e '/^.*EKS_CLUSTER_START.*/,/^.*EKS_CLUSTER_END.*/s/^#//' -i main.tf
terraform validate
terraform apply -var-file terraform.eks.tfvars

# Check whether you got any AWS EKS cluster after you gonna run terrafrom apply ...
aws eks list-clusters --profile devopsinuse --region eu-central-1
{
    "clusters": [
        "diu-eks-cluster"
    ]
}
- Remove comments from main.tf file and terrafrom section for AWS EKS Node Group
# Check whether you got any AWS EKS node group before you gonna run terrafrom apply ...
aws eks list-nodegroups --cluster-name diu-eks-cluster --profile devopsinuse --region eu-central-1
{
    "nodegroups": []
}

# apply main.tf terrrafrom code for AWS EKS cluster
sed -e '/^.*EKS_NODE_GROUP_START.*/,/^.*EKS_NODE_GROUP_END.*/s/^#//' -i main.tf
terraform validate
terraform apply -var-file terraform.eks.tfvars

# Check whether you got any AWS EKS node group after you gonna run terrafrom apply ...
aws eks list-nodegroups --cluster-name diu-eks-cluster --profile devopsinuse --region eu-central-1
{
    "nodegroups": [
        "diu-eks-cluster-node-group"
    ]
}


# List EC2 instances within AGS belonging to AWS EKS node group
aws ec2 describe-instances --filters Name=instance-type,Values=t3.micro --profile devopsinuse --region eu-central-1 | jq '.Reservations [].Instances [].Tags'
[
  {
    "Key": "aws:autoscaling:groupName",
    "Value": "eks-dcb90a4c-5373-6ef1-67cf-9706e0bb913b"
  },
  ...
  ...
  {
    "Value": "1"
  }
]


# retrive ASG, Lunch template, ...
aws autoscaling describe-auto-scaling-groups --profile devopsinuse --region eu-central-1 | jq '(.AutoScalingGroups [].AutoScalingGroupName), (.AutoScalingGroups [].LaunchTemplate)'
"eks-dcb90a4c-5373-6ef1-67cf-9706e0bb913b"
{
  "LaunchTemplateId": "lt-0f98da1f10a5bf8e7",
  "LaunchTemplateName": "eks-dcb90a4c-5373-6ef1-67cf-9706e0bb913b",
  "Version": "1"
}


# List AWS ENI Network Interfaces
aws ec2 describe-network-interfaces  --profile devopsinuse --region eu-central-1 | jq '(.NetworkInterfaces [].Description), (.NetworkInterfaces [].NetworkInterfaceId)'
"aws-K8S-i-044c234e0f9b30818"
"Amazon EKS diu-eks-cluster"
""
"aws-K8S-i-08d8fcb2bf3d16b54"
""
"Amazon EKS diu-eks-cluster"
"eni-0b82e1be272606a79"
"eni-0f6bcf69497705f5a"
"eni-0c8a4d31f6ae0a841"
"eni-06a9cc7fdfcb57b43"
"eni-03e6ba9d77782d502"
"eni-0a44e20c8afc8badc"
On Amazon Elastic Kubernetes Service (EKS), the maximum number of pods per node depends on the node type and ranges from 4 to 737.
Pod number mapping: https://github.com/awslabs/amazon-eks-ami/blob/master/files/eni-max-pods.txt
On Google Kubernetes Engine (GKE), the limit is 100 pods per node, regardless of the type of node.
On Azure Kubernetes Service (AKS), the default limit is 30 pods per node but it can be increased up to 250.
Configure your ~/.kube/config file to be able to communicate to your AWS EKS Kubernetes cluster
# run this command:
aws eks --region eu-central-1 update-kubeconfig --name diu-eks-cluster --profile devopsinuse
Examine a quick deployment:
kubectl apply -f https://k8s.io/examples/controllers/nginx-deployment.yaml
kubectl scale --replicas=2 deployment nginx-deployment
kubectl expose deployment nginx-deployment --port=80 --target-port=80
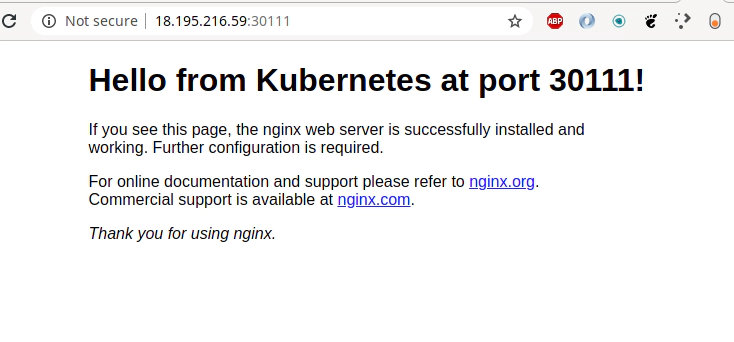
kubectl exec -it nginx-deployment-574b87c764-hjtcm -- sed -i 's/Welcome to nginx/Hello from Kubernetes at port 30111/' /usr/share/nginx/html/index.html
kubectl get nodes -o wide | awk -F" " '{print $1"\t"$7}'
NAME EXTERNAL-IP
ip-172-31-100-208.eu-central-1.compute.internal 18.195.216.59
ip-172-31-102-105.eu-central-1.compute.internal 3.120.228.32
Terrafrom destroy AWS EKS cluster and all the other resources
terraform destroy -var-file terraform.eks.tfvars
data.aws_availability_zones.default: Refreshing state...
aws_key_pair.this: Refreshing state... [id=aws-eks-ssh-key]
...
...
apsed]
aws_eks_node_group.this: Still destroying... [id=diu-eks-cluster:diu-eks-cluster-node-group, 3m0s elapsed]
aws_eks_node_group.this: Still destroying... [id=diu-eks-cluster:diu-eks-cluster-node-group, 3m10s elapsed]
aws_eks_node_group.this: Still destroying... [id=diu-eks-cluster:diu-eks-cluster-node-group, 3m20s elapsed]
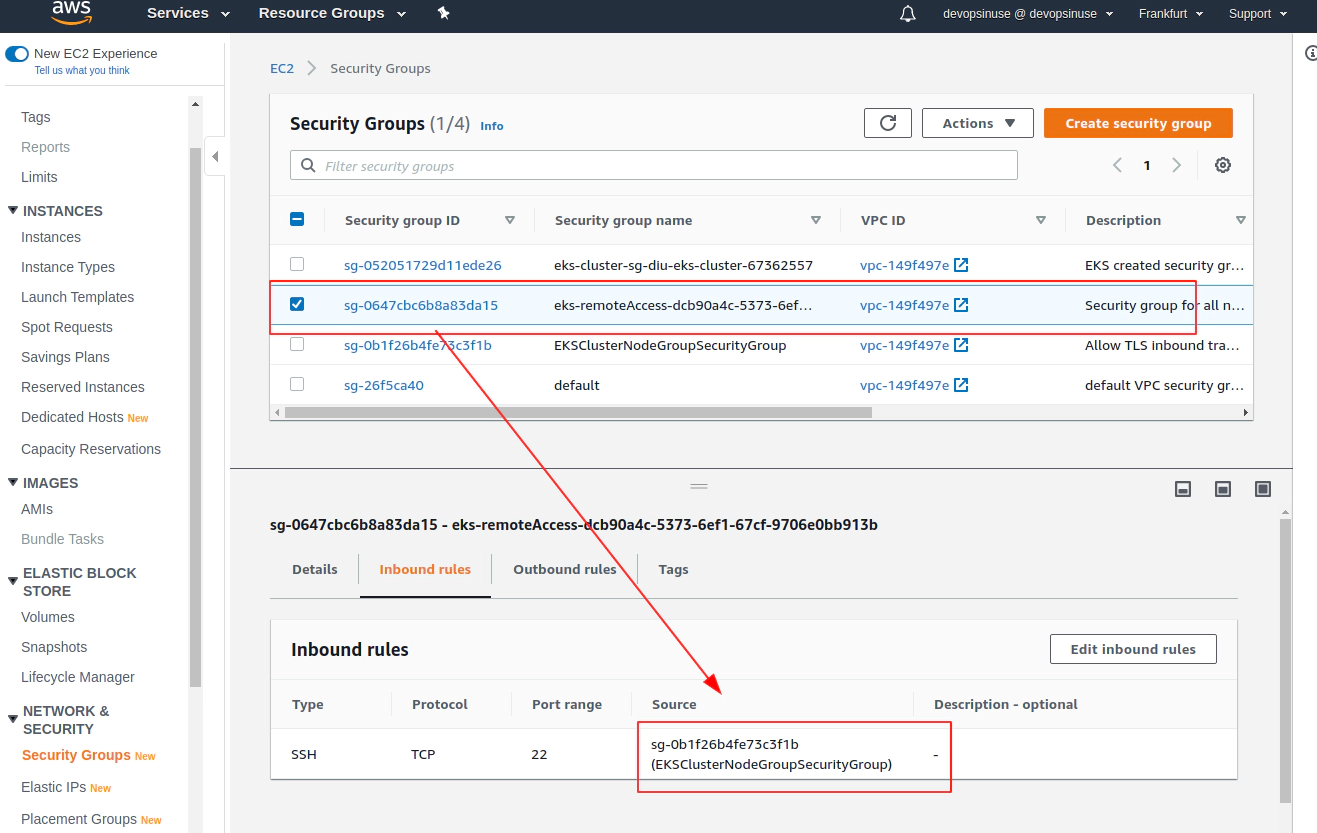
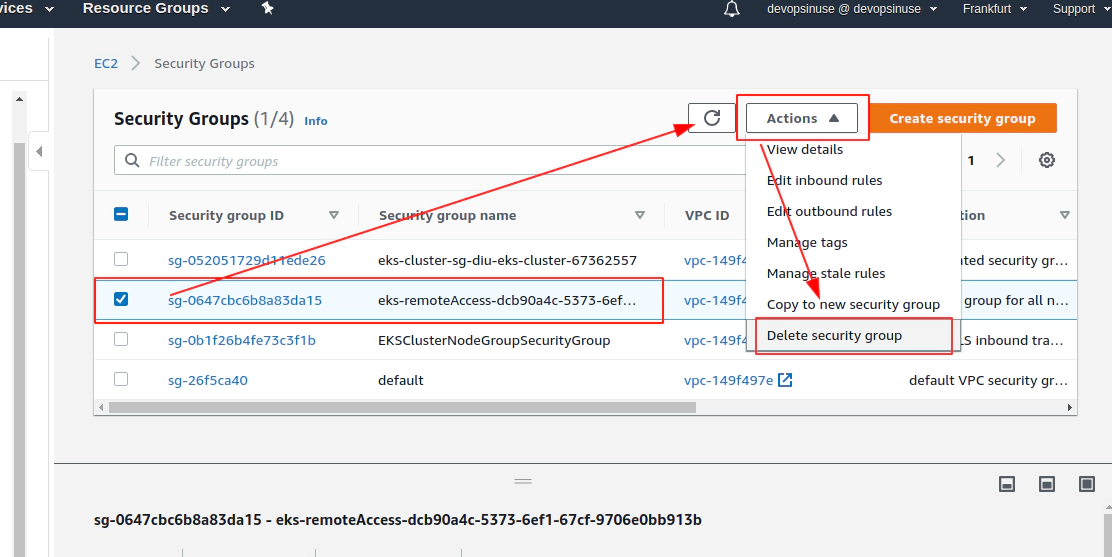
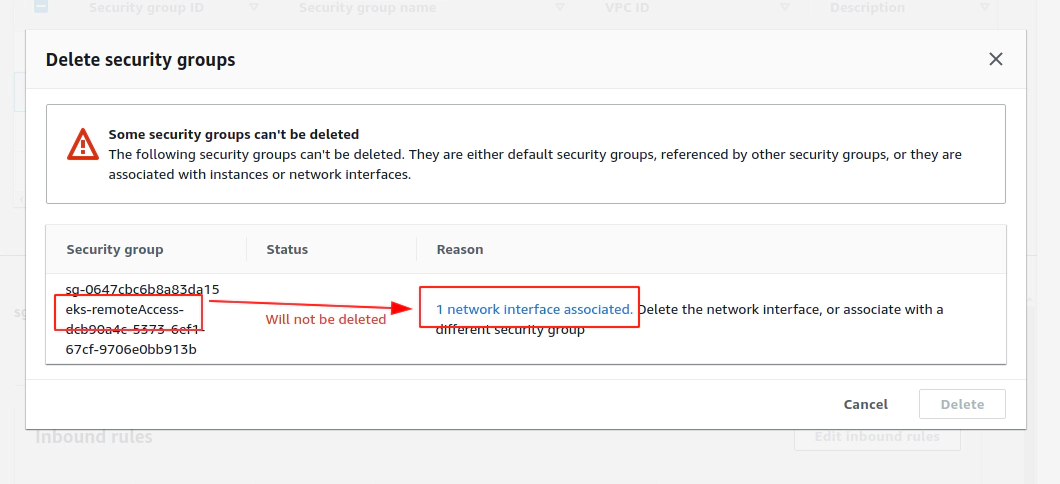
Error: error waiting for EKS Node Group (diu-eks-cluster:diu-eks-cluster-node-group) deletion: Ec2SecurityGroupDeletionFailure: DependencyViolation - resource has a dependent object. Resource IDs: [sg-0647cbc6b8a83da15]
Delete problematic AWS ENI interface for eks-remoteAccess-XYZ Security Group and corresponfing eni-111111111111
aws ec2 delete-network-interface --network-interface-id eni-0096ccb8555c18958 --profile devopsinuse --region eu-central-1
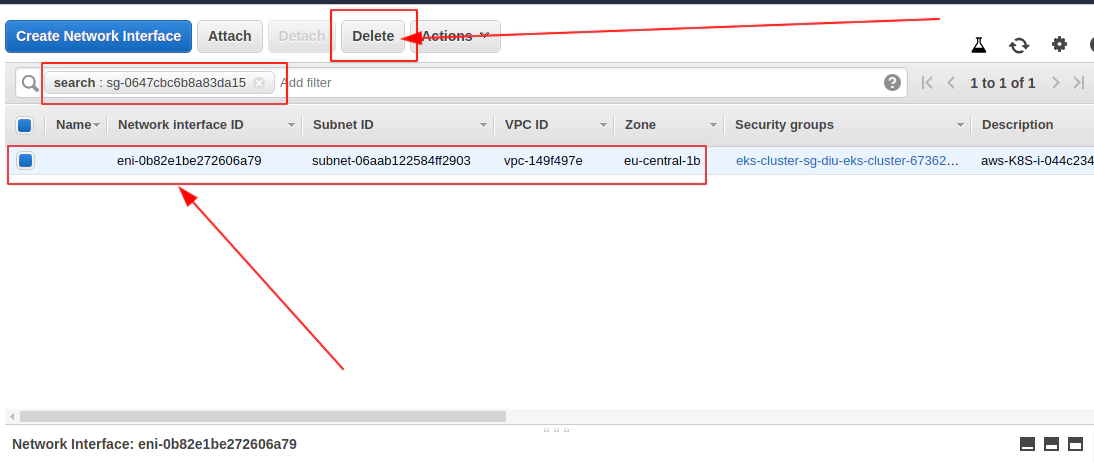
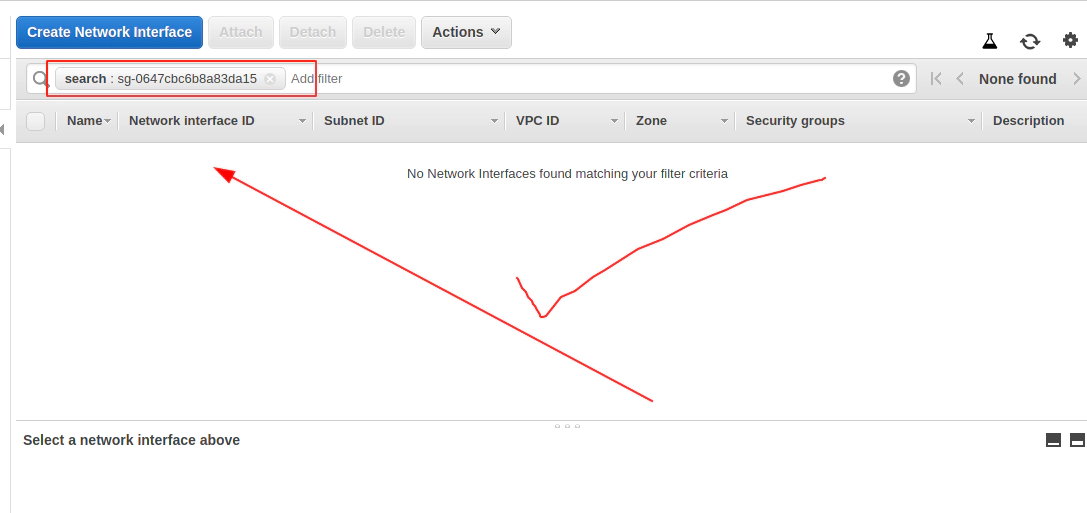
Now Terrafrom destroy AWS EKS cluster will work
terraform destroy -var-file terraform.eks.tfvars

...
aws_subnet.this[0]: Destroying... [id=subnet-064d6205839537b7b]
aws_subnet.this[2]: Destroying... [id=subnet-092c8c9af4f4501e6]
aws_subnet.this[1]: Destroying... [id=subnet-06aab122584ff2903]
aws_subnet.this[2]: Destruction complete after 1s
aws_subnet.this[1]: Destruction complete after 1s
aws_subnet.this[0]: Destruction complete after 1s
aws_iam_role_policy_attachment.diu-eks-cluster-AmazonEKSClusterPolicy: Destruction complete after 1s
aws_iam_role_policy_attachment.diu-eks-cluster-AmazonEKSServicePolicy: Destruction complete after 1s
aws_iam_role.diu-eks-cluster: Destroying... [id=diu-EksClusterIAMRole-tf]
aws_iam_role.diu-eks-cluster: Destruction complete after 2s

Destroy complete! Resources: 14 destroyed.
32. Provison and destroy AWS EKS Kubernetes cluster with terrafrom
git clone https://github.com/xjantoth/aws-eks-devopsinuse.git
uncomment all files from
eks-terraform/folder at once:sed 's/^#//' -i iam.tfsed 's/^#//' -i sg.tfsed 's/^#//' -i subnets.tfsed -e '/^.*EKS_CLUSTER_START.*/,/^.*EKS_CLUSTER_END.*/s/^#//' -i main.tfsed -e '/^.*EKS_NODE_GROUP_START.*/,/^.*EKS_NODE_GROUP_END.*/s/^#//' -i main.tf- variables.tf (this file is uncommented all the time)
- outputs.tf (does not really matter whether it’s uncommented or not)
fill up all the lines in
terraform.eks.tfvarsfile
echo "" > ~/.kube/config && cat ~/.kube/config
cd eks-terraform
rm terraform.tfstate.backup terraform.tfstate .terraform -rf
ls  ~/.ssh/eks-aws.pub
terraform init
terraform validate
terraform fmt -recursive
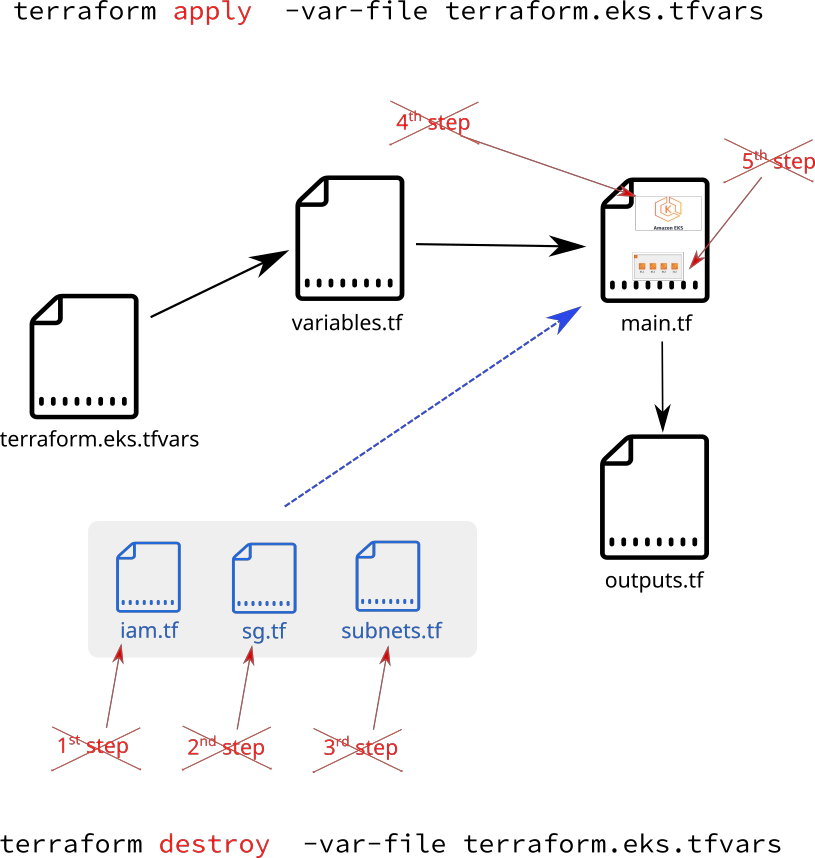
Provision your AWS EKS Kubernetes cluster with all the required AWS resources by executing one command
terraform apply -var-file terraform.eks.tfvars
Setup correct kubeconfig file:
aws eks --region eu-central-1 update-kubeconfig --name diu-eks-cluster
Go through a quick kubernetes deployment to verify your AWS EKS cluster:
kubectl apply -f https://k8s.io/examples/controllers/nginx-deployment.yaml
kubectl scale --replicas=2 deployment nginx-deployment
kubectl expose deployment nginx-deployment --port=80 --target-port=80

kubectl exec -it nginx-deployment-574b87c764-hjtcm -- sed -i 's/Welcome to nginx/Hello from K8s: terraform apply -var-file terraform.eks.tfvars/'  /usr/share/nginx/html/index.html

# edit Kubenretes service on the fly
# set service type: NodePort and nodePort: 30111
EDITOR=vim kubectl edit svc nginx-deployment


kubectl get nodes -o wide | awk -F" " '{print $1"\t"$7}'
NAME    EXTERNAL-IP
ip-172-31-100-208.eu-central-1.compute.internal 18.195.216.59
ip-172-31-102-105.eu-central-1.compute.internal 3.120.228.32
Destroy / get rid of your AWS EKS Kubernetes cluster with all the required AWS resources by executing one command
terraform destroy -var-file terraform.eks.tfvars
Learn AWS EKS Kubernetes cluster with Helm Charts (Part 2)
Introduction
- Leveraging helm charts for AWS EKS Kubernetes deployment
- using custom made frontend / backend + postgresql applications
- writing Dockerfiles
- docker-compose specification for:
- backend,
- frontend,
- Nginx Reverse Proxy,
- PostgreSQL
- build docker images
- learning about helm and helmfile binaries
- create backend helm chart (for dockerized custom written Python Flask application)
- create fronetend helm chart (for dockerized custom written React application)
- using Nginx Ingress Controller helm chart(used as reverse proxy)
- using PostgreSQL database helm chart as dependency for backend helm chart
!!! This course is a the second part of my previous course and it is highly recommended to ENROLL in:
Learn AWS EKS Kubernetes cluster and devops in AWS (Part 1)
unless you are familiar with AWS EKS(Elastic Kubernetes Service) solution and you can set it up on your OWN.
!!! If someone do not insist to use AWS EKS for deployment - and already having Kubenretes cluster available somewhere else ready to use - ONLY and ONLY in that case this course can be used as STANDALONE.
Important notes:
- please run
terraform destroy -var-file terraform.eks.tfvarswhenever you not using your resources in AWS - all materials can be found at my Github project
https://github.com/xjantoth/aws-eks-devopsinuse
- feel free to post any question into Q&A section
- all videos are recorded in Full HD however Udemy’s player use HD
- I’m greatful for your reviews - please drop some COMMENTS :)
- please setup budget within your Free AWS account to be notified if from some reason AWS is going to charge some fees.
3. Helm charts
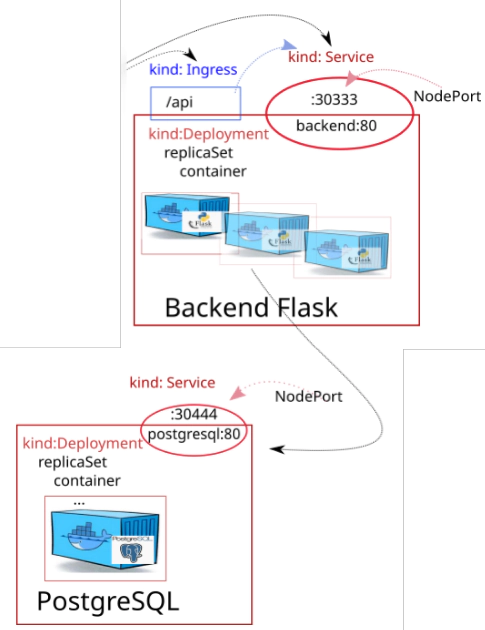
33. Desired Infrastructure with helm charts
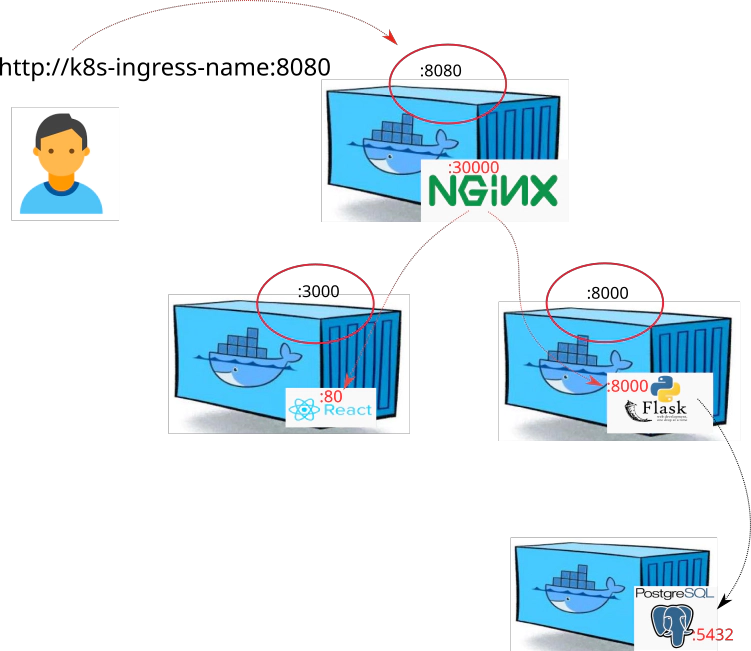
How to start up the whole setup all at once docker-compose:
- nginx
- front-end
- back-end
- postgresql
34. Setting up Infrastracture via docker-compose at local
Make sure that commands are installed at your PC:
dockerdocker-compose
Follow the instructions to bring up the entire infrastracture up and running by executing og one command: docker-compose up --build
git clone https://github.com/xjantoth/aws-eks-devopsinuse.git
cd aws-eks-devopsinuse
Delete all existing docker rrelated resources at your local
docker system prune --all
Explore file: docker-compose.yaml
---
version: '3'
services:

  # Nginx (Reverse proxy) specification
  ingress:
    image: docker.io/devopsinuse/nginx-docker-compose:v1.0.0
    ports:
      - 8080:30000
    container_name: nginx
    build:
      context: ./nginx/
      dockerfile: Dockerfile
    links:
      - backend
      - frontend

  # Frontend (React app) specification
  frontend:
    image: docker.io/devopsinuse/front-end:v1.0.0
    depends_on:
      - backend
    build:
      context: ./frontend/
      dockerfile: Dockerfile
    ports:
      - 3000:80
    container_name: frontend
    links:
      - backend

  # Backend (Python Flask) specification
  backend:
    image: docker.io/devopsinuse/back-end:v1.0.0
    depends_on:
      - db
    build:
      context: ./backend/
      dockerfile: Dockerfile
    ports:
      - 8000:8000
    container_name: backend
    environment:
      - VIRTUAL_HOST=backend
      - PSQL_DB_USER=micro
      - PSQL_DB_PASS=password
      - PSQL_DB_NAME=microservice
      - PSQL_DB_ADDRESS=postgresql
      - PSQL_DB_PORT=5432

  # PostgreSQL (dependency for Python Flask)
  db:
    image: postgres:alpine
    ports:
      - 5432:5432
    container_name: postgresql
    environment:
      - POSTGRES_USER=postgres
      - POSTGRES_PASSWORD=password
    volumes:
      - ./db.sql:/docker-entrypoint-initdb.d/db.sql
Build and start four docker containers (nginx, fronend, backend and database) via docker-compose
docker-compose up --build
35. Explore backend part of the setup
Call “Save IP address” like button directly from command line via Nginx reverse proxy
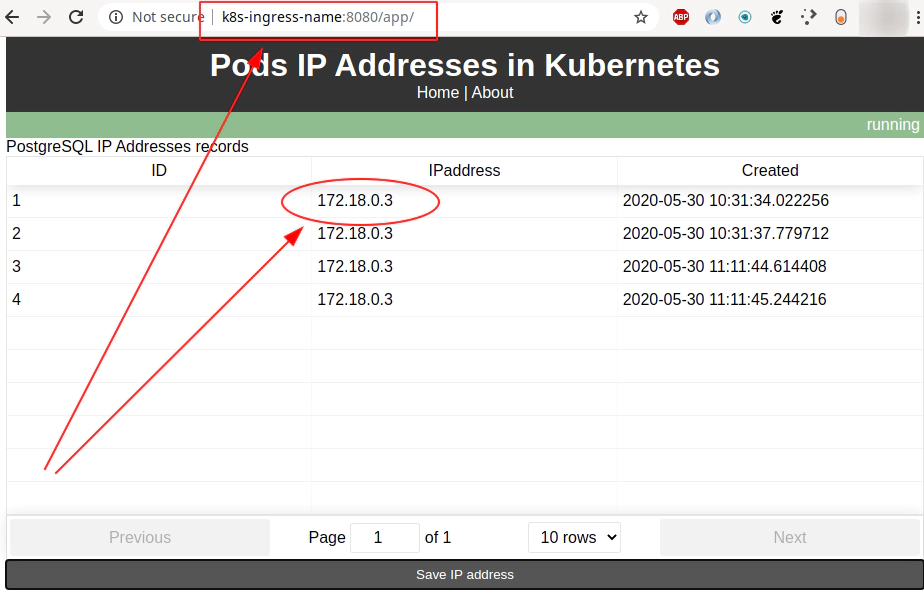
curl -s -X POST http://127.0.0.1:8080/api/ipaddress | jq
{
  "id": 8,
  "created": "2020-06-03 16:38:53.304293",
  "ipaddress": "172.18.0.3"
}
Call “Save IP address” like button directly at port 8000
 curl -s -X POST http://127.0.0.1:8000/api/ipaddress | jq
{
  "id": 7,
  "created": "2020-06-03 16:38:34.259627",
  "ipaddress": "172.18.0.3"
}
Get all IP addressess saved in database via Nginx reverse proxy at port 8080
curl -s -X GET http://127.0.0.1:8080/api/ipaddress | jq
[
  {
    "id": 1,
    "created": "2020-06-02 09:34:30.797599",
    "ipaddress": "172.18.0.3"
  },
  {
    "id": 2,
    "created": "2020-06-02 09:34:32.146712",
    "ipaddress": "172.18.0.3"
  },
...
  {
    "id": 8,
    "created": "2020-06-03 16:38:53.304293",
    "ipaddress": "172.18.0.3"
  }
]
Get all IP addressess saved in database directly at port 8000
curl -s -X GET http://127.0.0.1:8000/api/ipaddress | jq
[
  {
    "id": 1,
    "created": "2020-06-02 09:34:30.797599",
    "ipaddress": "172.18.0.3"
  },
  {
    "id": 2,
...
  {
    "id": 8,
    "created": "2020-06-03 16:38:53.304293",
    "ipaddress": "172.18.0.3"
  }
]
Delete a record from the database via Nginx reverse proxy at port 8080
curl -s -X DELETE "http://127.0.0.1:8080/api/ipaddress?id=7" | jq
{
  "msg": "Entry with id: 7 deleted"
}
Delete a record from the database directly at port 8000
curl -s -X DELETE "http://127.0.0.1:8000/api/ipaddress?id=8" | jq
{
  "msg": "Entry with id: 8 deleted"
}
36. Push docker images to docker hub
Check built docker images
docker images

devopsinuse/nginx-docker-compose   v1.0.0
devopsinuse/front-end              v1.0.0
devopsinuse/back-end               v1.0.0
...
Push docker images to your account at https://hub.docker.com/ This step is not mandatory if using already existing docker images under devopsinuse account at https://hub.docker.com/
# Login to your https://hub.docker.com/ account first
docker login --username devopsinuse

# Push previously build docker images to your **account** at https://hub.docker.com/
docker push docker.io/devopsinuse/nginx-docker-compose:v1.0.0
docker push docker.io/devopsinuse/front-end:v1.0.0
docker push docker.io/devopsinuse/back-end:v1.0.0
Make sure that you have this line in /etc/hosts
# Make sure that you have this line in /etc/hosts
# This can be easily done even on Windows OS (do a little search)
vim /etc/hosts
...

127.0.0.1 k8s-ingress-name
...
:wq!
37. Install helm and helmfile binaries
Install helm v3
curl -L https://get.helm.sh/helm-v3.2.1-linux-amd64.tar.gz | \
sudo tar xvzf - --strip-components=1 -C /usr/local/bin/ linux-amd64/helm
sudo chmod +x /usr/local/bin/helm

# In case you have no helm chart repository added
helm repo add stable https://kubernetes-charts.storage.googleapis.com/
helm repo update
Install helmfile binary
sudo curl -L \
--output /usr/bin/helmfile \
https://github.com/roboll/helmfile/releases/download/v0.116.0/helmfile_linux_amd64
sudo chmod +x /usr/bin/helmfile
38. Creating backend helm chart
Create backend helm chart from scatch
# Creating "backend" helm chart
cd backend/hc
helm create backend

# Take a look how it looks inside of backend/ helm chart
tree -L 2 backend
backend
├── charts
├── Chart.yaml
├── templates
│   ├── deployment.yaml
│   ├── _helpers.tpl
│   ├── hpa.yaml
│   ├── ingress.yaml
│   ├── NOTES.txt
│   ├── serviceaccount.yaml
│   ├── service.yaml
│   └── tests
└── values.yaml
Files to be modified (done by running four sed commands):
backend/Chart.yamlbackend/values.yamlbackend/templates/service.yamlbackend/templates/deployment.yamlbackend/templates/secret.yaml(completly new file)backend/templates/_helpers.tpl(append at the and of this file)
39. Modify Chart yaml file for backend helm chart
Shape your Chart.yaml file:
# Adding custom description to Chart.yaml file
sed -E \
-e 's/^(description:).*/\1 Backend Flask app helm chart/' \
-e 's/^(appVersion:).*/\1 v1.0.0 /' \
-e '$a  \\ndependencies: \n- name: postgresql \n  version: "9.8.1" \n  repository: "https://charts.bitnami.com/bitnami" \n' \
-i backend/Chart.yaml
Adding bitnami helm chart repository to my local
helm repo list
helm repo add bitnami https://charts.bitnami.com/bitnami

# Determine latest version of bitnami helm chart
helm search repo bitnami/postgresql -l | head
NAME                    CHART VERSION   APP VERSION     DESCRIPTION
bitnami/postgresql      9.8.1           11.9.0          Chart for PostgreSQL, an object-relational data...
bitnami/postgresql      9.8.0           11.9.0          Chart for PostgreSQL, an object-relational data...
bitnami/postgresql      9.7.2           11.9.0          Chart for PostgreSQL, an object-relational data...
bitnami/postgresql      9.7.1           11.9.0          Chart for PostgreSQL, an object-relati
Run helm dependency update for postgresql helm chart
# Downloads helm chart: to charts/ folder
cd backend && helm dependency update && cd ..
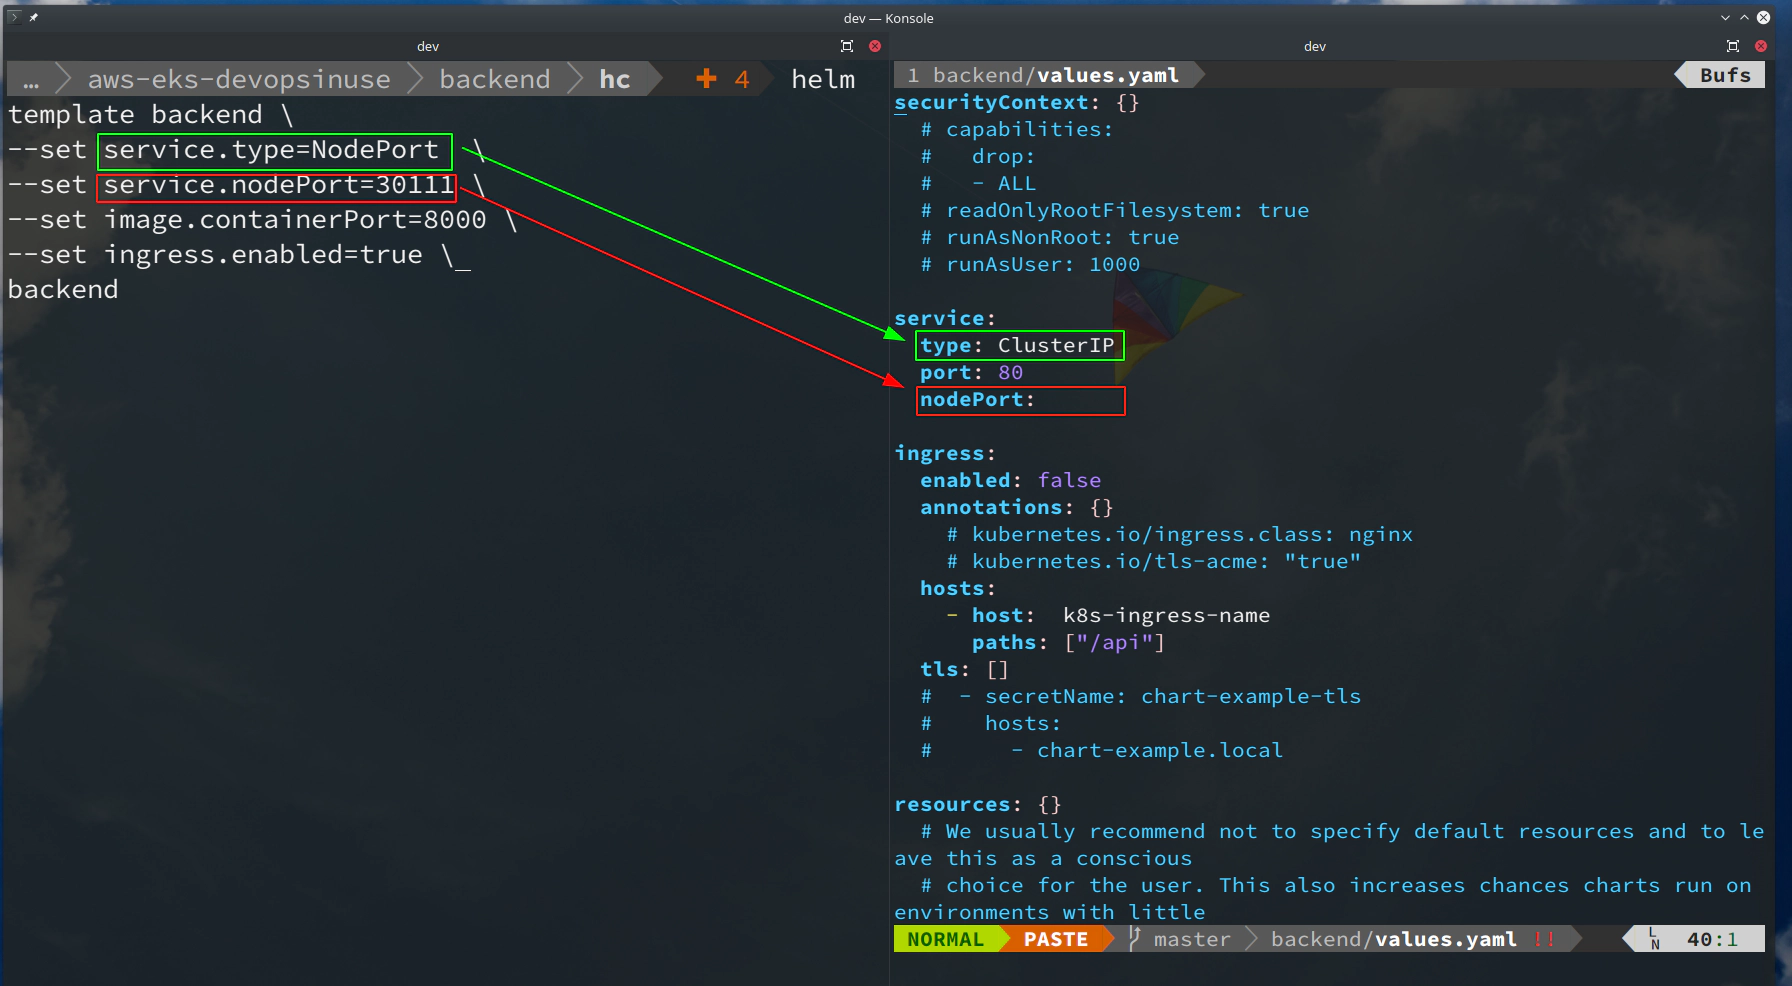
40. Modify values yaml file for backend helm chart
Setup file: backend/values.yaml within backend helm chart
# Setting up "backend/values.yaml" file
sed -E \
-e '/^.*port:.*/a \ \ nodePort:' \
-e 's/^(.*paths:).*/\1 ["\/api"]/' \
-e '/^ingress.*/,/^\s*tls:.*/s/^(.*-\shost: )(.*)/\1 k8s-ingress-name/' \
-e '/^.*pullPolicy:.*/a \ \ containerPort: 8000' \
-e '/^.*pullPolicy:.*/a \ \ # Database connection settings:' \
-e '/^.*pullPolicy:.*/a \ \ env:' \
-e '/^.*pullPolicy:.*/a \ \ \ \ secret:' \
-e '/^.*pullPolicy:.*/a \ \ \ \ \ \ PSQL_DB_USER: "micro"' \
-e '/^.*pullPolicy:.*/a \ \ \ \ \ \ PSQL_DB_PASS: "password"' \
-e '/^.*pullPolicy:.*/a \ \ \ \ \ \ PSQL_DB_NAME: "microservice"' \
-e '/^.*pullPolicy:.*/a \ \ \ \ \ \ PSQL_DB_ADDRESS: "backend-postgresql"' \
-e '/^.*pullPolicy:.*/a \ \ \ \ \ \ PSQL_DB_PORT: "5432"' \
-e '$a \\nlivenessProbe: \/api\/health' \
-e '$a \\nreadinessProbe: \/api\/health' \
-e 's/^(.*repository:).*/\1 devopsinuse\/back-end/' \
-i backend/values.yaml

cat <<'EOF' >>backend/values.yaml

postgresql:
  image:
    registry: docker.io
    repository: bitnami/postgresql
    tag: latest
    debug: true

  global:
    postgresql:
      postgresqlUsername: postgres
      postgresqlPassword: password

  persistence:
    enabled: false

  pgHbaConfiguration: |
    local all all trust
    host all all localhost trust
    host microservice micro 172.31.0.0/16 password

  initdbScripts:
    db-init.sql: |
      CREATE DATABASE microservice;
      CREATE USER micro WITH ENCRYPTED PASSWORD 'password';
      GRANT ALL PRIVILEGES ON DATABASE microservice TO micro;
      ALTER DATABASE microservice OWNER TO micro;

EOF
41. Modify service yaml file for backend helm chart
Do some little changes in file: backend/templates/service.yaml
# Setup "containerPort" in file: "backend/templates/service.yaml"
sed -E \
-e 's/^(.*targetPort:).*/\1 {{ .Values.image.containerPort | default 80 }}/' \
-e '/^.*targetPort:.*/a \ \ \ \ {{- if (and (eq .Values.service.type "NodePort") (not (empty .Values.service.nodePort))) }}\n      nodePort: {{ .Values.service.nodePort }}\n    {{- end }}' \
-i backend/templates/service.yaml
42. Modify deployment yaml file for backend helm chart
Do another little changes in file: backend/templates/deployment.yaml
# Setup "livenessProbe" and "readinessProbe" in backend/templates/deployment.yaml
sed -E \
-e '/^\s*livenessProbe:.*/,/^\s*port:.*/s/^(.*port:)(.*)/\1 {{ .Values.image.containerPort | default "http" }}/' \
-e '/^\s*readinessProbe:.*/,/^\s*port:.*/s/^(.*port:)(.*)/\1 {{ .Values.image.containerPort | default "http" }}/' \
-e '/^\s*livenessProbe:.*/,/^\s*port:.*/s/^(.*path:)(.*)/\1 {{ .Values.livenessProbe | default "\/" }}/' \
-e '/^\s*readinessProbe:.*/,/^\s*port:.*/s/^(.*path:)(.*)/\1 {{ .Values.readinessProbe | default "\/" }}/' \
-e 's/^(.*containerPort:).*/\1 {{ .Values.image.containerPort }}/' \
-e '/^.*image:.*/a \ \ \ \ \ \ \ \ \ \ env:' \
-e '/^.*image:.*/a \ \ \ \ \ \ \ \ \ \ {{- include "helpers.list-env-variables" . | indent 10 }}' \
-i backend/templates/deployment.yaml
43. Create brand new secret yaml file for backend helm chart
Create a completly new file: backend/templates/secret.yaml
# Creating file: "backend/templates/secret.yaml"
cat <<'EOF' >>backend/templates/secret.yaml
apiVersion: v1
kind: Secret
metadata:
  name: database-conection
type: Opaque
data:
  {{- range $key, $val := .Values.image.env.secret }}
  {{ $key }}: {{ $val | b64enc }}
  {{- end}}

EOF
44. Create helper function in helpers tpl file
Define and append new variable in file: backend/templates/_helpers.tpl
# Enrich file: "backend/templates/_helpers.tpl"
cat <<'EOF' >>backend/templates/_helpers.tpl

{{/*
Create the looper to define secret mounts as ENV variables
*/}}

{{- define "helpers.list-env-variables"}}
{{- range $key, $val := .Values.image.env.secret }}
- name: {{ $key }}
  valueFrom:
    secretKeyRef:
      name: database-conection
      key: {{ $key }}
{{- end}}
{{- end}}
EOF
45. Learn how to template backend helm chart and set values
Learn how to template helm chart with colors
# Template your backend helm chart
helm template backend

# Check which files have been templated
helm template backend | grep "# Source" | sort
...
# Source: backend/charts/postgresql/templates/configmap.yaml
# Source: backend/charts/postgresql/templates/initialization-configmap.yaml
# Source: backend/charts/postgresql/templates/secrets.yaml
# Source: backend/charts/postgresql/templates/statefulset.yaml
# Source: backend/charts/postgresql/templates/svc-headless.yaml
# Source: backend/charts/postgresql/templates/svc.yaml
# Source: backend/templates/deployment.yaml
# Source: backend/templates/secret.yaml
# Source: backend/templates/serviceaccount.yaml
# Source: backend/templates/service.yaml
# Source: backend/templates/tests/test-connection.yaml
...

helm template backend \
--set service.type=NodePort  \
--set service.nodePort=30111 \
--set image.containerPort=8000 \
--set ingress.enabled=true \
backend
# template only file: "backend/templates/service.yaml"
helm template backend \
--set service.type=NodePort  \
--set service.nodePort=30111 \
--set image.containerPort=8000 \
--set ingress.enabled=true \
--show-only templates/service.yaml
backend


# template only file: "backend/templates/secret.yaml"
helm template backend \
--set service.type=NodePort  \
--set service.nodePort=30111 \
--set image.containerPort=8000 \
--set ingress.enabled=true \
--show-only templates/secret.yaml
backend


# template only file: "backend/templates/deployment.yaml"
helm template backend \
--set service.type=NodePort  \
--set service.nodePort=30111 \
--set image.containerPort=8000 \
--set ingress.enabled=true \
--show-only templates/deployment.yaml
backend


# template only file: "backend/templates/ingress.yaml"
helm template backend \
--set service.type=NodePort  \
--set service.nodePort=30111 \
--set image.containerPort=8000 \
--set ingress.enabled=true \
--show-only templates/ingress.yaml
backend

# template only file: "backend/templates/ingress.yaml"
helm template backend \
--set service.type=NodePort  \
--set service.nodePort=30111 \
--set image.containerPort=8000 \
--set ingress.enabled=true \
--show-only backend/templates/service.yaml
backend


# Little nice feature to make your work more colorful
highlight -S yaml <(helm template backend \
--show-only templates/ingress.yaml \
--set service.type=NodePort  \
--set service.nodePort=30111 \
--set image.containerPort=8000 \
--set ingress.enabled=true \
backend)
Check for potential errors by running helm lint <helm chart-name>
# Check for potential errors
helm lint backend
46. Creating frontend React app helm chart
Create frontend helm chart
# Creating "frontend" helm chart
cd frontend/hc
helm create frontend

tree -L 2 frontend
frontend
├── charts
├── Chart.yaml
├── templates
│   ├── deployment.yaml
│   ├── _helpers.tpl
│   ├── hpa.yaml
│   ├── ingress.yaml
│   ├── NOTES.txt
│   ├── serviceaccount.yaml
│   ├── service.yaml
│   └── tests
└── values.yaml
Files to be modified (done by running four sed commands):
frontend/Chart.yamlfrontend/values.yamlfrontend/templates/service.yamlfrontend/templates/deployment.yaml
Adding custom description and appVersion to Chart.yaml file
# Adding custom description to Chart.yaml file
sed -E \
-e 's/^(description:).*/\1 Frontend React app helm chart/' \
-e 's/^(appVersion:).*/\1 v1.0.0 /' \
-i frontend/Chart.yaml
47. Setup values yaml file for frontend helm chart
Setup file: frontend/values.yaml within frontend helm chart
# Setting up "frontend/values.yaml" file
sed -E \
-e '/^.*port:.*/a \ \ nodePort:' \
-e 's/^(.*paths:).*/\1 ["\/app"]/' \
-e '/^ingress.*/,/^\s*tls:.*/s/^(.*-\shost: )(.*)/\1 k8s-ingress-name/' \
-e '/^.*pullPolicy:.*/a \ \ containerPort: 80' \
-e '$a \\nlivenessProbe: \/app' \
-e '$a \\nreadinessProbe: \/app' \
-e 's/^(.*repository:).*/\1 devopsinuse\/front-end/' \
-i frontend/values.yaml
48. Setup service yaml file for frontend helm chart
Modifying file: frontend/templates/service.yaml
# Setup "containerPort" in file: "frontend/templates/service.yaml"
sed -E \
-e 's/^(.*targetPort:).*/\1 {{ .Values.image.containerPort | default 80 }}/' \
-e '/^.*targetPort:.*/a \ \ \ \ {{- if (and (eq .Values.service.type "NodePort") (not (empty .Values.service.nodePort))) }}\n      nodePort: {{ .Values.service.nodePort }}\n    {{- end }}' \
-i frontend/templates/service.yaml
49. Setup deployment yaml file for frontend helm chart
Setup important livenessProbe and readinessProbe in file: frontend/templates/deployment.yaml
# Setup "livenessProbe" and "readinessProbe" in frontend/templates/deployment.yaml
sed -E \
-e '/^\s*livenessProbe:.*/,/^\s*port:.*/s/^(.*port:)(.*)/\1 {{ .Values.image.containerPort | default "http" }}/' \
-e '/^\s*readinessProbe:.*/,/^\s*port:.*/s/^(.*port:)(.*)/\1 {{ .Values.image.containerPort | default "http" }}/' \
-e '/^\s*livenessProbe:.*/,/^\s*port:.*/s/^(.*path:)(.*)/\1 {{ .Values.livenessProbe | default "\/" }}/' \
-e '/^\s*readinessProbe:.*/,/^\s*port:.*/s/^(.*path:)(.*)/\1 {{ .Values.readinessProbe | default "\/" }}/' \
-e 's/^(.*containerPort:).*/\1 {{ .Values.image.containerPort }}/' \
-i frontend/templates/deployment.yaml
50. Learn how to template frontend helm chart
Learn how to template helm chart with colors
# Template your frontend helm chart
helm template frontend

# Check which files have been templated
...
helm template frontend --set ingress.enabled=true | grep "# Source" | sort
# Source: frontend/templates/deployment.yaml
# Source: frontend/templates/ingress.yaml
# Source: frontend/templates/serviceaccount.yaml
# Source: frontend/templates/service.yaml
# Source: frontend/templates/tests/test-connection.yaml
...
Use helm template … command to template a particular file
# template only file: "frontend/templates/service.yaml"
helm template frontend \
--set service.type=NodePort  \
--set service.nodePort=30111 \
--set image.containerPort=8000 \
--set ingress.enabled=true \
--show-only templates/service.yaml \
frontend

# template only file: "frontend/templates/deployment.yaml"
helm template frontend \
--set service.type=NodePort  \
--set service.nodePort=30111 \
--set image.containerPort=8000 \
--set ingress.enabled=true \
--show-only templates/deployment.yaml \
frontend


# template only file: "frontend/templates/ingress.yaml"
helm template frontend \
--set service.type=NodePort  \
--set service.nodePort=30111 \
--set image.containerPort=8000 \
--set ingress.enabled=true \
--show-only templates/ingress.yaml \
frontend
Learn how to template helm chart with colors
# Little nice feature to make your work more colorful
highlight -S yaml <(helm \
template frontend \
--show-only templates/deployment.yaml \
--set service.type=NodePort \
--set service.nodePort=30222 \
--set image.containerPort=87 \
--set ingress.enabled=true frontend)
Check for potential errors by running helm lint <helm chart-name>
Verify that helm chart has no error
# Check for potential errors
helm lint frontend
51. Deploy backend helm chart
Reminder how to start AWS EKS cluster by terraform:
git clone https://github.com/xjantoth/aws-eks-devopsinuse.git
to comment terraform files (getting back to initial clear state). This helps to get the terraform code to the state right after fresh
git clone https://github.com/xjantoth/aws-eks-devopsinuse.gitcommand.sed -i 's/^/#/' iam.tf outputs.tf sg.tf subnets.tfsed -i '/^.*EKS_CLUSTER_START.*/,/^.*EKS_NODE_GROUP_END.*/s/^/#/' main.tf
uncomment all files from
eks-terraform/folder at once:sed 's/^#//' -i iam.tfsed 's/^#//' -i sg.tfsed 's/^#//' -i subnets.tfsed 's/^#//' -i outputs.tfsed -e '/^.*EKS_CLUSTER_START.*/,/^.*EKS_CLUSTER_END.*/s/^#//' -i main.tfsed -e '/^.*EKS_NODE_GROUP_START.*/,/^.*EKS_NODE_GROUP_END.*/s/^#//' -i main.tf- variables.tf (this file is uncommented all the time)
- outputs.tf (does not really matter whether it’s uncommented or not)
Notes:
echo "" > ~/.kube/config && cat ~/.kube/config
cd eks-terraform
rm terraform.tfstate.backup terraform.tfstate .terraform -rf
ls  ~/.ssh/eks-aws.pub
terraform init
terraform validate
terraform fmt -recursive
Slightly modified terrafrom code:
cat terraform.eks.tfvars

aws_region     = "eu-central-1"
aws_access_key = "..."
aws_secret_key = "..."
ssh_public_key = "~/.ssh/eks-aws.pub"
custom_tags = {
  Name      = "diu-eks-cluster-tag"
  Terraform = "true"
  Delete    = "true"
}

eks-cluster-name   = "diu-eks-cluster"
kubernetes-version = "1.16"

desired_number_nodes = 8
max_number_nodes     = 9
min_number_nodes     = 1

tcp_ports = ["22", "30111", "30222", "30333"]
Bring up your AWS EKS Kubernetes cluster (this will take about ~15min)
terraform apply -var-file terraform.eks.tfvars
Update KUBECONFIG once AWS EKS cluster is up and running
aws eks --region eu-central-1 update-kubeconfig --name diu-eks-cluster --profile devopsinuse
Deploy backend helm chart to AWS EKS cluster
# Example how to deploy backend helm chart
helm install backend \
--set service.type=NodePort \
--set service.nodePort=30333 \
--set replicaCount=1  \
--set ingress.enabled=true \
backend
Retrive all kubernetes objects created with backend deployment
kubectl get pods,svc,ing,deployment,rs,secret
Retrive public IP addresses of your Kubernetes nodes
kubectl get nodes -o wide | awk -F" " '{print $1"\t"$7}'
Call “Save IP address” like button directly from command line via Kubernetes Node Port 30333
curl -s -X POST http://11.22.33.44:30333/api/ipaddress | jq
Get all IP addressess saved in database directly at port 30333
curl -s -X GET http://11.22.33.44:30333/api/ipaddress | jq
Delete a record from the database via Kubernetes Node Port at port 30333
curl -s -X DELETE "http://11.22.33.44:30333/api/ipaddress?id=7" | jq
52. Deploy your frontend helm chart
Deploy frontend helm chart to a Kubernetes cluster
# Example how to deploy front-end helm chart
helm install frontend \
--set service.type=NodePort \
--set service.nodePort=30222 \
--set replicaCount=1 \
--set ingress.enabled=true \
frontend
53. Deploy Nginx Ingress Controller
List all helm deployments within AWS EKS cluster
helm ls -A

NAME            NAMESPACE       REVISION        UPDATED                                        STATUS   CHART                   APP VERSION
backend         default         1               2020-06-05 20:33:13.247397928 +0200 CEST       deployed backend-0.1.0           v1.0.0
frontend        default         1               2020-06-05 20:34:01.234179092 +0200 CEST       deployed frontend-0.1.0          v1.0.0
To finalize the whole infrastracture setup - please deploy Nginx Ingress Controller
helm install nginx stable/nginx-ingress  \
--set controller.service.type=NodePort \
--set controller.service.nodePorts.http=30111
Make an entry in your /etc/hosts
kubectl get nodes -o wide | awk -F" " '{print $7 "\tk8s-ingress-name"}' | grep -v "EXTER"

18.156.129.241  k8s-ingress-name
18.197.79.93    k8s-ingress-name
3.122.216.250   k8s-ingress-name
52.59.235.132   k8s-ingress-name
18.195.205.46   k8s-ingress-name
3.121.160.67    k8s-ingress-name
3.122.119.63    k8s-ingress-name
3.127.236.111   k8s-ingress-name
Describe configuration for Ingress Kubernetes objects
kubectl get ing backend -o yaml
kubectl get ing frontend -o yaml
List the content of WORKDIR within Nginx Ingress Controller running container
kubectl exec -it nginx-nginx-ingress-controller-c5ffff6df-7hnnk -- ls
fastcgi.conf            mime.types              scgi_params
fastcgi.conf.default    mime.types.default      scgi_params.default
fastcgi_params          modsecurity             template
fastcgi_params.default  modules                 uwsgi_params
geoip                   nginx.conf              uwsgi_params.default
koi-utf                 nginx.conf.default      win-utf
koi-win                 opentracing.json
lua                     owasp-modsecurity-crs
Get the content of nginx.conf file from inside of running Nginx pod from AWS EKS cluster
kubectl exec -it nginx-nginx-ingress-controller-c5ffff6df-7hnnk -- cat nginx.conf > nginx-from-inside-of-running-pod.conf
!!! Amazon itself refers that sometimes there is the problem to shut down EKS cluster because of ENI interface (Elastic Network Interface) however, by now you know how to delete this ENI by hand in case this happens to you.
https://aws.amazon.com/premiumsupport/knowledge-center/eks-delete-cluster-issues/
54. Deploy entire Infrastructure via helmfile binary
Delete your helm deployments
helm delete backend
helm delete frontend
helm delete nginx
Export sensitive data to your console to be used by helmfile binary
# export data from: temp.data
cat secret.data
export MASTER_DB_PASS="password"
export MASTER_DB_USER="postgres"

## Credentials for user: micro, database: microservice
export PSQL_ALLOWED_IPS="172.31.0.0/16"
export PSQL_DB_USER="micro"
export PSQL_DB_PASS="password"
export PSQL_DB_NAME="microservice"
export PSQL_DB_ADDRESS="backend-postgresql"
export PSQL_DB_PORT="5432"
Take a look what is inside hf-infrastructure.yaml file
cat hf-infrastracture.yaml
Deploy your whole infrastracture via helmfile binary
helmfile -f  hf-infrastracture.yaml template
helmfile -f  hf-infrastracture.yaml sync
helmfile -f  hf-infrastracture.yaml destroy
55. Terraform destroy fails
Delete problematic AWS ENI interface for eks-remoteAccess-XYZ Security Group and corresponfing eni-111111111111
aws ec2 delete-network-interface --network-interface-id eni-0096ccb8555c18958 --profile devopsinuse --region eu-central-1
Now Terrafrom destroy AWS EKS cluster will work
terraform destroy -var-file terraform.eks.tfvars

...
aws_subnet.this[0]: Destroying... [id=subnet-064d6205839537b7b]
aws_subnet.this[2]: Destroying... [id=subnet-092c8c9af4f4501e6]
aws_subnet.this[1]: Destroying... [id=subnet-06aab122584ff2903]
...
56. Helmfile selectors and removing NodePort options from backend and frontend release specification in helmfile
- helmfile’s
selectorsbrings a lot of flexibility to Kubernetes deployments - allows to install, delete, template particular helm deployments individually
- preserve the advantage of having one single helmfile for entire deployment
- file:
hf-infrastracture-without-backend-frontend-nodeports.yamlhas comments in front of NodePort specifcation for frontend and backend release
cat hf-infrastracture-without-backend-frontend-nodeports.yaml
repositories:
- name: stable
  url:  https://kubernetes-charts.storage.googleapis.com

releases:
  # (Helm v3) Upgrade your deployment with basic auth
  - name: backend
    labels:
      key: backend
      app: backend

    chart: backend/hc/backend
    version: 0.1.0
    set:
    #- name: service.type
    #  value: NodePort
    #- name: service.nodePort
    #  value: 30333
    ...

  # Frontend specification
  - name: frontend
    labels:
      key: frontend
      app: frontend

    chart: frontend/hc/frontend
    ...
    set:
    #- name: service.type
    #  value: NodePort
    #- name: service.nodePort
    #  value: 30222
    ...


  # Nginx Ingress Controller specification
  - name: nginx
    labels:
      key: nginx
      app: nginx

    chart: stable/nginx-ingress
    ...
Export sensitive data to your console to be used by helmfile binary
# export data from: temp.data
cat secret.data
export MASTER_DB_PASS="password"
export MASTER_DB_USER="postgres"

## Credentials for user: micro, database: microservice
export PSQL_ALLOWED_IPS="172.31.0.0/16"
export PSQL_DB_USER="micro"
export PSQL_DB_PASS="password"
export PSQL_DB_NAME="microservice"
export PSQL_DB_ADDRESS="backend-postgresql"
export PSQL_DB_PORT="5432"
- Template helm charts to AWS EKS Kubernetes cluster
helmfile --selector key=backend -f  hf-infrastracture-without-backend-frontend-nodeports.yaml template

helmfile --selector app=backend -f hf-infrastracture-without-backend-frontend-nodeports.yaml template
Template frontend helm chart deployment by using --selecor flag
helmfile --selector key=frontend -f  hf-infrastracture-without-backend-frontend-nodeports.yaml template

helmfile --selector app=frontend -f  hf-infrastracture-without-backend-frontend-nodeports.yaml template
Template nginx helm chart deployment by using --selecor flag
helmfile --selector key=nginx -f  hf-infrastracture-without-backend-frontend-nodeports.yaml template

helmfile --selector app=nginx -f  hf-infrastracture-without-backend-frontend-nodeports.yaml template
- Install/Sync helm charts to AWS EKS Kubernetes cluster
Install backend helm chart deployment by using --selecor flag
helmfile --selector key=backend -f  hf-infrastracture-without-backend-frontend-nodeports.yaml sync

helmfile --selector app=backend -f  hf-infrastracture-without-backend-frontend-nodeports.yaml sync
Install frontend helm chart deployment by using --selecor flag
helmfile --selector key=frontend -f  hf-infrastracture-without-backend-frontend-nodeports.yaml sync

helmfile --selector app=frontend -f  hf-infrastracture-without-backend-frontend-nodeports.yaml sync
Install nginx helm chart deployment by using --selecor flag
helmfile --selector key=nginx -f  hf-infrastracture-without-backend-frontend-nodeports.yaml sync

helmfile --selector app=nginx -f  hf-infrastracture-without-backend-frontend-nodeports.yaml sync
57. Connect to frontend and backend applications from inside of Nginx ingress controller pod
If you got a totally fresh AWS EKS cluster - update your KUBECONFIG file
aws eks --region eu-central-1 \
update-kubeconfig \
--name diu-eks-cluster \
--profile devopsinuse &> /dev/null
Export sensitive data to your console to be used by helmfile binary
# export data from: temp.data
cat secret.data
export MASTER_DB_PASS="password"
export MASTER_DB_USER="postgres"

## Credentials for user: micro, database: microservice
export PSQL_ALLOWED_IPS="172.31.0.0/16"
export PSQL_DB_USER="micro"
export PSQL_DB_PASS="password"
export PSQL_DB_NAME="microservice"
export PSQL_DB_ADDRESS="backend-postgresql"
export PSQL_DB_PORT="5432"
Deploy entire infrastracture via helmfile if needed
# Tempate your helmfile deployment first
helmfile \
--selector key=backend \
--selector key=frontend \
--selector key=nginx \
-f  hf-infrastracture-without-backend-frontend-nodeports.yaml template

# Deploy everything at once
helmfile \
--selector key=backend \
--selector key=frontend \
--selector key=nginx \
-f  hf-infrastracture-without-backend-frontend-nodeports.yaml sync

# Check fot the result of helmfile deployment
helm ls
NAME            NAMESPACE       REVISION        UPDATED                                        STATUS   CHART                   APP VERSION
backend         default         1               2020-06-12 20:55:46.534892289 +0200 CEST       deployed backend-0.1.0           v1.0.0
frontend        default         1               2020-06-12 20:55:46.555193202 +0200 CEST       deployed frontend-0.1.0          v1.0.0
nginx           default         1               2020-06-12 20:55:47.879248749 +0200 CEST       deployed nginx-ingress-1.39.1    0.32.0
List frontend, backend Kubernetes services
kubectl get svc
NAME                                  TYPE        CLUSTER-IP       EXTERNAL-IP   PORT(S)                      AGE
backend                               ClusterIP   10.100.78.115    <none>        80/TCP                       99s
backend-postgresql                    ClusterIP   10.100.168.82    <none>        5432/TCP                     99s
backend-postgresql-headless           ClusterIP   None             <none>        5432/TCP                     99s
frontend                              ClusterIP   10.100.103.7     <none>        80/TCP                       99s
kubernetes                            ClusterIP   10.100.0.1       <none>        443/TCP                      11m
nginx-nginx-ingress-controller        NodePort    10.100.250.185   <none>        80:30111/TCP,443:30604/TCP   97s
nginx-nginx-ingress-default-backend   ClusterIP   10.100.128.155   <none>        80/TCP                       97s
List all available pods in default namespace
kubectl get pods -o wide
NAME                                                           IP               NODE                                              NOMINATED NODE   READINESS GATES
backend-597c44ccf5-b8mjz                                       172.31.101.51    ip-172-31-101-220.eu-central-1.compute.internal   <none>           <none>
backend-597c44ccf5-j9j2j                                       172.31.102.191   ip-172-31-102-186.eu-central-1.compute.internal   <none>           <none>
backend-597c44ccf5-vl5nj                                       172.31.100.114   ip-172-31-100-130.eu-central-1.compute.internal   <none>           <none>
backend-597c44ccf5-zr2m9                                       172.31.101.199   ip-172-31-101-18.eu-central-1.compute.internal    <none>           <none>
backend-postgresql-0                                           172.31.102.171   ip-172-31-102-185.eu-central-1.compute.internal   <none>           <none>
frontend-58bf9db5c8-sjqrm                                      172.31.100.133   ip-172-31-100-151.eu-central-1.compute.internal   <none>           <none>
nginx-nginx-ingress-controller-c5ffff6df-ffst4                 172.31.101.229   ip-172-31-101-220.eu-central-1.compute.internal   <none>           <none>
nginx-nginx-ingress-default-backend-6d96c457f6-p4tqp           172.31.102.220   ip-172-31-102-186.eu-central-1.compute.internal   <none>           <none>
Get inside of Nginx ingress controller pod via kubectl exec ... command
# find out the pod name of nginx ingress controller
kubectl get pods | grep nginx
nginx-nginx-ingress-controller-c5ffff6df-ffst4         1/1     Running   0          4m59s
nginx-nginx-ingress-default-backend-6d96c457f6-p4tqp   1/1     Running   0          4m59s

kubectl exec -it nginx-nginx-ingress-controller-c5ffff6df-ffst4 -- sh
/etc/nginx $
Use curl/wget commands inside of Nginx ingress controller pod to call frontend
# use on of these commands to get the response from React app
curl -L http://frontend:80/app/
Do a DNS search on frontend service name
nslookup  frontend.default.svc.cluster.local
Server:         10.100.0.10
Address:        10.100.0.10:53


Name:   frontend.default.svc.cluster.local
Address: 10.100.103.7
Use curl/wget commands inside of Nginx ingress controller pod to call backend
# use on of these commands to get the response from React app
curl -X GET    http://backend:80/api/ipaddress
curl -X POST   http://backend:80/api/ipaddress
curl -X DELETE "http://backend:80/api/ipaddress?id=2"
Do a DNS search on backend service name
/etc/nginx $ nslookup backend.default.svc.cluster.local
Server:         10.100.0.10
Address:        10.100.0.10:53


Name:   backend.default.svc.cluster.local
Address: 10.100.78.115
Reach backend and frontend via nginx pod you are currently in
# use on of these commands to get the response from React app
curl -L http://localhost:80/app/

curl -X GET    http://localhost:80/api/ipaddress
curl -X POST   http://localhost:80/api/ipaddress
curl -X DELETE "http://localhost:80/api/ipaddress?id=2"
58. Deploy whole setup with Persistend storage for PostgreSQL database
Adjust /etc/hosts file if you have not done it already
kubectl get nodes -o wide | awk -F" " '{print $7 "\tk8s-ingress-name"}' | grep -v "EXTER"
Deploy entire setup via helmfile
export MASTER_DB_PASS="password"
export MASTER_DB_USER="postgres"

## Credentials for user: micro, database: microservice
export PSQL_ALLOWED_IPS="172.31.0.0/16"
export PSQL_DB_USER="micro"
export PSQL_DB_PASS="password"
export PSQL_DB_NAME="microservice"
export PSQL_DB_ADDRESS="backend-postgresql"
export PSQL_DB_PORT="5432"